ChevyParts
My Garage
My Account
Cart
OEM Chevrolet Camaro Wiper Pivot
Windshield Wiper Pivot- Select Vehicle by Model
- Select Vehicle by VIN
Select Vehicle by Model
orMake
Model
Year
Select Vehicle by VIN
For the most accurate results, select vehicle by your VIN (Vehicle Identification Number).
10 Wiper Pivots found

Chevrolet Camaro Wiper Transmission Part Number: 23360289
$56.42 MSRP: $105.96You Save: $49.54 (47%)Ships in 1-2 Business Days
Chevrolet Camaro Wiper Transmission, Driver Side Part Number: 22122286


Chevrolet Camaro Wiper Transmission Part Number: 22048653
Chevrolet Camaro Wiper Transmission Part Number: 22048652
Chevrolet Camaro Wiper Transmission Part Number: 22039679
Chevrolet Camaro Wiper Transmission Part Number: 22039678

Chevrolet Camaro Wiper Transmission Part Number: 20955390
Chevrolet Camaro Wiper Transmission, Driver Side Part Number: 10289727
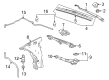
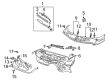
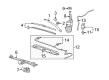
Chevrolet Camaro Wiper Pivot
Want to cut long-term maintenance and repair costs? Choose OEM Wiper Pivot. Those parts deliver top durability you can trust. On our site, you'll find a huge catalog of genuine Chevrolet Camaro parts. Prices are unbeatable, so you can keep more in your pocket. Every OEM Chevrolet Camaro Wiper Pivot includes a manufacturer's warranty. You can also get an easy return policy that keeps buying risk free. Fast delivery, get your car on the road quickly. It's simple to search, compare, and order. Stop guessing about quality or fit. Order today and save with parts that last.
Chevrolet Camaro Wiper Pivot Parts and Q&A
- Q: How to service and repair the Wiper Pivot on Chevrolet Camaro?A:So, to service and repair the Wiper Motor linkage you will remove the wiper arms, air inlet grille panel and water shield. Subsequently, remove the screw and nut, and then disconnect the rh linkage assembly from the lh linkage moving downward using the wiper linkage separator (J 39232). Then, unplug the lh linkage assembly and the screw from the Wiper Motor, extracting the Wiper Motor from the brackets' slots. Unhook the rh linkage assembly from the Wiper Motor with the help of the wiper linkage separator (J 39232), and then uninstall the three screws of the rh linkage assembly before removing it through the plenum access hole. For the installation, use the wiper linkage installer with reference to j39529 to install the rh linkage assembly through the plenum access hole and attach it to the Wiper Motor. Make sure the crank arm is at the inner wipe and the drive pin is inserted in the cam pocket while installing the Wiper Motor with two locator pads placed in the slots of the bracket. Install and tighten the screw to 10 n.m or 7.5 lb ft and then join the rh linkage assembly to the lh linkage assembly with the help of the wiper linkage installer (J 39529). Mount the lh linkage with the screw and nut, then screw it down to 10 n.m (7.5 lb ft) and then three screws to rh linkage assembly and tighten them down to 10 n.m (7.5 lb ft). Finally, install the water shield on lh linkage assembly with flat side under the shade blind, air inlet grille panel and wiper arms.

Related Chevrolet Camaro Parts
 Chevrolet Camaro Air Bag Sensor
 Chevrolet Camaro Antenna Cable
 Chevrolet Camaro Back Up Light Switch
 Chevrolet Camaro Cruise Control Switch
 Chevrolet Camaro Distributor Reluctor
 Chevrolet Camaro Engine Control Module
 Chevrolet Camaro Ignition Control Module
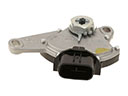 Chevrolet Camaro Neutral Safety Switch
 Chevrolet Camaro PCV Valve Hose
 Chevrolet Camaro Spark Plug
 Chevrolet Camaro Tailgate Lock Actuator Motor
 Chevrolet Camaro Washer Pump