ChevyParts
My Garage
My Account
Cart
OEM Chevrolet Equinox Rod Bearing
Engine Connecting Rod Bearing- Select Vehicle by Model
- Select Vehicle by VIN
Select Vehicle by Model
orMake
Model
Year
Select Vehicle by VIN
For the most accurate results, select vehicle by your VIN (Vehicle Identification Number).
8 Rod Bearings found

Chevrolet Equinox Connecting Rod Bearing Part Number: 12657438
$12.31 MSRP: $19.55You Save: $7.24 (38%)Ships in 1-3 Business Days

Chevrolet Equinox Connecting Rod Bearing Part Number: 12674806
$2.20 MSRP: $3.63You Save: $1.43 (40%)Ships in 1-2 Business Days


Chevrolet Equinox Connecting Rod Bearing Part Number: 12643667
$10.51 MSRP: $17.32You Save: $6.81 (40%)Ships in 1-2 Business Days

Chevrolet Equinox Bearings Part Number: 12636003
$10.36 MSRP: $17.07You Save: $6.71 (40%)Ships in 1-3 Business Days


Chevrolet Equinox Bearing Set, Green Line Part Number: 12591093
$42.83 MSRP: $72.96You Save: $30.13 (42%)Ships in 1-3 Business Days
Chevrolet Equinox Connecting Rod Bearing Part Number: 12480255
$0.38 MSRP: $0.59You Save: $0.21 (36%)Ships in 1-2 Business Days
Chevrolet Equinox Bearing Part Number: 55588336
$97.18 MSRP: $152.23You Save: $55.05 (37%)Ships in 1-3 Business Days
Chevrolet Equinox Bearing Part Number: 55588335
$29.00 MSRP: $45.42You Save: $16.42 (37%)Ships in 1-3 Business Days
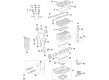
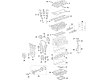
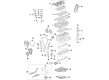
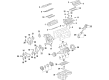
Chevrolet Equinox Rod Bearing
Want to cut long-term maintenance and repair costs? Choose OEM Rod Bearing. Those parts deliver top durability you can trust. On our site, you'll find a huge catalog of genuine Chevrolet Equinox parts. Prices are unbeatable, so you can keep more in your pocket. Every OEM Chevrolet Equinox Rod Bearing includes a manufacturer's warranty. You can also get an easy return policy that keeps buying risk free. Fast delivery, get your car on the road quickly. It's simple to search, compare, and order. Stop guessing about quality or fit. Order today and save with parts that last.
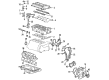
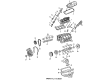
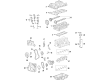
Thus, the Chevrolet EQUINOX ROD BEARING plays a crucial function of increasing the durability and the overall capacity of the Chevrolet EQUINOX models. Located to help bear the load of the crankshaft and the connecting rods, the Rod Bearing enhances the rotation and decrease friction which is important for the efficient working of the engine. Manufactured in bi-metal and tri-metal varieties, Rod Bearing is produced to address the need for specifying different Equinox versions, starting from the first generation cars that came out in 2004 up to the modern ones. Rod Bearings can be of tri-metal construction which is quite popular among performance models due to the advantage of high strength and fatigue resistances that are necessary in high output engines. The focus on Rod Bearing design zoomed in on improving general Chevrolet Equinox's performance while shoring up safety since oil clearance, mostly set at 0.001" to 0.0035", needs to be optimum. The distinguishable feature in the Chevrolet Equinox Rod Bearing set in the market pertains to the coatings and use of uneven barrel surfaces for the optimization of oil reservoirs and clearance. This invention increases the life span of the vehicle and smooth operation; thus, consumers can consider purchasing the Chevrolet Equinox. The Chevrolet Equinox is one of the most selling mid-size crossover SUV in the market with more than 2 million units sold and the quality of the product starts from the hearts of the vehicle, and in this case the Rod Bearing.
Chevrolet Equinox Rod Bearing Parts Questions & Experts Answers
- Q: How to replace the rod bearing in an engine on Chevrolet Equinox?A:In order to remove the Piston, the connecting rod and the bearing, perform the following: remove the Oil Pank and the Cylinder Head. In the case a ring ridge exists then turn the Crankshaft until the Piston is in the lower part of the stroke then put a cloth on top of the Piston and remove using the j 24270 the ring ridge. After that, rotate the Crankshaft to the top stroke, eliminate the cloth and debris as well as to mark the connecting rods and caps for assembly. Next, unbolt the connecting rod nuts, are curling nut and cap, discarding the bolts and nuts, and remove rod and Piston from the engine block with the j-43966-1. Depress the Piston to its top dead center, clean out the cylinder bores with a detergent and hot water or light honing then bring the Piston back to it's lowest point and swab the bore with engine oil and a clean dry cloth. For installation, engine oil should be applied on the Piston, the Piston rings, the cylinder bore, and the bearing surfaces, and then the Piston should be inserted in its original bore using the j-43966-1 gently tapping the top with a wooden hammer handle. Make sure stamped mark on the Piston faces the front of the engine, press the j 8037 against the engine block until all Piston rings get into the cylinder bore, and fit the connecting rod caps onto original rods with the previously marked numbers aligned. Install new connecting bolt and nuts, tighten up to 25 nm (18 lb ft) evenly the first time and use the j 45059 to tighten another 100 degrees on the final pass. Check the connecting rod side clearance with feeler gauge (0.070-0.370 mm, 0.0027-0.0145 in). Finally, install the Cylinder Head and the Oil Pan.

Related Chevrolet Equinox Parts
 Chevrolet Equinox Oil Filter
 Chevrolet Equinox Oil Pan
 Chevrolet Equinox Camshaft Seal
 Chevrolet Equinox Engine Oil Cooler
 Chevrolet Equinox Harmonic Balancer
 Chevrolet Equinox Oil Pan Gasket
 Chevrolet Equinox Oil Pump
 Chevrolet Equinox Oil Pump Rotor Set
 Chevrolet Equinox Piston
 Chevrolet Equinox Rocker Shaft Spring Kit
 Chevrolet Equinox Timing Chain Guide
 Chevrolet Equinox Valve Stem Oil Seal