ChevyParts
My Garage
My Account
Cart
OEM Chevrolet HHR Canister Purge Valves
Fuel Tank Evaporator Purge Control Valve- Select Vehicle by Model
- Select Vehicle by VIN
Select Vehicle by Model
orMake
Model
Year
Select Vehicle by VIN
For the most accurate results, select vehicle by your VIN (Vehicle Identification Number).
3 Canister Purge Valves found


Chevrolet HHR PCV Valve Part Number: 12608378
$31.84 MSRP: $59.80You Save: $27.96 (47%)Ships in 1-2 Business Days


Chevrolet HHR Solenoid Valve, Green Line Part Number: 12597567
$33.29 MSRP: $67.60You Save: $34.31 (51%)


Chevrolet HHR Vent Control Solenoid Part Number: 20880503
$33.68 MSRP: $63.24You Save: $29.56 (47%)Ships in 1-2 Business Days
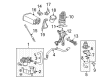
Chevrolet HHR Canister Purge Valves
Want to cut long-term maintenance and repair costs? Choose OEM Canister Purge Valves. Those parts deliver top durability you can trust. On our site, you'll find a huge catalog of genuine Chevrolet HHR parts. Prices are unbeatable, so you can keep more in your pocket. Every OEM Chevrolet HHR Canister Purge Valves includes a manufacturer's warranty. You can also get an easy return policy that keeps buying risk free. Fast delivery, get your car on the road quickly. It's simple to search, compare, and order. Stop guessing about quality or fit. Order today and save with parts that last.
Chevrolet HHR Canister Purge Valves Parts Questions & Experts Answers
- Q: How to replace the canister purge valves on Chevrolet HHR?A:If you wish to substitute the evaporative emission canister purge solenoid valve, remove the cleaner assembly of the air from the studs and put it aside. Remove the electrical connector from the evaporative emission (EVAP) canister purge valve, and the eviction canister purge valve tube to the Intake Manifold using the plastic collar quick connect fitting service. Next, use the plastic collar quick connect fitting service to disconnect the chassis evap vapor line from the evap canister purge valve. Unscrew the bolt from the evap canister purge valve bracket and remove the evap canister purge valve and the bracket from the car. Pull the evap canister purge valve away from the bracket and examine the ports for carbon discharge; if for some unknown reason there are loose carbon and it is found after going through the evaluation process, replace the evap canister and related components with it to get rid of the carbon particles. For installation, this is the bracket evap evap canister purge valve mounted to the bracket when the assembly with the bracket is placed on the Cylinder Head following the fastener notice. Fasten the evap canister purge valve bracket bolt with 18 n.m (13 lb ft). Connect the evap canister purge valve tube to the Intake Manifold using the plastic collar quick connect fitting service and connect the chassis evap vapor line to the evap canister purge valve. Lastly, re-connect the evap canister purge valve electrical connector and replace the air cleaner assembly to the studs.

Related Chevrolet HHR Parts
 Chevrolet HHR Catalytic Converter
 Chevrolet HHR Exhaust Manifold
 Chevrolet HHR Muffler
 Chevrolet HHR Catalytic Converter Gasket
 Chevrolet HHR Exhaust Flange Gasket
 Chevrolet HHR Exhaust Hanger
 Chevrolet HHR Exhaust Heat Shield
 Chevrolet HHR Exhaust Manifold Gasket
 Chevrolet HHR Exhaust Pipe
 Chevrolet HHR PCV Valve
 Chevrolet HHR Tail Pipe
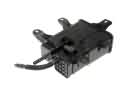 Chevrolet HHR Vapor Canister