ChevyParts
My Garage
My Account
Cart
OEM Chevrolet HHR Rod Bearing
Engine Connecting Rod Bearing- Select Vehicle by Model
- Select Vehicle by VIN
Select Vehicle by Model
orMake
Model
Year
Select Vehicle by VIN
For the most accurate results, select vehicle by your VIN (Vehicle Identification Number).
1 Rod Bearing found


Chevrolet HHR Bearing Set, Green Line Part Number: 12591093
$42.83 MSRP: $72.96You Save: $30.13 (42%)Ships in 1-3 Business Days
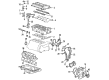
Chevrolet HHR Rod Bearing
Want to cut long-term maintenance and repair costs? Choose OEM Rod Bearing. Those parts deliver top durability you can trust. On our site, you'll find a huge catalog of genuine Chevrolet HHR parts. Prices are unbeatable, so you can keep more in your pocket. Every OEM Chevrolet HHR Rod Bearing includes a manufacturer's warranty. You can also get an easy return policy that keeps buying risk free. Fast delivery, get your car on the road quickly. It's simple to search, compare, and order. Stop guessing about quality or fit. Order today and save with parts that last.
Basically, the Chevrolet HHR Rod Bearing is a highly essential substitute, which observes an important role in improving the stability of Chevrolet HHR automobiles. Its main functionality is to locate the crankshaft and connecting rods and allow rotation, while creating minimal levels of friction, which is of high importance for an engine. These Rod Bearings come as the bi-metal and tri-metal constructions, suitable for handling the loads in different models of HHR with the 2.0 L, 2.2 L and 2.4 L Ecotec power units. The material of the Cylinder block is accurately machined so that the Rod Bearing has to retain the adequate oil clearance for maximum power. This care does not only increase the functionality of the Chevrolet HHR but also helps to increase the safety factor of the car by reducing tendency of faulty engine. Additional perks of the Rod Bearing include material enhancements and coatings that boost the functioning of the bearing; hence, making the Rod Bearing even more exceptional in its category in the market. In regard to the compatibility with various HHR models, the Chevrolet HHR Rod Bearing is indispensable for car enthusiasts in their bid to acquire a durable and powerful car. Finally, the Rod Bearing directs the general dependability of the Chevrolet HHR by making the driving experience a comfortable and secure one.
Chevrolet HHR Rod Bearing Parts and Q&A
- Q: What Tools Are Required to Replace the Rod Bearing on Chevrolet HHR?A:The following tools are required to replace the Piston, connecting rod, and bearing: en-47836, piston ring compressor (EN-47836) j-43966-1connecting rod guides (J-43966-1) and j.45059 angle meter (45-059). Start by removing Oil Pan and the Cylinder Head. If a ring ridge exists, change the Crankshaft until the Piston is at the bottom, put on the Piston, on top, a cloth and use a ridge reamer to get the ring ridge. Turn the Crankshaft to the top of the stroke and remove the cloth and cutting debris. Mark the connecting rods and caps for reassembly and remove the nuts and cap by discarding the bolts and nuts. Use the tool j-43966-1 to remove the connecting rod and Piston from the engine block and then clean the cylinder bores and swab them with engine oil. This is done by coating the Piston,articulating pints,piston ring, cylinder bore, and bearing surfaces with engine oil prior to placing Piston in its original bore using the j-43966-1. Tap the Piston gently with a wooden hammer handle so the punched mark is toward front of the engine. After all Piston rings get inside of the cylinder bore, hold the en-47836 to the engine block and install the connecting rod caps while aligning them by the previously marked numbers. Replace the old connecting rod bolts and nuts, ensuring that they are tightened equally to 25 n.m, or 18 lb ft, then another 100 degrees with the help of the j 45059. When measuring the connecting rod side clearance with a feeler gauge, you will need to make sure that it is between 0.070 - 0.370mm (0.0027-0.0145 inch). At last, fit in the Cylinder Head and Oil Pan.

Related Chevrolet HHR Parts
 Chevrolet HHR Balance Shaft Bearing Set
 Chevrolet HHR Cam Gear
 Chevrolet HHR Crankshaft Thrust Washer Set
 Chevrolet HHR Cylinder Head
 Chevrolet HHR Dipstick
 Chevrolet HHR Engine Mount
 Chevrolet HHR Harmonic Balancer
 Chevrolet HHR Oil Filler Cap
 Chevrolet HHR Rocker Shaft Spring Kit
 Chevrolet HHR Timing Chain Guide
 Chevrolet HHR Valve Cover Gasket
 Chevrolet HHR Valve Stem Oil Seal