ChevyParts
My Garage
My Account
Cart
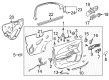
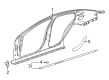
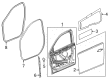
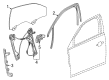
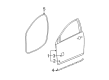
OEM Chevrolet Malibu Weather Strip
Door Weatherstripping- Select Vehicle by Model
- Select Vehicle by VIN
Select Vehicle by Model
orMake
Model
Year
Select Vehicle by VIN
For the most accurate results, select vehicle by your VIN (Vehicle Identification Number).
123 Weather Strips found

Chevrolet Malibu Lower Weatherstrip, Driver Side Part Number: 25963324
$130.74 MSRP: $195.47You Save: $64.73 (34%)Ships in 1-3 Business Days
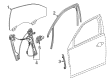
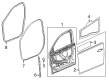
Chevrolet Malibu Run Weatherstrip, Front Driver Side Part Number: 23222920
$126.37 MSRP: $188.94You Save: $62.57 (34%)Ships in 1-3 Business Days
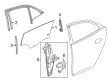
Chevrolet Malibu Fixed Glass, Rear Driver Side Part Number: 23478314
$214.83 MSRP: $321.18You Save: $106.35 (34%)Ships in 1-3 Business Days
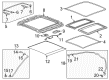
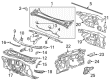
Chevrolet Malibu Weatherstrip On Body Part Number: 84692606
$42.22 MSRP: $62.85You Save: $20.63 (33%)Ships in 1-3 Business Days
Chevrolet Malibu Belt Weatherstrip, Front Passenger Side Part Number: 22900035
$5.56 MSRP: $8.27You Save: $2.71 (33%)Ships in 1-3 Business Days
Chevrolet Malibu Lower Weatherstrip, Driver Side Part Number: 84098852
$30.54 MSRP: $47.81You Save: $17.27 (37%)Ships in 1-3 Business Days
Chevrolet Malibu Weatherstrip On Body Part Number: 84692604
$51.08 MSRP: $76.03You Save: $24.95 (33%)Ships in 1-3 Business Days
Chevrolet Malibu Run Weatherstrip, Front Driver Side Part Number: 84156050
$126.81 MSRP: $189.59You Save: $62.78 (34%)Ships in 1-3 Business Days
Chevrolet Malibu Belt Weatherstrip, Rear Passenger Side Part Number: 22987628
$8.16 MSRP: $12.15You Save: $3.99 (33%)Ships in 1-3 Business Days
Chevrolet Malibu Weatherstrip On Body, Front Passenger Side Part Number: 25911998
$50.59 MSRP: $75.30You Save: $24.71 (33%)Ships in 1-3 Business Days
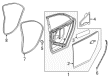
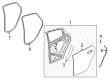
Chevrolet Malibu Rear Weatherstrip, Driver Side Part Number: 22871981
$93.55 MSRP: $139.24You Save: $45.69 (33%)Ships in 1-3 Business Days
Chevrolet Malibu Inner Seal Part Number: 23455110
$57.67 MSRP: $85.81You Save: $28.14 (33%)Ships in 1-3 Business DaysChevrolet Malibu Belt Weatherstrip, Rear Driver Side Part Number: 22987627
$8.16 MSRP: $12.15You Save: $3.99 (33%)Ships in 1-3 Business Days
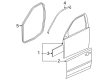
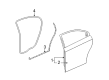
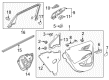
Chevrolet Malibu Door Weatherstrip, Front Driver Side Part Number: 15878946
$78.51 MSRP: $98.79You Save: $20.28 (21%)Ships in 1-2 Business Days
Chevrolet Malibu Rear Weatherstrip, Driver Side Part Number: 84157652
$28.98 MSRP: $45.36You Save: $16.38 (37%)Ships in 1-3 Business Days
Chevrolet Malibu Rear Weatherstrip Part Number: 23295859
$8.16 MSRP: $12.15You Save: $3.99 (33%)Ships in 1-3 Business Days
Chevrolet Malibu Belt Weatherstrip, Front Passenger Side Part Number: 22987626
$111.98 MSRP: $167.42You Save: $55.44 (34%)Ships in 1-3 Business Days
Chevrolet Malibu Belt Weatherstrip, Front Passenger Side Part Number: 20897271
$5.56 MSRP: $8.27You Save: $2.71 (33%)Ships in 1-3 Business Days

Chevrolet Malibu Belt Weatherstrip, Rear Driver Side Part Number: 23117255
$5.34 MSRP: $7.95You Save: $2.61 (33%)Ships in 1-3 Business Days

Chevrolet Malibu Door Weatherstrip, Titanium, Front Driver Side Part Number: 22793750
$107.43 MSRP: $159.90You Save: $52.47 (33%)
| Page 1 of 7 |Next >
1-20 of 123 Results
Chevrolet Malibu Weather Strip
Want to cut long-term maintenance and repair costs? Choose OEM Weather Strip. Those parts deliver top durability you can trust. On our site, you'll find a huge catalog of genuine Chevrolet Malibu parts. Prices are unbeatable, so you can keep more in your pocket. Every OEM Chevrolet Malibu Weather Strip includes a manufacturer's warranty. You can also get an easy return policy that keeps buying risk free. Fast delivery, get your car on the road quickly. It's simple to search, compare, and order. Stop guessing about quality or fit. Order today and save with parts that last.
Chevrolet Malibu Weather Strip is one of the significant parts that help in boosting the dependability and efficiency of Chevrolet Malibu on most of its models. This Weather Strip covers the gaps that exist around the doors, windows and any other opening to ensure that water or any debris does not get into the cabin to make the drivers comfort and safety compromised. The Chevrolet Malibu Weather Strip is made from materials such as the EPDM rubber for weather strip and special silicone to resist extremes of heat and automotive fluids to last longer. Therefore, its relevancy shown by its ability to work with multiple Malibu generations makes it crucial in maintaining car structure and comfort. Chevrolet Malibu Weather Strip apart from its seemingly obvious function to prevent metal part contacts that may cause scraping serves an even more important function in making the car more efficient by increasing the overall aerodynamics of the vehicle through the reduction of wind noise. For instance, the "Weather Strip' is usually combined with coatings that offer extra protection from UV and chemicals making it a unique product in the automotive industry. Since paint is a pretty important part of any car this is the most preferred body style for Chevrolet malibu consumers, the exterior requires to be checked frequently for signs of cracking or leakage with the aim of ensuring it continues to provide its premier performance and safety as required by the market. In conclusion, the Chevrolet Malibu Weather Strip is the premier proof of the brand's desire to offer clients quality designs, enabling them to drive safe cars whose sealing systems are highly effective.
Chevrolet Malibu Weather Strip Parts Questions & Experts Answers
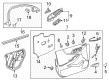
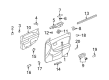
- Q: How to replace the rear door Weather Strip on Chevrolet Malibu?A:Starting the process to replace the rear door Weather Strip requires removal of carpet retainer together with center pillar upper trim panel and center pillar lower trim panel and rear quarter upper trim panel and body lock pillar trim panel. Obtain the door opening Weather Strip by holding both ends of the strip to remove it from the body flange of the door opening. To clean the body flange from adhesive residue use 3m(TM) adhesive remover p/n 8984 or an equivalent product. You should install the Weather Strip by applying gm p/n 12345095, or equivalent adhesive material to the surface. Push the Weather Strip gently into the door opening starting at its top rear section and move clockwise while making sure it seats properly across the entire door opening area. All installation will be completed by putting back the carpet retainer together with the body lock pillar trim panel, center pillar upper trim panel and rear quarter upper trim panel along with the center pillar lower trim panel.

Related Chevrolet Malibu Parts
 Chevrolet Malibu Emblem
 Chevrolet Malibu Trunk Latch
 Chevrolet Malibu Door Lock Actuator
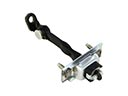 Chevrolet Malibu Door Check
 Chevrolet Malibu Door Hinge
 Chevrolet Malibu Door Lock Cylinder
 Chevrolet Malibu Liftgate Hinge
 Chevrolet Malibu Seat Switch
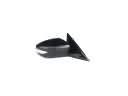 Chevrolet Malibu Side View Mirrors
 Chevrolet Malibu Tailgate Lift Support
 Chevrolet Malibu Tailgate Lock
 Chevrolet Malibu Window Crank Handles