ChevyParts
My Garage
My Account
Cart
OEM Chevrolet Metro Camshaft
Cam- Select Vehicle by Model
- Select Vehicle by VIN
Select Vehicle by Model
orMake
Model
Year
Select Vehicle by VIN
For the most accurate results, select vehicle by your VIN (Vehicle Identification Number).
2 Camshafts found

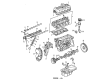
Chevrolet Metro Camshaft Part Number: 91173879

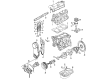
Chevrolet Metro Camshaft Part Number: 91173039
Chevrolet Metro Camshaft
Want to cut long-term maintenance and repair costs? Choose OEM Camshaft. Those parts deliver top durability you can trust. On our site, you'll find a huge catalog of genuine Chevrolet Metro parts. Prices are unbeatable, so you can keep more in your pocket. Every OEM Chevrolet Metro Camshaft includes a manufacturer's warranty. You can also get an easy return policy that keeps buying risk free. Fast delivery, get your car on the road quickly. It's simple to search, compare, and order. Stop guessing about quality or fit. Order today and save with parts that last.
The camshaft of the Chevrolet Metro is important for the controlling of the intake and exhaust valves through the admission of the air/fuel blend and the discharge of exhaust products. Usual camshaft material is iron or steel and the it works in different ways like Over Head Valve (OHV), Single Over Head Cam (SOHC) and the latest Double Over Head Cam (DOHC) types. Each one of them has different impact on the way the engine works, whereas DOHC configuration enables individual manipulations with the intake and exhaust valves. The camshaft in Chevrolets Metro is operated by the crankshaft thus ensuring accuracy in the functioning of the valves. Camshafts for performance can improve power and efficiency by increasing lift and duration, whereas other factors, such as LSA, have an impact on torque or improve the idling quality. In all, the camshaft is significant in influencing many aspects of the Chevrolet Metro's engine including fuel economy and power.
Chevrolet Metro Camshaft Parts Questions & Experts Answers
- Q: How to replace the camshaft on Chevrolet Metro?A:A replacement will start with disconnecting the battery negative terminal followed by removing the valve rocker arm cover along with the Distributor and Distributor housing. Lift the vehicle to position it properly then take out the Timing Belt. A proper holding device maintains the Camshaft gear stationary during bolt removal before removing the Camshaft timing gear. Before removing any parts from the cylinder head ensure the Crankshaft maintains its correct position. Next remove six bolts and three Camshaft housings (1, 2, 3) from the cylinder head followed by the Camshaft and six hydraulic valve lash (HVL) adjusters. Soak the extracted hvl adjusters in fresh engine oil while they await installation before placing them in contact with any other surfaces. Examine the Camshaft using the outside micrometer (J 26900-20) to check lobe height before replacing the Camshaft when the minimum heights are reached. Engine oil needs to flow through the Camshaft journal holes during installation while hvl adjuster bores should drain oil when installed. Add engine oil around hvl adjusters followed by installation of the adjusters to the cylinder head. Begin by applying engine oil to the Camshaft journal and individual cams. Once complete, place the Camshaft into position with the timing gear pin hole located in the lower position. Apply engine oil along the sliding surface of each Camshaft journal against the housing then distribute gm p/n 12346240 equivalent between the mating surfaces on housing numbers 1 and 3. The installation sequence for the Camshaft housing starts with no. 1 and ends with no. 3 then fasten all housings together using bolts torqued to 11 nm (97 inch lbs.). After applying engine oil to the oil seal lip of the Camshaft users should press-fit the oil seal until it is fully flush with the housing surface. Insert the dowel pin through the Camshaft timing gear pin hole then mount the timing gear with a holding tool to prevent rotation while you tighten the bolt to 60 nm (44 ft. Lbs.). Guard the front cylinder head drain opening by checking that silicone sealant does not block it. Use gm p/n 12346240 or equivalent to seal the corners of the cylinder head gasket before installing the new cylinder head cover gasket and new seal washers and cover nuts tightened to 5 nm (44 inch lbs.). After installing the Distributor case and Distributor remove the Timing Belt and reconnect the negative Battery Cable. A half-hour of no engine operation is needed after installing the hvl adjusters and Camshaft to stop valve and piston collisions. During the engine start the vehicle should reach a slightly higher idle speed to remove air from the hvl adjusters. Check for defects on the hvl adjusters when the noise does not go away.

Related Chevrolet Metro Parts
 Chevrolet Metro Coolant Filter
 Chevrolet Metro Crankshaft Thrust Washer Set
 Chevrolet Metro Cylinder Head
 Chevrolet Metro Intake Valve
 Chevrolet Metro Oil Filler Cap
 Chevrolet Metro Oil Filter
 Chevrolet Metro Oil Pump
 Chevrolet Metro Oil Pump Rotor Set
 Chevrolet Metro Rod Bearing
 Chevrolet Metro Timing Belt
 Chevrolet Metro Timing Cover Gasket
 Chevrolet Metro Valve Cover Gasket