ChevyParts
My Garage
My Account
Cart
OEM Chevrolet Silverado 1500 Brake Shoe
Brake Shoe Set- Select Vehicle by Model
- Select Vehicle by VIN
Select Vehicle by Model
orMake
Model
Year
Select Vehicle by VIN
For the most accurate results, select vehicle by your VIN (Vehicle Identification Number).
5 Brake Shoes found


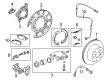
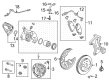
Chevrolet Silverado 1500 Brake Shoes, Rear Part Number: 23135902
$49.52 MSRP: $96.13You Save: $46.61 (49%)Ships in 1-2 Business Days
Chevrolet Silverado 1500 Actuator Seal Part Number: 13514244
$4.99 MSRP: $9.04You Save: $4.05 (45%)Ships in 1-3 Business Days

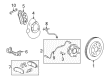
Chevrolet Silverado 1500 Brake Shoes, Rear Part Number: 25976968


Chevrolet Silverado 1500 Shoes Part Number: 15817020
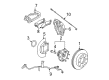
Chevrolet Silverado 1500 Brake Shoes, Rear Part Number: 19256494
Chevrolet Silverado 1500 Brake Shoe
Want to cut long-term maintenance and repair costs? Choose OEM Brake Shoe. Those parts deliver top durability you can trust. On our site, you'll find a huge catalog of genuine Chevrolet Silverado 1500 parts. Prices are unbeatable, so you can keep more in your pocket. Every OEM Chevrolet Silverado 1500 Brake Shoe includes a manufacturer's warranty. You can also get an easy return policy that keeps buying risk free. Fast delivery, get your car on the road quickly. It's simple to search, compare, and order. Stop guessing about quality or fit. Order today and save with parts that last.
Chevrolet Silverado 1500 Brake Shoe Parts Questions & Experts Answers
- Q: How to replace the brake shoes on Chevrolet Silverado 1500?A:Start with obtaining the essential replacement tools defined as Brake Shoe spanner & spring remover (J38400) and drum to Brake Shoe clearance gage (J21177-A). Start the process by taking out the Brake Drum from the back and cleaning brake shoes with denatured alcohol. The brakes should be adjusted to their lowest position to soften the retractor spring tension before starting the adjuster assembly removal process. Channel locks should be used to disconnect the retractor spring from the secondary Brake Shoe before separating the shoe from the backing plate. Initiate this process again for the primary Brake Shoe while you must remove the retractor spring before beginning. A small flat-bladed screwdriver can be used to press the park brake cable lock tab while you maintain its position after eliminating the return spring. Advancing the park brake cable releases it from the retainer yet maintain the return spring attached to the lever since it forms part of the Brake Shoe assembly. High-temperature silicone grease should be applied using a small amount to the points where the rear brake shoes touch the backing plate during installation. A proper seat of the Parking Brake Cable into the lever should produce either a snap sound or a click feedback. Verify that the retractor spring has a proper fit in the retaining bracket at the backing plate's bottom before mounting it onto the plate. Channel locks or j38400 Brake Shoe spanner & spring remover tools should be used for installing the retractor spring into both primary and secondary brake shoes. After installing the park brake adjusting hardware follow with shoe adjustment through use of drum to Brake Shoe clearance gage (J21177-A) before rear Brake Drum installation.

Related Chevrolet Silverado 1500 Parts
 Chevrolet Silverado 1500 Wheel Bearing
 Chevrolet Silverado 1500 ABS Sensor
 Chevrolet Silverado 1500 Brake Backing Plate
 Chevrolet Silverado 1500 Brake Caliper Bracket
 Chevrolet Silverado 1500 Brake Dust Shields
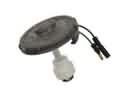 Chevrolet Silverado 1500 Brake Fluid Level Sensor
 Chevrolet Silverado 1500 Brake Proportioning Valve
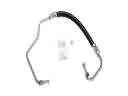 Chevrolet Silverado 1500 Hydraulic Hose
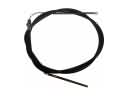 Chevrolet Silverado 1500 Parking Brake Cable
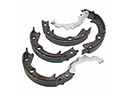 Chevrolet Silverado 1500 Parking Brake Shoe
 Chevrolet Silverado 1500 Wheel Cylinder
 Chevrolet Silverado 1500 Wheel Speed Sensor