ChevyParts
My Garage
My Account
Cart
OEM Chevrolet Silverado 2500 Window Motor
Window Lift Motor- Select Vehicle by Model
- Select Vehicle by VIN
Select Vehicle by Model
orMake
Model
Year
Select Vehicle by VIN
For the most accurate results, select vehicle by your VIN (Vehicle Identification Number).
4 Window Motors found


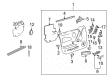
Chevrolet Silverado 2500 Window Motor, Front Driver Side Part Number: 19179943
$50.15 MSRP: $97.34You Save: $47.19 (49%)Ships in 1-2 Business Days
Chevrolet Silverado 2500 Window Motor, Front Passenger Side Part Number: 19179942
$50.15 MSRP: $97.34You Save: $47.19 (49%)Ships in 1-2 Business Days

Chevrolet Silverado 2500 Window Motor
Our website offers an extensive catalog of genuine Chevrolet Silverado 2500 Window Motor at unbeatable prices. Every OEM Chevrolet Silverado 2500 Window Motor comes with a manufacturer's warranty, an easy return policy, and rapid delivery service. Don't miss out on this great opportunity!
Chevrolet Silverado 2500 Window Motor Parts Questions & Experts Answers
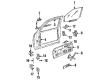
- Q: How to replace the rear door window motor on Chevrolet Silverado 2500?A: Before replacing the rear door Window Regulator motor users must start by raising the window but if the motor fails to operate then they can proceed to remove the window until reaching the retaining screws. After that remove the door trim panel together with the water deflector and door speaker before you can support the window. Cut the wiring harness connection from the Window Regulator motor before removing the 3 bolts (115 001 01) from the motor front side but maintain cable gear inside the housing to stop cable spool failure. Wiggle the Window Motor while separating its position with the cable housing before removing it from the Window Regulator assembly. Keep track of the motor orientation. Reassemble the motor inside the cable housing by wiggling it back into position before adding the 3 bolts (115 001 01) which need torquing to 5 n.m (44 lb in). You should first reinstall the window except when you need to connect the wiring harness to the Window Regulator motor and uninstall the window support. Alternative speakers along with water deflectors should be installed after verifying windows function with the wire connector attached to the switch.

Related Chevrolet Silverado 2500 Parts
 Chevrolet Silverado 2500 Door Armrest
 Chevrolet Silverado 2500 Door Latch Assembly
 Chevrolet Silverado 2500 Door Lock
 Chevrolet Silverado 2500 Door Lock Actuator
 Chevrolet Silverado 2500 Door Lock Cylinder
 Chevrolet Silverado 2500 Door Seal
 Chevrolet Silverado 2500 Door Striker
 Chevrolet Silverado 2500 Tailgate Lock
 Chevrolet Silverado 2500 Trunk Latch
 Chevrolet Silverado 2500 Weather Strip
 Chevrolet Silverado 2500 Window Crank Handles
 Chevrolet Silverado 2500 Window Regulator