ChevyParts
My Garage
My Account
Cart
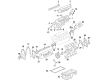
OEM Chevrolet Suburban 1500 Harmonic Balancer
Engine Harmonic Balancer- Select Vehicle by Model
- Select Vehicle by VIN
Select Vehicle by Model
orMake
Model
Year
Select Vehicle by VIN
For the most accurate results, select vehicle by your VIN (Vehicle Identification Number).
1 Harmonic Balancer found


Chevrolet Suburban 1500 Vibration Damper Part Number: 12634105
Chevrolet Suburban 1500 Harmonic Balancer
Want to cut long-term maintenance and repair costs? Choose OEM Harmonic Balancer. Those parts deliver top durability you can trust. On our site, you'll find a huge catalog of genuine Chevrolet Suburban 1500 parts. Prices are unbeatable, so you can keep more in your pocket. Every OEM Chevrolet Suburban 1500 Harmonic Balancer includes a manufacturer's warranty. You can also get an easy return policy that keeps buying risk free. Fast delivery, get your car on the road quickly. It's simple to search, compare, and order. Stop guessing about quality or fit. Order today and save with parts that last.
Chevrolet Suburban 1500 Harmonic Balancer Parts and Q&A
- Q: How to replace the harmonic balancer on Chevrolet Suburban 1500?A:The first step to change the crankshaft balancer requires removal of either the air conditioning (A/C) Drive Belt if present or the accessory Drive Belt if absent. Start by taking out both the lower Fan Shroud along with the Starter motor. Use the Flywheel holding tool (J 42386-A) with its teeth fitted properly into the engine Flywheel teeth. You must tighten two m10-1.5 x 120 mm and m10-1.5 x 45 mm bolts onto the j 42386-a until they achieve a torque of 50 nm (37 ft. Lbs.). The original crankshaft balancer bolt should be set aside because it will return for reinstallation. The crankshaft balancer remover (J 41816) should be combined with the crankshaft end protector (J 41816-2) to detach the crankshaft balancer. After removal clean the components thoroughly then conduct an inspection. Install the crankshaft balancer on the crankshaft in a straight line before using the crankshaft balancer and sprocket installer (J 41665) to perform the installation. Screw the installer with threaded rod into the balancer before rotating the clockwise nut until the balancer starts. Use the installer tool to reverse direction before placing its larger end against the balancer. Slowly tighten the tool until the balancer achieves complete installation. The used crankshaft balancer bolt requires tightening to 330 nm (240 ft. Lbs.), after which the bolt must be removed. Check for proper balancer installation through measurements; subsequent installations using the j 41665 should happen if incorrect. A new crankshaft balancer bolt requires installation followed by initial 50 nm (37 ft. Lbs.) torque value and subsequent 140 degrees angles using the torque angle meter (J 36660-A). The procedure ends with Starter motor reinstallation followed by the Fan Shroud and accessory Drive Belt (if no A/C) and a/c Drive Belt (if equipped). The crankshaft position (CKP) system variation learn procedure must be executed at this stage.

Related Chevrolet Suburban 1500 Parts
 Chevrolet Suburban 1500 Camshaft Bearing
 Chevrolet Suburban 1500 Crankshaft
 Chevrolet Suburban 1500 Crankshaft Thrust Washer Set
 Chevrolet Suburban 1500 Dipstick
 Chevrolet Suburban 1500 Dipstick Tube
 Chevrolet Suburban 1500 Exhaust Valve
 Chevrolet Suburban 1500 Lash Adjuster
 Chevrolet Suburban 1500 Oil Pan Gasket
 Chevrolet Suburban 1500 Oil Pump
 Chevrolet Suburban 1500 Pushrod
 Chevrolet Suburban 1500 Valve Stem Oil Seal
 Chevrolet Suburban 1500 Variable Timing Sprocket