ChevyParts
My Garage
My Account
Cart
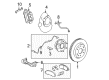
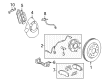
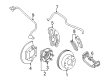
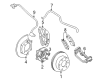
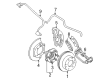
OEM Chevrolet Suburban 2500 ABS Control Module
Anti Lock Brake Control Module- Select Vehicle by Model
- Select Vehicle by VIN
Select Vehicle by Model
orMake
Model
Year
Select Vehicle by VIN
For the most accurate results, select vehicle by your VIN (Vehicle Identification Number).
30 ABS Control Modules found


Chevrolet Suburban 2500 Control Module Part Number: 15905737
$432.59 MSRP: $808.62You Save: $376.03 (47%)Ships in 1-2 Business Days


Chevrolet Suburban 2500 Control Module Part Number: 19244895
$790.28 MSRP: $1593.66You Save: $803.38 (51%)Ships in 1-2 Business Days
Chevrolet Suburban 2500 Control Module Part Number: 19244883
$1556.56 MSRP: $2802.72You Save: $1246.16 (45%)Ships in 1-3 Business Days


Chevrolet Suburban 2500 Control Module Part Number: 19244894
$499.47 MSRP: $1051.99You Save: $552.52 (53%)Ships in 1-2 Business Days


Chevrolet Suburban 2500 Control Module Part Number: 19244899
$882.71 MSRP: $2476.90You Save: $1594.19 (65%)Ships in 1-2 Business Days


Chevrolet Suburban 2500 Module Part Number: 20850925
$163.11 MSRP: $304.39You Save: $141.28 (47%)Ships in 1-2 Business Days


Chevrolet Suburban 2500 Control Module Part Number: 20896914
$1742.44 MSRP: $2959.27You Save: $1216.83 (42%)Ships in 1-2 Business Days


Chevrolet Suburban 2500 Module Part Number: 20964299
$113.46 MSRP: $211.72You Save: $98.26 (47%)


Chevrolet Suburban 2500 Module Part Number: 20850923
$120.98 MSRP: $236.85You Save: $115.87 (49%)


Chevrolet Suburban 2500 Module Part Number: 20791897
$129.84 MSRP: $242.28You Save: $112.44 (47%)
Chevrolet Suburban 2500 Pressure Valve Part Number: 25879226
$334.02 MSRP: $604.57You Save: $270.55 (45%)Ships in 1-2 Business Days


Chevrolet Suburban 2500 Control Module Part Number: 25912635
$594.21 MSRP: $1066.86You Save: $472.65 (45%)


Chevrolet Suburban 2500 Control Valve Part Number: 15904563


Chevrolet Suburban 2500 Pressure Valve Part Number: 19122463


Chevrolet Suburban 2500 Pressure Valve Part Number: 19149234


Chevrolet Suburban 2500 Modulator Valve Part Number: 88935864


Chevrolet Suburban 2500 Control Module Part Number: 19244882

Chevrolet Suburban 2500 Control Module Part Number: 19300859
$367.20 MSRP: $577.77You Save: $210.57 (37%)
Chevrolet Suburban 2500 Control Module Part Number: 25853666
Chevrolet Suburban 2500 Control Module Part Number: 19122254
| Page 1 of 2 |Next >
1-20 of 30 Results
Chevrolet Suburban 2500 ABS Control Module
Want to cut long-term maintenance and repair costs? Choose OEM ABS Control Module. Those parts deliver top durability you can trust. On our site, you'll find a huge catalog of genuine Chevrolet Suburban 2500 parts. Prices are unbeatable, so you can keep more in your pocket. Every OEM Chevrolet Suburban 2500 ABS Control Module includes a manufacturer's warranty. You can also get an easy return policy that keeps buying risk free. Fast delivery, get your car on the road quickly. It's simple to search, compare, and order. Stop guessing about quality or fit. Order today and save with parts that last.
Chevrolet Suburban 2500 ABS Control Module Parts Questions & Experts Answers
- Q: How to replace the ABS Control Module (W/JL4) on Chevrolet Suburban 2500?A:Starting the ABS Control Module (ABS CM) (W/JL4) replacement process requires users to disconnect the negative Battery Cable followed by securely lifting the vehicle. The ehcu area needs a clean environment to prevent abs component contamination because all contaminants must be washed off. Remove the abs cm from the bpmv by detaching its pressure sensor connector, pressure accumulator switch connector as well as the four mounting screws holding the abs cm in place. Remove the abs cm carefully from the bpmv while keeping track of the jumper harness routes that will be needed for reinstallation. First deactivate the abs cm unit and remove it along with all jumper harnesses from the automotive system. Next separate jumper harnesses from the abs cm part. Use a clean cloth to wipe the surface where the bpmv will be mounted to the abs cm. Jumper harnesses should be fitted to an abs cm before installing the abs cm with jumper harnesses inside the vehicle. New mounting screws are necessary for installing the abs cm to the bpmv while skipping any use of sealant on abs cm mating surfaces and gasket. Fasten the new screws in the abs cm using an x-pattern before securing them to 5 nm (39 inch lbs.). Connect the brake fluid pressure sensor along with pressure accumulator switch electrical connectors while lowering the vehicle before reestablishing the negative Battery Cable. The tire size calibration process with the scan tool tire size calibration function becomes the last step before the diagnostic starting point for antilock brake system.

Related Chevrolet Suburban 2500 Parts
 Chevrolet Suburban 2500 Antenna
 Chevrolet Suburban 2500 Battery Fuse
 Chevrolet Suburban 2500 Body Control Module
 Chevrolet Suburban 2500 Fuel Pump Relay
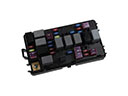 Chevrolet Suburban 2500 Fuse
 Chevrolet Suburban 2500 Fuse Box
 Chevrolet Suburban 2500 Headlight Relay
 Chevrolet Suburban 2500 Headlight Switch
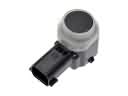 Chevrolet Suburban 2500 Parking Assist Distance Sensor
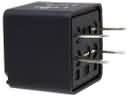 Chevrolet Suburban 2500 Relay
 Chevrolet Suburban 2500 Seat Belt
 Chevrolet Suburban 2500 TPMS Sensor