ChevyParts
My Garage
My Account
Cart
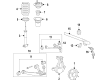
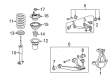
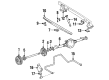
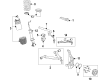
OEM Chevrolet Tahoe Shock Absorber
Suspension Shock Absorber- Select Vehicle by Model
- Select Vehicle by VIN
Select Vehicle by Model
orMake
Model
Year
Select Vehicle by VIN
For the most accurate results, select vehicle by your VIN (Vehicle Identification Number).
145 Shock Absorbers found


Chevrolet Tahoe Shock Absorber Part Number: 20955486
$67.96 MSRP: $186.79You Save: $118.83 (64%)Ships in 1-2 Business Days

Chevrolet Tahoe Shock Absorber Part Number: 23106628
$167.65 MSRP: $460.78You Save: $293.13 (64%)Ships in 1-2 Business Days


Chevrolet Tahoe Shock Absorber, Rear Part Number: 12476113
$295.53 MSRP: $578.62You Save: $283.09 (49%)

Chevrolet Tahoe Shock Absorber Part Number: 25871231
$58.71 MSRP: $173.80You Save: $115.09 (67%)Ships in 1-2 Business Days


Chevrolet Tahoe Strut Part Number: 22811853
$119.08 MSRP: $231.13You Save: $112.05 (49%)Ships in 1-2 Business Days


Chevrolet Tahoe Shock Absorber Part Number: 19300047
$329.62 MSRP: $639.74You Save: $310.12 (49%)Ships in 1-2 Business Days
Chevrolet Tahoe Shock Absorber Part Number: 84844798
$126.34 MSRP: $226.61You Save: $100.27 (45%)Ships in 1-3 Business DaysChevrolet Tahoe Shock Absorber Part Number: 23338831
$90.02 MSRP: $174.76You Save: $84.74 (49%)Ships in 1-2 Business Days
Chevrolet Tahoe Shock Absorber Part Number: 20765198
$64.54 MSRP: $191.02You Save: $126.48 (67%)Ships in 1-2 Business DaysChevrolet Tahoe Strut Part Number: 23183876
$113.94 MSRP: $221.14You Save: $107.20 (49%)Ships in 1-2 Business DaysChevrolet Tahoe Shock Absorber Part Number: 84887496
$143.41 MSRP: $257.24You Save: $113.83 (45%)Ships in 1-3 Business Days
Chevrolet Tahoe Shock Absorber Part Number: 88945406
$69.18 MSRP: $123.54You Save: $54.36 (44%)Ships in 1-3 Business Days
Chevrolet Tahoe Shock Absorber Part Number: 85619254
$278.96 MSRP: $500.39You Save: $221.43 (45%)Ships in 1-2 Business Days
Chevrolet Tahoe Shock Absorber, Rear Part Number: 86787493
$138.86 MSRP: $271.87You Save: $133.01 (49%)Chevrolet Tahoe Strut Part Number: 23124593
$198.65 MSRP: $546.00You Save: $347.35 (64%)Ships in 1-2 Business DaysChevrolet Tahoe Strut Part Number: 23148687
$187.14 MSRP: $363.24You Save: $176.10 (49%)
Chevrolet Tahoe Shock Absorber Part Number: 84171354
$72.52 MSRP: $199.30You Save: $126.78 (64%)Ships in 1-2 Business DaysChevrolet Tahoe Shock Absorber Part Number: 84082043
$67.87 MSRP: $122.84You Save: $54.97 (45%)Ships in 1-2 Business DaysChevrolet Tahoe Shock Absorber Part Number: 84171353
$116.17 MSRP: $210.26You Save: $94.09 (45%)Ships in 1-2 Business Days
Chevrolet Tahoe Shock Absorber Part Number: 85640963
$255.98 MSRP: $459.15You Save: $203.17 (45%)Ships in 1-2 Business Days
| Page 1 of 8 |Next >
1-20 of 145 Results
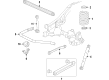
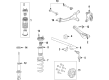
Chevrolet Tahoe Shock Absorber
Want to cut long-term maintenance and repair costs? Choose OEM Shock Absorber. Those parts deliver top durability you can trust. On our site, you'll find a huge catalog of genuine Chevrolet Tahoe parts. Prices are unbeatable, so you can keep more in your pocket. Every OEM Chevrolet Tahoe Shock Absorber includes a manufacturer's warranty. You can also get an easy return policy that keeps buying risk free. Fast delivery, get your car on the road quickly. It's simple to search, compare, and order. Stop guessing about quality or fit. Order today and save with parts that last.
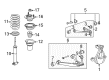
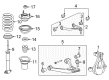
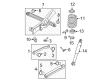
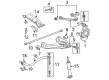
Now, the Chevrolet Tahoe uses the Shock Absorber and strut assembly for the vehicle's suspension; these components are responsible for responding to shock impulses whilst stabilizing the vehicle and enhancing the quality of the ride. These components, together with springs, are used to reduce unwanted motion of suspension, and use hydraulic pistons to transfer shock and energy to them in the form of heat. Many types of shock absorbers have been developed over the years that include the twin-tube and mono-tube shock absorbers where they differ in the mechanisms used to control the flow of hydraulic fluids and that enhances the ability of your car to respond to different driving conditions. Continuing improvements are seen in spool valve dampers, Position Sensitive Damping (PSD), and Acceleration Sensitive Damping (ASD); while electrorheological and magnetorheological dampers allow semi-active and adaptive suspensions for better comfort and control. A well-maintained and well-inspected Chevrolet Tahoe suspension system components are critical to the good performance and durability of the automobiles; hence, one should avoid defaulting on these aspects to avoid jeopardizing the vehicle's movement characteristics.
Chevrolet Tahoe Shock Absorber Parts Questions & Experts Answers
- Q: How to replace the shock absorber on Chevrolet Tahoe?A:The initial step for Shock Absorber (1500) replacement requires raising and supporting both vehicle and rear axle. The electronic suspension control connector needs to be disconnected if it is present. Before proceeding, you should enable air leveling using an on ignition alongside a scan tool then clear all air pressure from the system for 60 seconds. The replacement process begins by disconnecting the air line when present followed by the removal of upper Shock Absorber nuts and bolts and then lower Shock Absorber nuts and bolts and finally the Shock Absorber. The procedure starts by installing the Shock Absorber followed by placement of the upper Shock Absorber nut and bolt . Keep in mind the fastener caution guidelines during the process. Move to the installation of the lower Shock Absorber nut and bolt while torquing upper and lower nuts and to 115 nm (85 lb ft). The installation requires reconnecting the electronic suspension control connector when present together with reconnecting the air line when fitted. Lower the vehicle by removing the support which holds the rear axle. Turn on ignition with engine off along with the start of a scan tool process followed by air compressor operation for 30 seconds until the vehicle rear section starts to elevate. Reconnect the scan tool while turning off and then back on the ignition key with engine running to allow the air suspension system to adjust its rear suspension position.

Related Chevrolet Tahoe Parts
 Chevrolet Tahoe Drive Shaft
 Chevrolet Tahoe Control Arm
 Chevrolet Tahoe Alignment Bolt
 Chevrolet Tahoe Axle Shaft
 Chevrolet Tahoe CV Boot
 Chevrolet Tahoe Lateral Arm
 Chevrolet Tahoe Ride Height Sensor
 Chevrolet Tahoe Suspension Strut Rod
 Chevrolet Tahoe Sway Bar Bushing
 Chevrolet Tahoe Torsion Bar
 Chevrolet Tahoe Trailing Arm
 Chevrolet Tahoe Wheel Cover