ChevyParts
My Garage
My Account
Cart
OEM Chevrolet Tracker Rack And Pinion
Steering Rack And Pinion- Select Vehicle by Model
- Select Vehicle by VIN
Select Vehicle by Model
orMake
Model
Year
Select Vehicle by VIN
For the most accurate results, select vehicle by your VIN (Vehicle Identification Number).
2 Rack And Pinions found

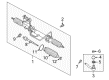
Chevrolet Tracker Gear Assembly Part Number: 91177194
Chevrolet Tracker Steering Gear Part Number: 91175546
Chevrolet Tracker Rack And Pinion
Want to cut long-term maintenance and repair costs? Choose OEM Rack And Pinion. Those parts deliver top durability you can trust. On our site, you'll find a huge catalog of genuine Chevrolet Tracker parts. Prices are unbeatable, so you can keep more in your pocket. Every OEM Chevrolet Tracker Rack And Pinion includes a manufacturer's warranty. You can also get an easy return policy that keeps buying risk free. Fast delivery, get your car on the road quickly. It's simple to search, compare, and order. Stop guessing about quality or fit. Order today and save with parts that last.
Steering rack is an essential part of car's steering system that turns the rotational movement of the steering wheel into the lateral movement of the front wheels of the Chevrolet Tracker vehicles. The Chevrolet Tracker steering rack is a hydraulic Steering Rack and Pinion, this kind of steering system comprises of a pinion gear mounted on the steering column and a rectangular shaped gear known as rack that is housed in a metal tube and which operates the wheels in accordance to the steering instructions. In the Chevrolet Tracker models throughout the years these cars have essentially used power assisted rack and pinion steering for added ease and sensitivity of the steering. Such systems involve the use of hydraulic pressure to help control the movement of the rack and as an added bonus, receiving feedback. Albeit straight gears are considered to be more efficient and powerful, helical gears are used but at the same time they have some likely disadvantages as the increase of wear. To keep the automobile in good status, does not allow receiving failures for instance leaks or worn components of the Chevrolet Tracker's Steering Rack.
Chevrolet Tracker Rack And Pinion Parts and Q&A
- Q: How to replace the Rack and Pinion steering gear on Chevrolet Tracker?A:Replacement of the Rack And Pinion starts by checking that wheels are straight while locking the Steering Column and disabling the supplemental inflatable restraint system. Lift the vehicle and next remove the skid plate if present in your vehicle. Use the Tie Rod puller j6627-a to disconnect the Tie Rod End from the knuckle by first removing the left inner Tie Rod nut from this assembly. The right outer Tie Rod undergoes the same installation steps as the left. The drain pan needs placement while you remove the Rack And Pinion inlet hose fitting and the hose and all gaskets. To prevent fluid loss during replacement of the Rack And Pinion fluid reservoir hose clamp the hose then safely remove it before plugging the ends of all hoses. Bang up decals on the lower Steering Shaft and Rack And Pinion casing before dismounting the shaft and unscrewing four bolts securing the Rack And Pinion. Remove the Rack And Pinion from its mount along with all attached insulators and brackets while taking away the brackets and insulators from the Rack And Pinion itself. Using a marker, note down the inner Tie Rod thread positions before removing the lock nuts to free up the outer Tie Rod ends. During installation measure the replacement Rack And Pinion to match the original inner tie rods before installing the Tie Rod lock nuts and outer Tie Rod ends keeping them loose. Use pins to mark the pinion shaft and Rack And Pinion housing in order to ensure straightness between the steering wheel and front wheels. You should attach the insulators to the brackets before you tighten the four bolts that secure the Rack And Pinion in position by matching the marks. First tighten the clamp bolt of the lower Steering Shaft to 25 nm (18 ft. Lbs.) before proceeding to the bolts securing the Rack And Pinion which need a torque of 55 nm (40 ft. Lbs.). Insert the Rack And Pinion fluid reservoir hose into position along with the hose clamp before securing the Rack And Pinion inlet hose with its gaskets and fitting. Torque the fitting to 35 nm (25.5 ft. Lbs.). The left outer Tie Rod End should be installed to the knuckle using a new nut torqued to 43 nm (31.5 ft. Lbs.). Similarly, the right outer Tie Rod End is installed using a new nut tightened to 43 nm (31.5 ft. Lbs.). After reinstallation of the skid plate complete these steps: lower the vehicle, refill the reservoir then bleed the Rack And Pinion system, turn on the sir function, check wheel alignment and adjust the front toe when necessary before securing the Tie Rod lock nuts to 65 nm (47 ft. Lbs.).
- Q: How to service and repair the Rack and Pinion steering gear on Chevrolet Tracker?A:To service and fix the Rack And Pinion, it is important to check that the wheels are straight ahead and the Steering Column is locked to prevent damage on the coil assembly. Pump power steering fluid into the reservoir with a syringe, lift and support the vehicle. Pull off the skid plate, then pull off the left outer Tie Rod nut and apply the universal steering linkage puller (J 24319-B) to pull off the left outer Tie Rod End to knock it from the knuckle. Do this for the right outer Tie Rod as well. Drain pan should be placed underneath the Rack And Pinion, bolt of the power steering gear inlet pipe/hose should be removed with the two gaskets of the power steering gear inlet pipe/hose. Remove the power steering fluid reservoir hose and seal the hoses from leaking fluid. Unscrew the intermediate Steering Shaft clamp bolt, unscrew the lower Steering Shaft from the Rack And Pinion. Paint pinion shaft and Rack And Pinion housing for alignment mark. The four Rack And Pinion mounting nuts must be removed as well as the insulators and brackets while getting the Rack And Pinion out. Loosen the pair of Tie Rod lock nuts in order to take off the outer Tie Rod ends from the inner tie rods. For installation, label lh & rh inner tie rods, install the Tie Rod lock nuts without tightening and connect the outer Tie Rod ends. Lay the mark on match on the pinion shaft and Rack And Pinion housing before tightening the Rack And Pinion with the steadying brackets of two and the four bolts. Lubricate the lower Steering Shaft area with "help self-lub 100" special grease and attach the lower Steering Shaft and tighten the intermediate Steering Shaft clamp bolt to 25 nm (18 ft. Lbs.), and then steer the Rack And Pinion mounting bolts 55 nm (40 ft. Lbs.). Retighten the Power Steering Hoses connecting, ensuring that the power steering gear inlet pipe/hose bolt is tightened to 35 nm (25.5 ft. Lbs.). Perform the following: reinstall the skid plate, refill the reservoir with dexron(R) - 111 automatic transmission fluid, g.m. P/n 12346143, or equivalent, before bleeding the power-steering system. Finally, activate the sir system and check the front toe (make sure to adjust it if required) and make sure to tighten the Tie Rod lock nut to 65 nm (47 ft. Lbs.).

Related Chevrolet Tracker Parts
 Chevrolet Tracker Drag Link
 Chevrolet Tracker Idler Arm
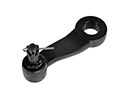 Chevrolet Tracker Pitman Arm
 Chevrolet Tracker Power Steering Hose
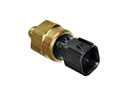 Chevrolet Tracker Power Steering Pressure Switch
 Chevrolet Tracker Power Steering Pump
 Chevrolet Tracker Power Steering Reservoir
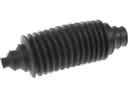 Chevrolet Tracker Rack and Pinion Boot
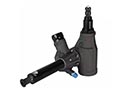 Chevrolet Tracker Steering Gearbox
 Chevrolet Tracker Tie Rod
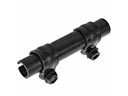 Chevrolet Tracker Tie Rod Adjusting Sleeve
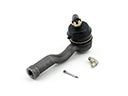 Chevrolet Tracker Tie Rod End