ChevyParts
My Garage
My Account
Cart
OEM GMC Bumper
Bumper Fascia- Select Vehicle by Model
- Select Vehicle by VIN
Select Vehicle by Model
orMake
Model
Year
Select Vehicle by VIN
For the most accurate results, select vehicle by your VIN (Vehicle Identification Number).
175 Bumpers found

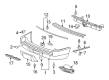
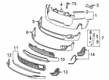
GMC Bumper Cover, Rear Part Number: 20951798
$444.91 MSRP: $665.17You Save: $220.26 (34%)Ships in 1-3 Business DaysProduct Specifications- Other Name: Fascia-Rear Bumper *Service Primer; Fascia, Front And Rear Bumper/Fascia Face
- Position: Rear
- Replaces: 15909707, 20771921

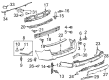
GMC Bumper Cover, Rear Upper Part Number: 23196406
$602.26 MSRP: $904.48You Save: $302.22 (34%)Ships in 1-3 Business DaysProduct Specifications- Other Name: Fascia Assembly-Rear Bumper Upper; Fascia, Front And Rear Bumper/Fascia Face
- Position: Rear Upper
- Replaces: 25961373, 20983300

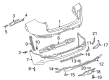
GMC Lower Cover Part Number: 25880093
$370.37 MSRP: $553.73You Save: $183.36 (34%)Ships in 1-3 Business DaysProduct Specifications- Other Name: Fascia, Front And Rear Bumper/Fascia Face
- Position: Rear Lower

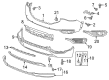
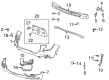
GMC Bumper Cover, Front Part Number: 84286368
$358.79 MSRP: $534.06You Save: $175.27 (33%)Ships in 1-3 Business DaysProduct Specifications- Other Name: Fascia-Front Bumper; Fascia, Front And Rear Bumper/Fascia Face
- Position: Front
- Replaces: 84013205, 84063573, 84142249

GMC Lower Cover, Black Part Number: 84341007
$284.72 MSRP: $423.32You Save: $138.60 (33%)Ships in 1-3 Business DaysProduct Specifications- Other Name: Fascia, Front And Rear Bumper/Fascia Face
- Position: Rear Lower

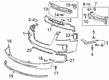
GMC Lower Cover, Black, Front Part Number: 85556161
$317.63 MSRP: $472.53You Save: $154.90 (33%)Ships in 1-3 Business DaysProduct Specifications- Other Name: Fascia-Front Bumper Lower *Black; Fascia, Front And Rear Bumper/Fascia Face
- Position: Front Lower
- Replaces: 84657881, 84778532, 84961161, 84856958

GMC Lower Cover, Black, Front Part Number: 84406735
$311.42 MSRP: $463.24You Save: $151.82 (33%)Product Specifications- Other Name: Fascia-Front Bumper Lower *Black; Fascia, Front And Rear Bumper/Fascia Face
- Position: Front Lower

GMC Bumper Cover, Front Part Number: 84243274
$309.72 MSRP: $460.69You Save: $150.97 (33%)Ships in 1-3 Business DaysProduct Specifications- Other Name: Fascia-Front Bumper; Fascia, Front And Rear Bumper/Fascia Face
- Position: Front
- Replaces: 23404958, 84157423, 23325705

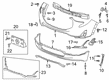
GMC Lower Cover, Black, Front Part Number: 84207761
$312.93 MSRP: $465.49You Save: $152.56 (33%)Ships in 1-3 Business DaysProduct Specifications- Other Name: Fascia-Front Bumper Lower *Black *Black; Fascia, Front And Rear Bumper/Fascia Face
- Position: Front Lower
GMC Lower Cover, Front Part Number: 84286231
$264.63 MSRP: $393.28You Save: $128.65 (33%)Ships in 1-3 Business DaysProduct Specifications- Other Name: Fascia-Front Bumper Lower *Service Primer; Fascia, Front And Rear Bumper/Fascia Face
- Position: Front Lower

GMC Lower Cover Part Number: 84038114
$295.04 MSRP: $438.75You Save: $143.71 (33%)Ships in 1-3 Business DaysProduct Specifications- Other Name: Fascia, Front And Rear Bumper/Fascia Face
- Position: Front Lower
- Replaces: 23475971, 23372633

GMC Lower Cover Part Number: 84286371
$325.82 MSRP: $484.76You Save: $158.94 (33%)Ships in 1-3 Business DaysProduct Specifications- Other Name: Fascia, Front And Rear Bumper/Fascia Face
- Position: Front Lower
- Replaces: 84142251, 84013226

GMC Bumper Cover, Rear Upper Part Number: 84346629
$336.81 MSRP: $501.20You Save: $164.39 (33%)Ships in 1-3 Business DaysProduct Specifications- Other Name: Fascia-Rear Bumper Upper; Fascia, Front And Rear Bumper/Fascia Face
- Position: Rear Upper
- Replaces: 84286227

GMC Bumper Cover, Rear Part Number: 84180677
$447.86 MSRP: $670.23You Save: $222.37 (34%)Product Specifications- Other Name: Fascia Assembly-Rear Bumper *Paint To Mat; Fascia, Front And Rear Bumper/Fascia Face
- Position: Rear
- Replaces: 84142253
GMC Lower Cover, Front Part Number: 84680695
$311.42 MSRP: $463.24You Save: $151.82 (33%)Ships in 1-3 Business DaysProduct Specifications- Other Name: Fascia-Front Bumper Lower *Service Primer; Fascia, Front And Rear Bumper/Fascia Face
- Position: Front Lower

GMC Bumper Cover Part Number: 84769843
$447.86 MSRP: $670.23You Save: $222.37 (34%)Product Specifications- Other Name: Fascia, Front And Rear Bumper/Fascia Face
- Position: Rear Lower


GMC Side Cover, Rear Upper Driver Side Part Number: 84842846
$331.49 MSRP: $493.25You Save: $161.76 (33%)Ships in 1-3 Business DaysProduct Specifications- Other Name: Fascia-Rear Bumper Upper *Service Primer; Fascia, Front And Rear Bumper/Fascia Face
- Position: Rear Upper Driver Side
- Replaces: 84749686
GMC Lower Cover, Black Part Number: 84341005
$284.72 MSRP: $423.32You Save: $138.60 (33%)Ships in 1-3 Business DaysProduct Specifications- Other Name: Fascia, Front And Rear Bumper/Fascia Face
- Position: Rear Lower

GMC Bumper Cover, Rear Upper Part Number: 23287381
$398.63 MSRP: $593.62You Save: $194.99 (33%)Ships in 1-3 Business DaysProduct Specifications- Other Name: Fascia-Rear Bumper Upper *Service Primer; Fascia, Front And Rear Bumper/Fascia Face
- Position: Rear Upper

GMC Bumper Cover Part Number: 84418636
$422.14 MSRP: $628.78You Save: $206.64 (33%)Product Specifications- Other Name: Fascia, Front And Rear Bumper/Fascia Face
- Position: Front
- Replaces: 84296772, 84340466
| Page 1 of 9 |Next >
1-20 of 175 Results
GMC Bumper
Want to cut long-term maintenance and repair costs? Choose OEM Bumper. Those parts deliver top durability you can trust. On our site, you'll find a huge catalog of genuine GMC parts. Prices are unbeatable, so you can keep more in your pocket. Every OEM GMC Bumper includes a manufacturer's warranty. You can also get an easy return policy that keeps buying risk free. Fast delivery, get your car on the road quickly. It's simple to search, compare, and order. Stop guessing about quality or fit. Order today and save with parts that last.
GMC Bumper Parts Questions & Experts Answers
- Q: How to replace the rear bumper fascia on GMC Envoy?A:The first step to replace the rear bumper fascia involves removing back up lamp socket assemblies when these exist on back up lamp housings. Combine the removal of these components: start by removing push-pins under the fascia followed by wheelhouse flange screws then upper retaining bolts from behind. The fascia should come off after removing all these components. Place the fascia on the vehicle impact bar while you should bolt the upper retaining components to the fascia before tightening them to 2.5 Nm (22 lb in). After mounting the fascia to the wheelhouse flanges use screws installed at 4.5 Nm (40 lb in) torque but not exceeding 5.5 Nm (50 lb in). Reinstall back up lamp sockets along with executing installation of lower push-pin components.
- Q: How to replace the front bumper fascia on GMC Canyon?A:The process to change the front bumper fascia of a Canyon/Colorado starts by supporting and raising the vehicle. Initiate operations by taking out the front bumper assembly. Opening the fascia requires removing push-pins securing it to the front bumper before pulling the fascia away from the bumper to detach. Assemble the front bumper fascia to the bumper front then reinstall its push-pins for holding the fascia in place afterward construct the complete front bumper assembly for lowering the vehicle.
- Q: How to replace the endgate bumper on a utility on GMC Jimmy?A:You should start by removing the lower side bumper bolt before loosening the upper side bumper bolt to rotate the side bumper along with its spacer (if available) away from the lower side bumper bolt hole. Move on to install the lower side bumper bolt while tightening it for solid backing plate attachment. Following this stage remove the upper side bumper bolt before later taking out the spacer (if present) and side bumper. Start the installation process by putting on the side bumper followed by the spacer (if equipped) and finish by installing the upper side bumper bolt. After proper alignment of the threaded hole, remove the lower side bumper bolt so you can position the side bumper together with its spacer (if present) through the backing plate's threaded hole. After proper alignment of the threaded hole, install the lower side bumper bolt by applying 22 N.m (16 lb ft) of torque.


Related GMC Parts
 GMC Emblem
 GMC Door Handle
 GMC Door Lock Actuator
 GMC Body Mount Hole Plug
 GMC Door Lock Cylinder
 GMC Lift Support
 GMC Liftgate Hinge
 GMC Mirror Cover
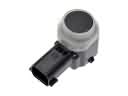 GMC Parking Assist Distance Sensor
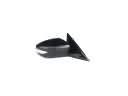 GMC Side View Mirrors
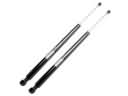 GMC Tailgate Lift Support
 GMC Window Channel
Browse GMC Bumper by Models
Acadia Sierra 1500 Yukon Canyon Sierra 2500 HD Terrain Envoy Sonoma Typhoon Syclone Envoy XL Envoy XUV Jimmy S15 S15 Jimmy Safari Savana 2500 Savana 3500 Sierra 2500 Sierra 3500 Yukon XL Acadia Limited Savana 1500 Yukon XL 1500 Hummer EV Pickup Sierra 1500 Classic Sierra 1500 HD Sierra 1500 HD Classic Sierra 2500 HD Classic Sierra 3500 Classic Sierra 3500 HD Yukon XL 2500