ChevyParts
My Garage
My Account
Cart
OEM GMC C2500 Oil Pan
Oil Drain Pan- Select Vehicle by Model
- Select Vehicle by VIN
Select Vehicle by Model
orMake
Model
Year
Select Vehicle by VIN
For the most accurate results, select vehicle by your VIN (Vehicle Identification Number).
11 Oil Pans found


GMC C2500 Oil Pan Part Number: 12557558
$175.72 MSRP: $301.79You Save: $126.07 (42%)Ships in 1-3 Business Days


GMC C2500 Oil Pan Part Number: 10240721
$173.43 MSRP: $272.76You Save: $99.33 (37%)
GMC C2500 Oil Pan Part Number: 14081035
GMC C2500 Oil Pan Part Number: 14015307

GMC C2500 Oil Pan Part Number: 23502600
GMC C2500 Oil Pan Part Number: 23501614
GMC C2500 Oil Pan Part Number: 14103141

GMC C2500 Oil Pan Part Number: 14082348
GMC C2500 Oil Pan Part Number: 12563902
GMC C2500 Oil Pan Part Number: 10181247

GMC C2500 Oil Pan Part Number: 10054809
GMC C2500 Oil Pan
Want to cut long-term maintenance and repair costs? Choose OEM Oil Pan. Those parts deliver top durability you can trust. On our site, you'll find a huge catalog of genuine GMC C2500 parts. Prices are unbeatable, so you can keep more in your pocket. Every OEM GMC C2500 Oil Pan includes a manufacturer's warranty. You can also get an easy return policy that keeps buying risk free. Fast delivery, get your car on the road quickly. It's simple to search, compare, and order. Stop guessing about quality or fit. Order today and save with parts that last.
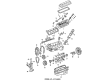
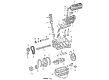
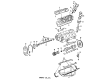
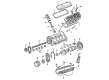
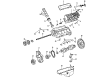
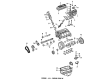
The Oil Pan is indispensable part of the manufacturer's vehicle series GMC C2500, launched in 1960 and still popular in the segment of heavy-duty pickups. Being engineered to hold the engine oil the GMC C2500 oil pan plays a role of holding the oil that is used to lubricate moving parts a factor that help in the efficiency as well as the durability of the GMC C2500 engines. A majority of the GMC C2500 models incorporate the wet sump system; here, the oil pan circulates the oil to boost general engine performance. From the oil pan Lucus pointed out that earlier models it was made from stamped steel but the modern ones are made from cast aluminum in order to increase its durability and the ability to dissipate heat. The ability to fit a variety of GMC C2500 models ranging from the basic models of Base, to the slightly more advanced trim level of GMC C2500 Deluxe, up to the completely customized GMC C2500 Sierra makes this one of the equipment's prime features. The Oil Pan not only improves the engine performance but also increases the safety through maintaining a sufficient amount of oil supply in critical circumstances. Its layout reduces the threat of seepage and guarantees a steady source of oil, both of which are vital for avoiding any issues to the engine. Also, the Oil Pan has a high degree of the rational basis and reliability in construction and use compared with other cars in the automotive market; thus, the oil pan is indispensable for all GMC C2500 car owners who want to keep up the excellent performance and safety of vehicles in the future.
GMC C2500 Oil Pan Parts Questions & Experts Answers
- Q: How to replace the oil pan on GMC C2500?A:Before changing the Oil Pan, begin with disconnecting the negative Battery Cable. Should the car have four-wheel drive, take out the front Differential. Next, get rid of the underbody shield and the Oil Pan underbody shield and also take out the cross brace if it exists. Drain out the engine oil and get rid of the engine Oil Filter. After that, unbolt the lower transmission-to-Oil Pan, cut off the electrical cable from strain gauge block and remove two front wiring harness connections on the engine Oil Pan. Take out the engine oil cooler pipe from the Oil Pan bolt and the transmission oil cooler pipe retainer and bolt as well. Then, take away the Starter motor and the cover and fastener on the left and finally remove the engine Oil Pan. Before the installation, apply a 5 mm (0.20 inch) bead of sealant gm p/n 12378190 or its equivalent to both the engine block and the front and rear cover's protruding gasket tabs that contact the Oil Pan. Set the Oil Pan Gasket onto the Oil Pan before installing the whole assembly with tightened bolts to the engine block. Place the two lower bellhousing bolts to properly fix the Oil Pan and tighten them with your fingers. Fix the Oil Pan-to-block, Oil Pan-to-Oil Pan front cover and Oil Pan-to-rear cover bolts to a tension of 25 n.m (18 lb ft) and tighten all the bellhousing bolts to 50 n.m (37 lb ft). Put back the left closeout cover and bolt and make sure to tighten the Oil Pan closeout cover bolt to 9 n.m (80 lb in). Make sure to fit the Starter motor, secure the transmission pipe retainer and bolt it to the Oil Pan, plus the oil cooler pipe to the Oil Pan and fasten the oil cooler pipe nut at 10 n.m (89 lb in). Fix the engine wiring harness retainer bolts into the engine Oil Pan, fitting the oil level sensor electrical connector and attach the transmission to Oil Pan bolts, tightening them until you reach 55 n.m (41 lb ft). In case your vehicle is equipped with four-wheel drive, replace the front Differential and finish by putting the underbody shield back on. Turn the vehicle upside down, top up the engine with motor oil and insert the Oil Filter before you replace the negative cable.

Related GMC C2500 Parts
 GMC C2500 Cam Gear
 GMC C2500 Coolant Filter
 GMC C2500 Crankshaft
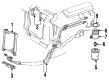
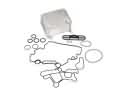 GMC C2500 Engine Oil Cooler
 GMC C2500 Fuel Filter
 GMC C2500 Harmonic Balancer
 GMC C2500 Head Gasket
 GMC C2500 Lash Adjuster
 GMC C2500 Motor And Transmission Mount
 GMC C2500 Piston Ring
 GMC C2500 Timing Chain
 GMC C2500 Valve Cover Grommet