ChevyParts
My Garage
My Account
Cart
OEM GMC C3500 Universal Joint
U-Joint- Select Vehicle by Model
- Select Vehicle by VIN
Select Vehicle by Model
orMake
Model
Year
Select Vehicle by VIN
For the most accurate results, select vehicle by your VIN (Vehicle Identification Number).
2 Universal Joints found


GMC C3500 Universal Joints Part Number: 23104840
$36.45 MSRP: $88.98You Save: $52.53 (60%)


GMC C3500 Universal Joints Part Number: 88964413
$196.62 MSRP: $328.19You Save: $131.57 (41%)Ships in 1-2 Business Days
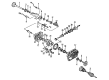
GMC C3500 Universal Joint
Want to cut long-term maintenance and repair costs? Choose OEM Universal Joint. Those parts deliver top durability you can trust. On our site, you'll find a huge catalog of genuine GMC C3500 parts. Prices are unbeatable, so you can keep more in your pocket. Every OEM GMC C3500 Universal Joint includes a manufacturer's warranty. You can also get an easy return policy that keeps buying risk free. Fast delivery, get your car on the road quickly. It's simple to search, compare, and order. Stop guessing about quality or fit. Order today and save with parts that last.
The part is known as the GMC C3500 Universal Joint and this component is very crucial as it gives the needed boost for the excellent performance of the GMC C3500 vehicles. This Universal Joint links the driveshaft and the differential assembly and consequently enables the relative rotation thus enabling the relative easy movement of the vehicle and increasing on the overall efficiency. Cross and needle bearings of the GMC C3500 Universal Joint are enclosed in strong steel cups; moreover, this joint comes from the aircraft factory pre-lubricated, which means it will work without problems right after being purchased by the customer. The fact that it suits most GMC C3500 models, namely both standard and crew chassis cabs, only evidences its relevance and contribution to the vehicle's integrity. The condition of the Universal Joint is therefore quite critical since a worn one will make a lot of noise and cause excessive vibrations; this is usually an indication that the particular part needs to be replaced. In automotive market, the GMC C3500 Universal Joint distinguishes itself for the excellent engineering applied to the make, where solid is created without overstress and for this reason resistant. The design also enhances the easy installation and maintenance of the GMC C3500 hence why many of the users opt for this design. Thus, by increasing the automobile's durability in both light and medium duty tasks, this GMC C3500 Universal Joint not only boost the car performance but also reduce the rates of accidents. In summary, GMC C3500 Universal Joint reflects the company's prime efforts and modern thinking in the creation of a durable vehicle for its customers that will provide a comfortable and safe ride no matter the distance.
GMC C3500 Universal Joint Parts Questions & Experts Answers
- Q: How to replace the universal joints (Nylon Injected Ring Type) on GMC C3500?A:To install the new universal joints, set the propeller shaft on a press table, make marks for connecting to the transmission and rear axle and then remove the shaft to measure the distance between the joints. Rest the lower ear of the Universal Joint in a (30 mm) 1 1/8 inch socket. Shear the plastic retaining ring on the bearing cup using the j9522-3 and push the lower bearing cup out of the yoke ear. Should the bearing cup remain attached, remove the cross and put j9522-5 between the seal and the bearing cup. Twist the propeller shaft counterclockwise to eject the bearing cup on the other side and disassemble the cross from the yoke; throw out all the Universal Joint parts since they cannot be put back together. Get rid of all the loose parts from the yoke and if getting a new front Universal Joint, eliminate the bearing cups from the Slip Yoke in the same manner. Make sure the grooves and bores of the retaining rings and bearings are free of anything that could hinder new bearing placement, then clear out the bearing cup grooves of sheared plastic. Before installation, unclip the bearing cups from the universal joints, grease the needle bearings and put one bearing cup halfway into the yoke's side. Align the yoke ear at a downward angle, place the cross to lower its trunnion into the bearing cup and press the bearing cup against the yoke ear. Put on the top bearing cup about halfway and make sure the trunnions are aligned, then press the cup into the yoke and check if the trunnions still move smoothly. Press the bearing until it is completely inside the yoke and stop if there is any tightening, since this could mean the parts are not perfectly aligned. After that, insert the bearing retainer into the groove and keep pressing until both retainers click into their places with some help from the chassis grease.


