ChevyParts
My Garage
My Account
Cart
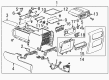
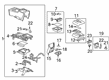
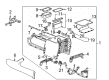
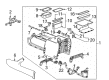
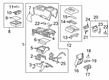
OEM GMC Center Console
Floor Console Assembly- Select Vehicle by Model
- Select Vehicle by VIN
Select Vehicle by Model
orMake
Model
Year
Select Vehicle by VIN
For the most accurate results, select vehicle by your VIN (Vehicle Identification Number).
198 Center Consoles found


GMC Center Console, Jet Black, Front Part Number: 85128418
$841.88 MSRP: $1264.34You Save: $422.46 (34%)Ships in 1-3 Business DaysProduct Specifications- Other Name: Console Assembly-Front Floor *Jet Black; Console, Floor Console
- Position: Front
- Replaces: 85512399

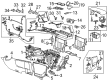
GMC Console Assembly, Black Part Number: 84204941
$447.69 MSRP: $672.33You Save: $224.64 (34%)Ships in 1-3 Business DaysProduct Specifications- Other Name: Console, Floor Console; Console, Seat Separator Console
- Position: Front
- Replaces: 84126907

GMC Console Assembly, Titanium Part Number: 84054519
$512.79 MSRP: $770.10You Save: $257.31 (34%)Ships in 1-3 Business DaysProduct Specifications- Other Name: Console, Floor Console; Center Console Base; Console
- Position: Front
- Replaces: 23355242
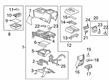
GMC Console Assembly, Black Part Number: 84054500
$502.87 MSRP: $755.22You Save: $252.35 (34%)Ships in 1-3 Business DaysProduct Specifications- Other Name: Console, Floor Console; Center Console Base; Console
- Position: Front
- Replaces: 23355221
GMC Console Assembly, Titanium Part Number: 84054524
$502.62 MSRP: $754.83You Save: $252.21 (34%)Ships in 1-3 Business DaysProduct Specifications- Other Name: Center Console Base; Console, Floor Console; Console
- Position: Front
GMC Console Assembly, Black, Front Part Number: 84204942
$447.69 MSRP: $672.33You Save: $224.64 (34%)Ships in 1-3 Business DaysProduct Specifications- Other Name: Console Assembly-Front Floor *Dune; Console, Seat Separator Console
- Position: Front
- Replaces: 84126908

GMC Side Panel, Gray, Rear Passenger Side Part Number: 84218871
$15.90 MSRP: $23.67You Save: $7.77 (33%)Ships in 1-3 Business DaysProduct Specifications- Other Name: Panel Assembly-Front Floor Console Rear Trim *Medium Ash Gy; Console, Floor Console; Panel, Floor Console
- Position: Rear Passenger Side

GMC Console Assembly, Titanium Part Number: 15910756
$104.54 MSRP: $155.60You Save: $51.06 (33%)Ships in 1-2 Business DaysProduct Specifications- Other Name: Center Console Base; Console
- Position: Front
GMC Console Assembly, Titanium Part Number: 23216814
Product Specifications- Other Name: Center Console Base; Console, Floor Console; Console
- Position: Front
GMC Console Assembly, Titanium Part Number: 20954376
Product Specifications- Other Name: Center Console Base; Console
- Position: Front
- Replaces: 20924388, 20914434

GMC Console Assembly, Front Part Number: 15910732
Product Specifications- Other Name: Compartment-Front Floor *Light Cashmere; Center Console Base; Console
- Position: Front
GMC Console Assembly, Titanium Part Number: 15910733
Product Specifications- Other Name: Center Console Base; Console
- Position: Front

GMC Console Assembly, Front Part Number: 23136517
Product Specifications- Other Name: Console; Center Console Base
- Position: Front
- Replaced by: 23466991

GMC Console Assembly, Front Part Number: 23466991
Product Specifications- Other Name: Console Assembly-Front Floor *Cocoa; Center Console Base; Console, Seat Separator Console; Console
- Position: Front
- Replaces: 22995080, 23136517
GMC Console Assembly Part Number: 15910731
Product Specifications- Other Name: Compartment, Seat Separator Console; Center Console Base; Console
- Position: Front
GMC Console Assembly, Titanium Part Number: 15910737
Product Specifications- Other Name: Center Console Base; Console
- Position: Front
GMC Console Assembly, Black; Red Part Number: 23466986
Product Specifications- Other Name: Console, Floor Console; Center Console Base; Console
- Position: Front
- Replaces: 23136512, 22995075

GMC Console Assembly, Titanium, Front Part Number: 20943741
Product Specifications- Other Name: Compartment Assembly-Front Floor *Light Ttnum; Center Console Base; Console
- Position: Front
- Replaces: 20893121
GMC Console Assembly, Front Part Number: 20943862
Product Specifications- Other Name: Compartment Assembly-Front Floor *Light Cashmere; Center Console Base; Console
- Position: Front
- Replaces: 20893176
GMC Console Assembly, Titanium, Front Part Number: 20943733
Product Specifications- Other Name: Compartment Assembly-Front Floor *Light Ttnum; Center Console Base; Console
- Position: Front
- Replaces: 20893117
| Page 1 of 10 |Next >
1-20 of 198 Results
GMC Center Console
Want to cut long-term maintenance and repair costs? Choose OEM Center Console. Those parts deliver top durability you can trust. On our site, you'll find a huge catalog of genuine GMC parts. Prices are unbeatable, so you can keep more in your pocket. Every OEM GMC Center Console includes a manufacturer's warranty. You can also get an easy return policy that keeps buying risk free. Fast delivery, get your car on the road quickly. It's simple to search, compare, and order. Stop guessing about quality or fit. Order today and save with parts that last.
GMC Center Console Parts Questions & Experts Answers
- Q: How to replace the Center Console in large with manual or auto transmission on GMC Canyon?A:The installation of a new console in vehicles with manual or automatic transmission requires starting by disassembling the passenger front bucket seat of regular cab models. Standard and crew along with extended cab vehicles require removal of floor-console fasteners that hold down the base structure to the floors. When your vehicle has a shift lever installed on the floor you must first detach its bezel and boot. Disengage the retainers by lifting the console's front and middle sections before removing it from the vehicle. To install this component position it on the floor panel then ensure that each retainer fits its assigned hole while placing the console bracket beneath the seat frame. After securing retainers with console pressure you should replace the shift lever bezel and boot if present then install console bolts. You need to reinstall both the front bucket seats if required.
- Q: How to replace the Center Console on GMC Envoy?A:The console replacement requires blocking of the wheels followed by rubber ash tray insert removal as well as rubber mat extraction and floor shift control knob detachment. During Center Console replacement for oldsmobile models start by removing the shift lever bezel and storage compartment before you uninstall the retaining screws. Stow the parking brake at its complete engagement while untethering the 2 forward trim extension ears securing the lower ip. Pull the console backward while lifting the rear section to work on electrical connectors which must be detached for this procedure. Use the halfway position of the parking brake to remove the vehicle's Center Console. Position the Center Console inside the vehicle before tightly engaging the parking brake and reconnecting all electrical connections. Lower the rear of the console before you push it forward into place while making sure the 2 retaining ears on the front extensions lock into position with the lower ip. Secure the Center Console retaining screws with 2.5 n.m (22 lb in) torque measurements before adding the console storage compartment, Center Console shift lever bezel, floor shift control knob and rubber ash tray inserts, and rubber mat. Take away all blocks located on the vehicle.
- Q: How to replace the front Center Console (Non-Full Length) in manual transmission on GMC Sonoma?A:To replace the front floor console (Non-Full Length), firstly, for manual transmission of vehicles, take out the shift control lever associated to Manual Transmission - NV 1500 or Manual Transmission - NV 3500 according to the proper procedure. Neither will detach it from the floor pull down hard on the console and at the same time pull up on the console to release the retainer clips and get it loose from the floor. When installing, be careful not to bend the clips and reinstall them back onto the ground. Finally, for vehicles with a manual transmission, replace the shift lever using the instructions provided in the Manual Transmission - NV 1500, Manual Transmission - NV 3500.


Related GMC Parts
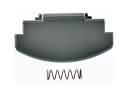 GMC Center Console Latch
 GMC Cup Holder
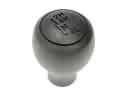 GMC Shift Knob
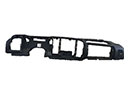 GMC Dash Panel Vent Portion Covers
 GMC Door Armrest
 GMC Door Hinge
 GMC Door Striker
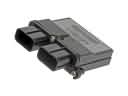 GMC Occupant Detection Sensor
 GMC Parking Assist Distance Sensor
 GMC Seat Heater Pad
 GMC Seat Switch Panel
 GMC Weather Strip
Browse GMC Center Console by Models
Acadia Sierra 1500 Yukon Canyon Sierra 2500 HD Terrain Envoy Sonoma C1500 Envoy XL Envoy XUV Jimmy K1500 S15 Jimmy Sierra 2500 Sierra 3500 Yukon XL Acadia Limited C2500 C3500 K2500 K3500 Yukon XL 1500 C1500 Suburban C2500 Suburban Hummer EV Pickup K1500 Suburban K2500 Suburban Sierra 1500 Classic Sierra 1500 HD Sierra 1500 HD Classic Sierra 2500 HD Classic Sierra 3500 Classic Sierra 3500 HD Yukon XL 2500