ChevyParts
My Garage
My Account
Cart
OEM GMC Jimmy Torsion Bar
Suspension Torsion Bar- Select Vehicle by Model
- Select Vehicle by VIN
Select Vehicle by Model
orMake
Model
Year
Select Vehicle by VIN
For the most accurate results, select vehicle by your VIN (Vehicle Identification Number).
4 Torsion Bars found

GMC Jimmy Torsion Bar, Front Passenger Side Part Number: 15956510
GMC Jimmy Torsion Bar, Front Driver Side Part Number: 15956509
GMC Jimmy Torsion Bar, Front Part Number: 14034282
GMC Jimmy Torsion Bar, Front Part Number: 14034281
GMC Jimmy Torsion Bar
Want to cut long-term maintenance and repair costs? Choose OEM Torsion Bar. Those parts deliver top durability you can trust. On our site, you'll find a huge catalog of genuine GMC Jimmy parts. Prices are unbeatable, so you can keep more in your pocket. Every OEM GMC Jimmy Torsion Bar includes a manufacturer's warranty. You can also get an easy return policy that keeps buying risk free. Fast delivery, get your car on the road quickly. It's simple to search, compare, and order. Stop guessing about quality or fit. Order today and save with parts that last.
GMC Jimmy Torsion Bar Parts and Q&A
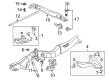
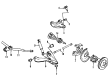
- Q: How to service and repair the torsion bar on GMC Jimmy?A:To complete the servicing and repairing for torsion bar, start by raising and supporting the vehicle with the safety-stands. Unload both torsion bars through the Torsion Bar Loading/Unloading Tool (J 36202), recording the number of turns reached while releasing the adjusting bolt, and then remove the tool. Following this, take out the lower link mount nut from one side together with the torsion bars while making sure to identify the exact direction of the forward end and the side you are taking out from. Move on to extracting the lower link mount nut from the other side and the lower link mount and then continue to extracting the upper link mount nut and upper link mount. Finally, take off the torsion bar support from the frame. For installation, position the torsion bars in the same way they were removed and install the torsion bar support, upper link mount and upper link mount nut, tighten the upper link mount nut to 65 Nm (48 ft. lbs. ). Mount the bottom link mount bushing on it and use the jack stand to hold up the torsion bar support member, then install the lower link mount nut and tighten until it reaches 50 Nm (37 ft. lbs.). Adjust the torsion bar with a Torsion Bar Loading/Unloading Tool (J 36202) tightening the tool against the adjusting arm for the recorded number of turns to load the torsion bars. Pull the car down and determine the final Z trim height.

Related GMC Jimmy Parts
 GMC Jimmy Ball Joint
 GMC Jimmy Alignment Bolt
 GMC Jimmy Axle Beam Mount
 GMC Jimmy Axle Support Bushings
 GMC Jimmy Coil Spring Insulator
 GMC Jimmy Control Arm Bolt
 GMC Jimmy Control Arm Bumper
 GMC Jimmy Control Arm Bushing
 GMC Jimmy Spindle
 GMC Jimmy Steering Knuckle
 GMC Jimmy Sway Bar Bushing
 GMC Jimmy Sway Bar Kit