ChevyParts
My Garage
My Account
Cart
OEM GMC Power Window Switch
Electric Window Switch- Select Vehicle by Model
- Select Vehicle by VIN
Select Vehicle by Model
orMake
Model
Year
Select Vehicle by VIN
For the most accurate results, select vehicle by your VIN (Vehicle Identification Number).
177 Power Window Switches found


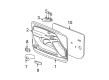
GMC Switch Assembly, Gray, Driver Side Part Number: 25866996
$213.99 MSRP: $433.39You Save: $219.40 (51%)Ships in 1-2 Business DaysProduct Specifications- Other Name: Switch Assembly-Door Lock & Side Window *Gray D; Switch, Door And End Gate Electrical
- Position: Driver Side
- Replaces: 25861569, 15857291, 25811563


GMC Lock Switch Part Number: 15867074
$15.44 MSRP: $25.44You Save: $10.00 (40%)Ships in 1-2 Business DaysProduct Specifications- Other Name: Switch, Door Electric And Vacuum Locks; Door Lock Switch; Switch, Door And End Gate Electrical

GMC Window Switch, Black Carbon, Front Passenger Side Part Number: 23488406
$29.57 MSRP: $44.00You Save: $14.43 (33%)Product Specifications- Other Name: Switch Assembly-Front Side Door Window *Black Carbon; Switch, Door And End Gate Electrical
- Position: Front Passenger Side
- Replaces: 23180790

GMC Window Switch, Passenger Side Part Number: 23343975
$13.62 MSRP: $30.65You Save: $17.03 (56%)Ships in 1-3 Business DaysProduct Specifications- Other Name: Switch, Door Window
- Position: Passenger Side
GMC Window Switch, Driver Side Part Number: 25866992
$163.40 MSRP: $317.14You Save: $153.74 (49%)Ships in 1-2 Business DaysProduct Specifications- Other Name: Switch Assembly-Door Lock & Side Window *Ebony; Switch Assembly; Switch, Door And End Gate Electrical
- Position: Driver Side
- Replaces: 15857240, 25811557, 25861559

GMC Window Switch, Passenger Side Part Number: 15186209
$85.12 MSRP: $133.33You Save: $48.21 (37%)Ships in 1-3 Business DaysProduct Specifications- Other Name: Switch Assembly-Door Lock & Side Window; Switch
- Position: Passenger Side
GMC Switch Assembly, Gray, Driver Side Part Number: 25866994
$194.11 MSRP: $330.48You Save: $136.37 (42%)Ships in 1-2 Business DaysProduct Specifications- Other Name: Switch Assembly-Door Lock & Side Window *Gray D; Switch, Door And End Gate Electrical
- Position: Driver Side
- Replaces: 25861567

GMC Window Switch, Passenger Side Part Number: 84879638
$30.67 MSRP: $48.04You Save: $17.37 (37%)Ships in 1-3 Business DaysProduct Specifications- Other Name: Switch, Door Window
- Position: Passenger Side
- Replaces: 84751368


GMC Window Switch Part Number: 25943472
Product Specifications- Other Name: Switch, Door Window; Switch, Door And End Gate Electrical
- Position: Rear
- Replaces: 25867017
GMC Window Switch, Gray, Rear Driver Side Part Number: 25943470
Product Specifications- Other Name: Switch Assembly-Rear Side Door Window *Gray L; Switch, Door And End Gate Electrical
- Position: Rear Driver Side
- Replaces: 25867015

GMC Window Switch, Gray Part Number: 15937172
Product Specifications- Other Name: Switch, Door And End Gate Electrical
- Position: Rear
- Replaces: 15791633

GMC Window Switch, Camel; Oak, Rear Part Number: 15757505
Product Specifications- Other Name: Switch Assembly-Rear Side Door Window *Oak; Switch, Door And End Gate Electrical
- Position: Rear


GMC Window Switch, Rear Part Number: 10363355
Product Specifications- Other Name: Switch Assembly-Rear Side Door Window; Switch, Back/Rear Door Window
- Position: Rear

GMC Switch Assembly, Driver Side Part Number: 15678669
Product Specifications- Other Name: Switch, Door And End Gate Electrical
- Position: Driver Side
- Replaces: 15678667, 15678665, 15678671

GMC Window Switch Part Number: 20835556
Product Specifications- Other Name: Switch Assembly-Door Lock & Side Window; Handle, Inside Cover; Switch, Door And End Gate Electrical
- Replaces: 25783954
GMC Switch Assembly, Driver Side Part Number: 15114260
Product Specifications- Other Name: Switch Assembly-Door Lock & Side Window *Ebony; Switch, Door And End Gate Electrical
- Position: Driver Side
- Replaces: 15101663, 15179990, 15079602
GMC Switch Assembly, Passenger Side Part Number: 15204690
Product Specifications- Other Name: Switch Assembly-Door Lock & Side Window *Pewter; Switch, Door And End Gate Electrical
- Position: Passenger Side
- Replaces: 15180076
GMC Switch Assembly, Passenger Side Part Number: 15114257
Product Specifications- Other Name: Switch Assembly-Door Lock & Side Window *Ebony; Switch, Door And End Gate Electrical
- Position: Passenger Side
- Replaces: 15179989, 15079601, 15101662
GMC Window Switch, Driver Side Part Number: 15114266
Product Specifications- Other Name: Switch Assembly-Door Lock & Side Window *Ebony; Switch Assembly; Switch, Door And End Gate Electrical
- Position: Driver Side
- Replaces: 15101661, 15179988, 15172534, 15079603
GMC Window Switch, Passenger Side Part Number: 25866973
Product Specifications- Other Name: Switch Assembly-Door Lock & Side Window *Ebony; Switch Assembly; Switch, Door And End Gate Electrical
- Position: Passenger Side
- Replaces: 25811582, 15857234, 15905403
| Page 1 of 9 |Next >
1-20 of 177 Results
GMC Power Window Switch
Want to cut long-term maintenance and repair costs? Choose OEM Power Window Switch. Those parts deliver top durability you can trust. On our site, you'll find a huge catalog of genuine GMC parts. Prices are unbeatable, so you can keep more in your pocket. Every OEM GMC Power Window Switch includes a manufacturer's warranty. You can also get an easy return policy that keeps buying risk free. Fast delivery, get your car on the road quickly. It's simple to search, compare, and order. Stop guessing about quality or fit. Order today and save with parts that last.
GMC Power Window Switch Parts Questions & Experts Answers
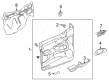
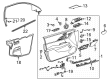
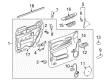
- Q: How to remove and replace the power window switch on GMC Canyon?A:A technician needs to start replacement work by disassembling the switch plate assembly from its mount on the door trim panel through two mounting screws. The switch plate needs lifting from its front portion to free the clip before pulling out the switch plate through the door trim panel. The electrical connectors (3, 4) should be disconnected from switches (2, 5) before taking out the switch plate assembly from the vehicle. The maintenance process requires either keeping the switches on the removed plate or maintaining them for switch transfer. Install the switches (2, 5) to the switch plate before connecting electrical connectors (3, 4) to the switches (2, 5). Secure the switch plate assembly to the door trim panel by using 2 screws while keeping the front door switch plate screws at 2 N.m (18 lb in).
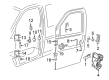
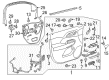
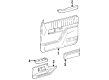
- Q: How to Replace the Door Lock Switch and Power Window Switch on a Driver Door on GMC Envoy?A:The first step to replace the Power Window Switch on the driver door requires lifting both the front and rear edges of the switch panel to release all retaining clips. The electrical connections of the driver door module require removal before proceeding while replacement of only the driver door module should remove its component from the door trim panel. The next step requires disconnecting all remaining electrical connectors from the switch panel except when replacing the panel alone because the driver door module needs to be saved for transfer. Extraction of the switch panel assembly from the automobile must occur. Start the installation by attaching the driver door module to the door trim panel followed by connecting its wiring port. When replacing the switch panel users should connect all remaining electrical connectors to their related systems. The setup process requires completion after you have replaced the driver door module because it follows the procedures found in dcm programming/rpo configuration. Seating the front and rear retaining clips properly should be your final step in installing the switch panel to the door trim panel.
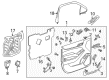
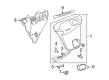
- Q: How to service and repair the power window switch on GMC Savana 3500?A:The front trim plate must be removed before starting power window switch servicing and repair. The power window switch gets its electrical connection removed before you can detach the escutcheon by freeing its clip from the front door trim plate. Complete the removal process by pushing away the tabs found on the power window switch from the escutcheon. Connect the power window switch to its escutcheon while assuring the proper insertion of locking tabs. Next install the fixings of the escutcheon and power window switch to the front door trim plate by pushing them to enter retaining clips. The last step includes connecting the electrical connector to the power window switch and reinstalling the front door trim plate.


Related GMC Parts
 GMC Fuse
 GMC Instrument Cluster
 GMC Body Control Module
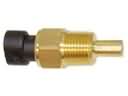 GMC Coolant Temperature Sensor
 GMC Fuse Box
 GMC Headlight Switch
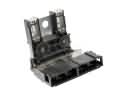 GMC Battery Fuse
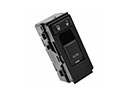 GMC Door Lock Switch
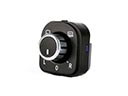 GMC Mirror Switch
 GMC Seat Heater Switch
 GMC Seat Switch
 GMC Shift Solenoid
Browse GMC Power Window Switch by Models
Acadia Sierra 1500 Yukon Canyon Sierra 2500 HD Terrain Envoy Sonoma Typhoon C1500 Envoy XL Envoy XUV Jimmy K1500 Safari Savana 2500 Savana 3500 Sierra 2500 Sierra 3500 Yukon XL Acadia Limited C2500 C3500 G2500 K2500 K3500 Savana 1500 Yukon XL 1500 C1500 Suburban C2500 Suburban G1500 G3500 K1500 Suburban K2500 Suburban P2500 R1500 R1500 Suburban R2500 R2500 Suburban R3500 Sierra 1500 Classic Sierra 1500 HD Sierra 1500 HD Classic Sierra 1500 Limited Sierra 2500 HD Classic Sierra 3500 Classic Sierra 3500 HD V1500 V1500 Suburban V2500 V2500 Suburban V3500 Yukon XL 2500