ChevyParts
My Garage
My Account
Cart
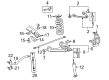
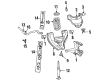
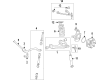
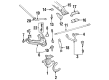
OEM GMC Savana 3500 Ball Joint
Control Arm Joint- Select Vehicle by Model
- Select Vehicle by VIN
Select Vehicle by Model
orMake
Model
Year
Select Vehicle by VIN
For the most accurate results, select vehicle by your VIN (Vehicle Identification Number).
5 Ball Joints found


GMC Savana 3500 Lower Ball Joint, Front Part Number: 12475478
$103.35 MSRP: $161.18You Save: $57.83 (36%)Ships in 1-2 Business Days
GMC Savana 3500 Lower Ball Joint, Front Part Number: 19416896
$88.06 MSRP: $145.05You Save: $56.99 (40%)Ships in 1-2 Business Days
GMC Savana 3500 Lower Ball Joint, Front Part Number: 19210782
$47.17 MSRP: $115.09You Save: $67.92 (60%)Ships in 1-2 Business Days

GMC Savana 3500 Upper Ball Joint Part Number: 19146901
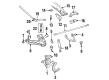
GMC Savana 3500 Upper Ball Joint, Front Part Number: 19416903
GMC Savana 3500 Ball Joint
Want to cut long-term maintenance and repair costs? Choose OEM Ball Joint. Those parts deliver top durability you can trust. On our site, you'll find a huge catalog of genuine GMC Savana 3500 parts. Prices are unbeatable, so you can keep more in your pocket. Every OEM GMC Savana 3500 Ball Joint includes a manufacturer's warranty. You can also get an easy return policy that keeps buying risk free. Fast delivery, get your car on the road quickly. It's simple to search, compare, and order. Stop guessing about quality or fit. Order today and save with parts that last.
GMC Savana 3500 Ball Joint Parts Questions & Experts Answers
- Q: How to replace the upper ball joint on a light-duty suspension on GMC Savana 3500?A:Begin replacing the upper Ball Joint of light-duty suspension by acquiring a Ball Joint separator tool j23742 first. Lift and stabilize the vehicle with safety stands while also supporting the lower Control Arm for secure work space. Remove tire and wheel first before moving to brake caliper. Detach the bolt and nut connecting wheel speed sensor harness bracket to the upper Control Arm and brake hose before taking out the upper Control Arm itself from the vehicle. Center punch two rivets that hold the Ball Joint to the Control Arm before drilling 5 mm deep holes using a 3.175 mm drill. Use a 12.7 mm (1/2 inch) drill to cut away rivet heads and drive out rivets using a small punch from the center hole made by a 3.175 mm (1/8 inch) drill. Install a brand new upper Ball Joint onto the upper Control Arm by placing its four bolts and nuts correctly and then tightening the upper Ball Joint retaining nuts to 24 nm (18 ft. Lbs). Connect the upper Control Arm to the vehicle then harness and brake hose brackets using a 17 nm torque setting (13 ft. Lbs.) with the specified bolt and nut. Reinstall the brake caliper, place back the wheel and tire, inspect suspension movement spaces, take away the safety blocks and lower the car before testing wheel alignment settings.

Related GMC Savana 3500 Parts
 GMC Savana 3500 Coil Spring Insulator
 GMC Savana 3500 Coil Springs
 GMC Savana 3500 Control Arm
 GMC Savana 3500 Control Arm Bumper
 GMC Savana 3500 Control Arm Bushing
 GMC Savana 3500 Spindle
 GMC Savana 3500 Steering Knuckle
 GMC Savana 3500 Sway Bar Bracket
 GMC Savana 3500 Sway Bar Bushing
 GMC Savana 3500 Sway Bar Kit
 GMC Savana 3500 Sway Bar Link
 GMC Savana 3500 Torsion Bar