ChevyParts
My Garage
My Account
Cart
OEM GMC Sonoma Engine Mount
Engine Motor Mount- Select Vehicle by Model
- Select Vehicle by VIN
Select Vehicle by Model
orMake
Model
Year
Select Vehicle by VIN
For the most accurate results, select vehicle by your VIN (Vehicle Identification Number).
21 Engine Mounts found


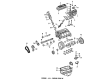
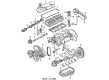
GMC Sonoma Motor Mount Part Number: 22188284
$51.94 MSRP: $88.43You Save: $36.49 (42%)Ships in 1-2 Business Days

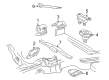
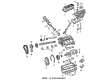
GMC Sonoma Mount Bracket, Passenger Side Part Number: 15725994
$16.28 MSRP: $26.77You Save: $10.49 (40%)Ships in 1-2 Business Days


GMC Sonoma Mount Bracket, Driver Side Part Number: 15725995
$19.08 MSRP: $29.13You Save: $10.05 (35%)Ships in 1-2 Business Days
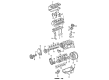
GMC Sonoma Mount Bracket, Driver Side Part Number: 15980139
$3.40 MSRP: $5.34You Save: $1.94 (37%)Ships in 1-3 Business Days
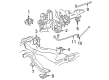
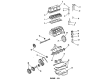
GMC Sonoma Front Mount, Driver Side Part Number: 15149543
$45.57 MSRP: $71.39You Save: $25.82 (37%)Ships in 1-3 Business Days
GMC Sonoma Motor Mount, Passenger Side Part Number: 15638410
$30.13 MSRP: $62.42You Save: $32.29 (52%)Ships in 1-2 Business DaysGMC Sonoma Mount Bracket, Driver Side Part Number: 15967991
$24.15 MSRP: $48.49You Save: $24.34 (51%)
GMC Sonoma Mount Bracket, Driver Side Part Number: 15725993


GMC Sonoma Motor Mount Part Number: 22188970

GMC Sonoma Mount Bracket, Driver Side Part Number: 14027913
GMC Sonoma Mount Bracket, Passenger Side Part Number: 15531862

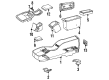
GMC Sonoma Console Bracket Part Number: 14062314
GMC Sonoma Mount Bracket, Driver Side Part Number: 15602787

GMC Sonoma Mount Bracket, Passenger Side Part Number: 15598558
GMC Sonoma Mount Bracket, Driver Side Part Number: 15602789
GMC Sonoma Mount Bracket, Passenger Side Part Number: 15674856
GMC Sonoma Mount Bracket, Driver Side Part Number: 15590285

GMC Sonoma Mount Bracket, Passenger Side Part Number: 15967992
GMC Sonoma Motor Mount, Driver Side Part Number: 15638409

GMC Sonoma Front Mount, Passenger Side Part Number: 15967994
| Page 1 of 2 |Next >
1-20 of 21 Results
GMC Sonoma Engine Mount
Our website offers an extensive catalog of genuine GMC Sonoma Engine Mount at unbeatable prices. Every OEM GMC Sonoma Engine Mount comes with a manufacturer's warranty, an easy return policy, and rapid delivery service. Don't miss out on this great opportunity!
GMC Sonoma Engine Mount Parts Questions & Experts Answers
- Q: How to replace the right engine mount on GMC Sonoma?A: The first step to change the right Engine Mount calls for vehicle lift and shield removal from beneath. Start by removing the through-bolt and nut from the Engine Mount of the target side and place a jack on the engine block's rear square tab to lift the engine sufficiently to remove the Starter if needed for access to the right side square tab. Raising the engine slightly until you can remove the Engine Mount and then unfasten brackets that connect the mount to the frame and finally remove all brackets. The procedure begins with removing bolts that secure the Engine Mount to both the engine and vice-versa. You can then remove the Engine Mount together with its shield. You should start by sub-assembly of the Engine Mount and shield with one bolt before mounting them to the engine. Tighten the Engine Mount engine bolts to 54 nm (40 ft. Lbs.). Install the Engine Mount frame bracket onto the frame before securing it with bolts and referencing an 45 nm torque value (33 ft.lb.). Lower the engine from the jack support and fasten the Engine Mount through-bolts then nuts at 74 nm (55 ft. Lbs.) and 63 nm (46 ft. Lbs.) levels respectively. Reinstall the Starter only when it was taken out during the process and lower the vehicle back down.

Related GMC Sonoma Parts
 GMC Sonoma Camshaft
 GMC Sonoma Coolant Filter
 GMC Sonoma Crankshaft
 GMC Sonoma Crankshaft Pulley
 GMC Sonoma Cylinder Head
 GMC Sonoma Drain Plug
 GMC Sonoma Lash Adjuster
 GMC Sonoma Oil Pump
 GMC Sonoma Piston Ring
 GMC Sonoma Rocker Arm
 GMC Sonoma Timing Belt Tensioner
 GMC Sonoma Variable Timing Sprocket