ChevyParts
My Garage
My Account
Cart
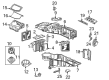
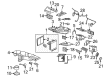
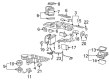
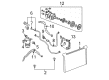
OEM GMC Yukon XL 2500 A/C Accumulator
Accumulator- Select Vehicle by Model
- Select Vehicle by VIN
Select Vehicle by Model
orMake
Model
Year
Select Vehicle by VIN
For the most accurate results, select vehicle by your VIN (Vehicle Identification Number).
8 A/C Accumulators found


GMC Yukon XL 2500 Drier Part Number: 89018647
$20.96 MSRP: $62.06You Save: $41.10 (67%)


GMC Yukon XL 2500 Drier Part Number: 19130064
$46.73 MSRP: $96.02You Save: $49.29 (52%)Ships in 1-2 Business Days


GMC Yukon XL 2500 Drier Part Number: 19130063
$38.51 MSRP: $79.14You Save: $40.63 (52%)Ships in 1-2 Business Days
GMC Yukon XL 2500 Drier Part Number: 1132755
$68.78 MSRP: $122.83You Save: $54.05 (44%)Ships in 1-3 Business Days


GMC Yukon XL 2500 Drier Part Number: 22949455


GMC Yukon XL 2500 Drier Part Number: 20828235


GMC Yukon XL 2500 Drier Part Number: 20828234

GMC Yukon XL 2500 Accumulator Part Number: 20828229
GMC Yukon XL 2500 A/C Accumulator
Want to cut long-term maintenance and repair costs? Choose OEM A/C Accumulator. Those parts deliver top durability you can trust. On our site, you'll find a huge catalog of genuine GMC Yukon XL 2500 parts. Prices are unbeatable, so you can keep more in your pocket. Every OEM GMC Yukon XL 2500 A/C Accumulator includes a manufacturer's warranty. You can also get an easy return policy that keeps buying risk free. Fast delivery, get your car on the road quickly. It's simple to search, compare, and order. Stop guessing about quality or fit. Order today and save with parts that last.
GMC Yukon XL 2500 A/C Accumulator Parts Questions & Experts Answers
- Q: How to replace the A/C Accumulator on GMC Yukon XL 2500?A:To replace the accumulator, you should recover the refrigerant first. You need to remove the evaporator tube nut and the steam evaporators. Then remove the nut from the evaporator tube and disconnect the electrical connector from the a/c low pressure switch. Unscrew the compressor hose nut off the accumulator and then compressor hose. Then remove the nut (from the evaporator fitting) and the accumulative bracket nut (from retaining stud) before getting rid of the accumulator. Remove o-ring seals, bolt and retaining bracket from the accumulator. For the installation, you should install new o-ring seals, and if you replace the accumulator, add refrigerant oil to the condenser. Mount the retaining bracket onto the accumulator, fasten it with the retaining bracket bolt and tighten it with the torque of 10 n.m (89 lb in). Wrench the accumulator and accelerator bracket nut with a torque of 9 n.m (80 lb in). Next, install the nut to the evaporator fitting, tighten it 16 nm (12 lb ft), the compressor hose to the accumulator and again the compressor hose nut, tighten that to 16 n.m (12 lb ft). Reconnect the electric connector to the a/c low pressure switch and fasten the nut of the evaporator tube to 25 n.m (18 lb ft). Lastly, install the evaporator tube to the evaporator and the evaporator tube nut and tighten to 16n.m (12 lb ft). Evacuate and recharge the system, and conduct a leak test on the fittings with the halogen leak detector (J 39400-A).

Related GMC Yukon XL 2500 Parts
 GMC Yukon XL 2500 A/C Clutch
 GMC Yukon XL 2500 A/C Compressor
 GMC Yukon XL 2500 A/C Compressor Cut-Out Switches
 GMC Yukon XL 2500 A/C Condenser
 GMC Yukon XL 2500 A/C Hose
 GMC Yukon XL 2500 A/C Orifice Tube
 GMC Yukon XL 2500 A/C Service Cap
 GMC Yukon XL 2500 Blend Door Actuator
 GMC Yukon XL 2500 Blower Motor
 GMC Yukon XL 2500 HVAC Control Module
 GMC Yukon XL 2500 HVAC Pressure Switch
 GMC Yukon XL 2500 Heater Core