ChevyParts
My Garage
My Account
Cart
OEM 2000 Buick Regal Oil Pan
Oil Drain Pan- Select Vehicle by Model
- Select Vehicle by VIN
Select Vehicle by Model
orMake
Model
Year
Select Vehicle by VIN
For the most accurate results, select vehicle by your VIN (Vehicle Identification Number).
1 Oil Pan found

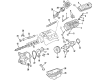
2000 Buick Regal Oil Pan Part Number: 12563240
Product Specifications- Other Name: Pan, Engine Oil
- Replaces: 24508692, 24505348, 24507900
- Item Weight: 6.60 Pounds
- Item Dimensions: 20.0 x 10.6 x 7.7 inches
- Condition: New
- Fitment Type: Direct Replacement
- SKU: 12563240
- Warranty: This genuine part is guaranteed by GM's factory warranty.
2000 Buick Regal Oil Pan
With a comprehensive array of OEM 2000 Buick Regal Oil Pan, from fuel pumps to door handles, our website is a one-stop-shop for your needs. All our genuine 2000 Buick Regal Oil Pan are backed by the manufacturer's warranty and are offered at competitive prices in the market. Rest assured, you can shop with complete confidence.
2000 Buick Regal Oil Pan Parts and Q&A
- Q: How to service and repair the oil pan on 2000 Buick Regal?A: Begin servicing or repairing the Oil Pan by discharging the negative Battery Cable followed by a delicate removal of the throttle body air inlet duct. First remove Engine Mount struts and Drive Belt followed by installation of j28467-90a engine support adapters and j28467-b universal engine support fixture and j36462-a engine support adapter leg set without engine elevation. Support the vehicle during service while you remove the three-way catalytic converter pipe from the right Exhaust Manifold followed by disconnection of the right front tire wheel and right splash shield. Engine oil should be drained while also removing the Oil Filter from its location. Begin by removing ac compressor bracket bolts and repositioning the ac compressor then disconnect power steering oil cooler pipe brackets from the frame and subsequently remove Engine Mount bracket bolts and lower Engine Mount nuts. Before removing the oil level sensor disconnect its wiring harness and remove the torque converter cover. The j28467-b tool allows engine lift once the vehicle reaches its lowest point. Support the frame by loosening bolts at the left side then remove bolts at the right side to lower the frame down. First remove the Engine Mount and Engine Mount bracket before uninstalling the Oil Pan retaining bolts to finally remove the Oil Pan. First remove the oil pump pipe and screen assembly and Oil Pan Gasket then clean all surfaces of the Oil Pan flanges, Oil Pan rail, front cover, rear main bearing cap, and threaded holes. Use the provided Oil Pan Gasket to install both the oil pump pipe and screen assembly before tightening all pipe and screen bolts to 15 nm (11 ft. Lbs.). Apply one drop of thread lock compound gm p/n 12345382 or equivalent to the Oil Pan bolt threads before installing clean pan bolts. Tighten Oil Pan bolts to a torque of 14 nm (125 inch lbs.). Install the Engine Mount bracket first followed by the Engine Mount then bolt the Engine Mount bracket securely. Installation of new right side frame bolts must occur with frame support present before installing new left side frame bolts. Using the j28467-b tool to lower the engine when the vehicle reaches its lowest point. Rise the vehicle once more for support while you install lower Engine Mount nuts that require 47 nm (35 ft. Lbs.) torque then add the oil level sensor, securing it with 20 nm (15 ft. Lbs.). The oil level sensor wiring harness connector should be connected while you install the torque converter cover before attaching power steering oil cooler pipe brackets to their frame locations. Install all bolts for the ac compressor bracket along with the new Oil Filter while tightening the Oil Pan drain plug to 30 nm (22 ft. Lbs.). Reattach the right engine splash shield after installing the right front tire and wheel then join the three-way catalytic converter pipe to the right Exhaust Manifold. Begin by lowering the vehicle after which workers should remove the j28467-b, j36462-a, and j28467-90a and then install the Drive Belt and Engine Mount struts. Position the throttle body air inlet duct while you fill the crankcase with engine oil before reattaching the negative battery ground cable. The finishing tasks include inspecting fluid levels and leak detection along with wheel alignment measurement.
Related 2000 Buick Regal Parts
 2000 Buick Regal Camshaft Bearing
 2000 Buick Regal Crankshaft
 2000 Buick Regal Crankshaft Gear
 2000 Buick Regal Crankshaft Seal
 2000 Buick Regal Cylinder Head
 2000 Buick Regal Dipstick Tube
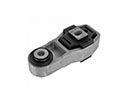 2000 Buick Regal Engine Mount Torque Strut
 2000 Buick Regal Intake Valve
 2000 Buick Regal Lash Adjuster
 2000 Buick Regal Oil Pan Gasket
 2000 Buick Regal Piston Ring
 2000 Buick Regal Rocker Arm