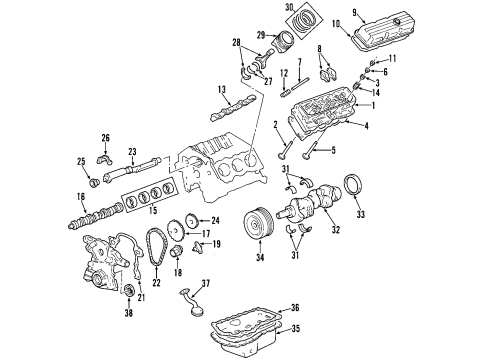
To demolish the Oil Pan, have the required tools: engine support adapters (J 28467-9OA), universal engine support fixture (J 28467-B), engine support adapter leg set (J 36462-A). Start by disconnecting negatively cable from the battery and remove fuel injector sight shield. Then, disconnect the intake air temperature (IAT) sensor electric connector, and take off air inlet duct from the Throttle Body and Drive Belt. Then, after the removal of the right and left engine mount struts, install the engine support fixture and raise the vehicle. Ditch the right exhaust manifold pipe studs nuts from the Catalytic Converter, right front tire and wheel, right side engine splash shield retainers and splash shield. Drain out the engine oil and take out the Oil Filter, remove the A/C Compressor nuts and the A/C Compressor without releasing the a/c system and reposition it later on. Unscrew the guide bracket A/C Compressor bolts, the power steering oil cooler pipes brackets from the frame and disconnect the oil level sensor electrical connection. Remove the oil level sensor wiring sanitary bolt and make way for the wire harness, then unstability the engine mount downpan nuts. Lower the vehicle and lift the engine using the engine support fixture and bring it up before raising the vehicle once more to take off the left and right engine mount bracket bolts. Support the frame with jackstands and loosen the left side frame bolts along with removing the right side frame bolts and bring the right side frame for engine mount bracket removal. Take out the engine mount bracket and torque converter cover and then take out the oil level sensor before you drive in the Oil Pan bolts and place out the Oil Pan. Take off the oil pump pipe as well as the screen-assembled oil pump and Oil Pan Gasket, and clean the Oil Pan flanges along with the Oil Pan rail, front cover and rear main bearing cap, and the threaded holes. The Oil Pan Gasket is to be installed along with the oil pump pipe, and screen assembly and secured by oil pump pipe and screen bolts that are tightened to 15 nm (11 ft. Lbs.). Install the Oil Pan, clean the Oil Pan bolts, and apply one drop of thread lock compound gm p/n 12345382 or equivalent on threads. Tighten the Oil Pan bolts to 14 nm (125 inch lbs) and install the oil level sensor and tighten to 20 nm (15 ft. Lbs). Mount the torque converter cover, engine mount bracket, and loosely mount the right and left engine mount bracket bolts and tighten it to 102 nm (75 lb. Ft.). By means of the jacks, raise the frame to a previous position, and fasten the right side frame bolts, tightening the latter ones, both on the right and left sides, to 180 nm (133 ft. Lbs.). Take off the jackstands and bring the vehicle down, and then use the engine support fixture to bring down the engine. Jack up the vehicle once more to put in the engine mount lower nuts tightening them to 78 nm (58 ft. Lbs.). Mount the oil level sensor wiring harness and the bolt and tighten the bolt to 10 nm (89 inch lbs) and then attach the oil level sensor electrical connector. Mount the power steering oil cooler pipe brackets, a/c compressor bracket, and bolts, tightening the screw brackets on the A/C Compressor bracket to 50 nm (37 ft. Lbs.)) and the A/C Compressor nuts to 30 nm (22 ft. Lbs.)). Change a new Oil Filter, tighten the Oil Pan drain plug to 30 nm (22 ft. Lbs.), right side engine splash shield, and retainers, right front tire and wheel, and right exhaust manifold pipe stud nut also, tighten it to 32 nm (24 ft. Lbs.). Lower the vehicle and remove its engine support fixture, then put right and left engine mount struts, the Drive Belt, and the air inlet duct to the Throttle Body. Hook up the intake air temperature (IAT) sensor, electric connection, fill the crankcase with engine oil, install the fuel injector sight shield, and finish the process, with the negative Battery Cable, checking for leakage during the process.
Posted by ChevyPartsGiant Specialist