ChevyParts
My Garage
My Account
Cart
OEM 2000 Cadillac Seville Thermostat Housing
Engine Coolant Thermostat Housing- Select Vehicle by Model
- Select Vehicle by VIN
Select Vehicle by Model
orMake
Model
Year
Select Vehicle by VIN
For the most accurate results, select vehicle by your VIN (Vehicle Identification Number).
1 Thermostat Housing found


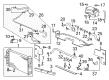
2000 Cadillac Seville Thermostat Housing Part Number: 1647540
$11.19 MSRP: $21.01You Save: $9.82 (47%)Ships in 1-2 Business DaysProduct Specifications- Other Name: Housing E; Thermostat Housing Cover; Water Outlet; Housing, Engine Coolant Thermostat
- Item Weight: 0.50 Pounds
- Item Dimensions: 4.4 x 4.3 x 2.2 inches
- Condition: New
- Fitment Type: Direct Replacement
- SKU: 1647540
- Warranty: This genuine part is guaranteed by GM's factory warranty.
2000 Cadillac Seville Thermostat Housing
With a comprehensive array of OEM 2000 Cadillac Seville Thermostat Housing, from fuel pumps to door handles, our website is a one-stop-shop for your needs. All our genuine 2000 Cadillac Seville Thermostat Housing are backed by the manufacturer's warranty and are offered at competitive prices in the market. Rest assured, you can shop with complete confidence.
2000 Cadillac Seville Thermostat Housing Parts and Q&A
- Q: How to service and repair the thermostat housing on 2000 Cadillac Seville?A: Must start with draining the cooling system when servicing and repairing the Thermostat Housing. After removing the air cleaner assembly, remove the two nuts from intake manifold sight shield, and remove the latter from its position on the engine. Upper motor mount bolts are 16mm. The second step is to pull off the airflow Throttle Body and its connecting nut at the back lift bracket, the surge tank inlet hose from the fitting, and the generator coolant hose from the heater pipe. Then, take out the surge tank inlet fitting, the rear lift bracket bolt, and the rear lift bracket. Virtually, unscrew the EGR Valve and pry loose the egr inlet pipe nut at the point where it connects to the crossover of the exhaust - replace the egr inlet pipe if it comes off from the water crossover. Unbolt and remove the egr inlet pipe bolt and flange from the water crossover and dump the egr inlet pipe to waste. Remove mo evap emission canister purge valve and remove the electrical connector from MAP Sensor before removing MAP Sensor. Using the hose clamp pliers (J 38185), remove the inlet and outlet radiator hoses from the water housing crossover and Thermostat Housing respectively. Remove the two bolts holding the Water Pump belt tensioner to the water crossover and disconnect the Water Pump from its place, then remove the Water Pump belt tensioner. Remove the cable harness clip that is inside the water housing crossover and the heater that is connected to the water housing crossover and the next step would be to remove the water housing crossover from the engine. Clean and check the water housing crossover, then install the new gaskets onto the crossover retaining bolts, positioning them properly. Put the water housing crossover in place and hand start bolts and tighten them in sequence to 25 nm (18 ft. Lbs.). Mount the heater hose and cable harness clip to the water housing crossover, then bolt the Water Pump belt tensioner to the water crossover with the two bolts, and tighten to 10 nm (89 inch lbs.). Mount the Water Pump and attach the outlet Radiator Hose to the Thermostat Housing and the inlet Radiator Hose to the water housing crossover with the hose clamp pliers (J 38185). Install the MAP Sensor and solder the electrical connector. Mount the EGR Valve and make sure to hand start the new egr inlet pipe-to-crossover pipe nut to avoid crossthread it and tighten it 60 nm (44 ft. Lbs). Join the egr inlet pipe flange to the water crossover and tighten in place with a 25 nm (18 ft. Lbs) bolt on the egr inlet pipe to the water crossover flange bolt. Mount the evap emission canister purge valve, position rear lift bracket to the water x-over, and install the rear lift bracket bolt with 24 nm (18 ft. Lbs.). Install the surge tank inlet fitting & tighten to 47 nm (35 ft. Lbs.), connect surge tank inlet hose to fitting, generator coolant hose to heater pipe and fuel rail bracket retaining nut to rear lift bracket, tightn to 4 nm (35 inch lbs). Link the air solenoid vacuum tube and fuel regulator vacuum tube, followed by the brake booster vacuum tube. Mount the Throttle Body, align the intake manifold sight shield to the engine, and screw the two intake manifold sight shield nuts, wrenching them to 3 nm (27 inch lbs.). Finally, place the air cleaner assembly, and fill the cooling system.
Related 2000 Cadillac Seville Parts
 2000 Cadillac Seville Radiator
 2000 Cadillac Seville A/C Condenser Fan
 2000 Cadillac Seville Coolant Reservoir Cap
 2000 Cadillac Seville Cooling Hose
 2000 Cadillac Seville Fan Blade
 2000 Cadillac Seville Fan Shroud
 2000 Cadillac Seville Radiator Hose
 2000 Cadillac Seville Radiator fan
 2000 Cadillac Seville Thermostat
 2000 Cadillac Seville Thermostat Gasket
 2000 Cadillac Seville Water Pump Gasket
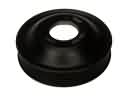 2000 Cadillac Seville Water Pump Pulley