ChevyParts
My Garage
My Account
Cart
OEM Cadillac Seville Thermostat Housing
Engine Coolant Thermostat Housing- Select Vehicle by Model
- Select Vehicle by VIN
Select Vehicle by Model
orMake
Model
Year
Select Vehicle by VIN
For the most accurate results, select vehicle by your VIN (Vehicle Identification Number).
5 Thermostat Housings found


Cadillac Seville Thermostat Housing Part Number: 1647540
$11.19 MSRP: $21.01You Save: $9.82 (47%)Ships in 1-2 Business Days

Cadillac Seville Thermostat Housing Part Number: 1646974


Cadillac Seville Thermostat Housing, Lower Part Number: 1620610
Cadillac Seville Thermostat Housing Part Number: 3520936

Cadillac Seville Thermostat Housing, Upper Part Number: 1609644
Cadillac Seville Thermostat Housing
Want to cut long-term maintenance and repair costs? Choose OEM Thermostat Housing. Those parts deliver top durability you can trust. On our site, you'll find a huge catalog of genuine Cadillac Seville parts. Prices are unbeatable, so you can keep more in your pocket. Every OEM Cadillac Seville Thermostat Housing includes a manufacturer's warranty. You can also get an easy return policy that keeps buying risk free. Fast delivery, get your car on the road quickly. It's simple to search, compare, and order. Stop guessing about quality or fit. Order today and save with parts that last.
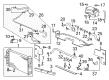
The Thermostat Housing is one of the reliable and performance-oriented parts in Cadillac vehicles. The Thermostat Housing controls the temperature of the Cadillac Seville's engine and is invaluable in increasing efficiency thereby preventing overheating and damaging of the engine. This fits Cadillacs Seville model that was manufactured between 1975 and 2004 The part is keenly designed to withstand the rough conditions of the engine and keep the thermostat free from extraneous influences. The Thermostat Housing had metal and high-grade plastic versions and while the latter has better resilience, the metal has higher chances of rust and corrosive affects. Different sorts of water outlet necks, including a straight one, the swivel one, and the angle one, permit more possibilities in hosing and are sealed with the help of o-rings which do not allow leaks. Moreover, thanks to such flexibility, the cooling system works better and helps to extend the Cadillac Seville engine's lifespan. Cadillac Seville has the sophisticated design and fittings together with other impressive added features for which having a very reliable Thermostat Housing is a competitive advantage in the auto industry. In this way, the Thermostat Housing regulates the heat transfer, providing the smooth and safe ride for a driver, which testifies Cadillac's workmanship and focus on quality in each car model.
Cadillac Seville Thermostat Housing Parts and Q&A
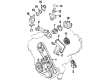
- Q: How to service and repair the thermostat housing and replace the water crossover on Cadillac Seville?A:Dehydration of the cooling system is the first step before beginning Thermostat Housing service followed by removal of the air cleaner assembly fuel injector sight shield vacuum tube disconnect from water housing crossover. After disconnecting the fuel regulator vacuum tube and air solenoid vacuum tube you must remove the Throttle Body. The service repair of the Thermostat Housing and replacement of the water crossover starts with removing the fuel rail bracket retaining nut at the rear lift bracket and the surge tank inlet hose from the fitting along with the surge tank inlet fitting and rear lift bracket bolt and rear lift bracket. The EGR Valve requires removal while disconnecting the egr inlet pipe nut from the exhaust crossover and replacing the EGR Valve inlet pipe that connects to the water crossover. First remove the bolt and flange of the egr inlet pipe from the water crossover before discarding the egr inlet pipe itself. Begin by disconnecting the electrical connector from the MAP Sensor followed by removing the evap emission canister purge valve and MAP Sensor itself. Apply j38185 hose clamp pliers (J38185) to detach the inlet Radiator Hose from the water housing crossover while removing the outlet Radiator Hose from the Thermostat Housing. First disconnect the Water Pump along with its 2 belt tensioner bolts linking it to the water crossover before removing the Water Pump belt tensioner. Disengage the water housing crossover's cable harness clip then move it out of the way before removing the heater hose from the crossover and removing the crossover from the engine. A thorough inspection should precede xcrossover water housing installation. Before installation slide two water housing crossover gaskets onto crossover retaining bolts and make sure they sit properly. Fit the water housing crossover into position before you start tightening its bolts by hand up to 25 nm (18 ft.lbs.). Secure the heater hose and cable harness clip to the water housing crossover and bolt the Water Pump belt tensioner to the water crossover with 10 nm (89 inch lbs.) of torque. Ueinstall the Water Pump while using the j38185 tool to attach the outlet Radiator Hose to the Thermostat Housing and the inlet Radiator Hose to the water housing crossover. After installation of the MAP Sensor connect its electrical connector before installing the EGR Valve and if the EGR Valve inlet pipe was removed do not forget to replace it. Start the new egr inlet pipe-to-crossover pipe nut by hand to avoid crossthreading before tightening it to 60 nm (44 ft. Lbs.). Next install the egr inlet pipe flange onto the water crossover then install the egr inlet pipe-to-water crossover flange bolt and tighten it to 25 nm (18 ft. Lbs.). First install the evap emission canister purge valve then mount the rear lift bracket over the water crossover before installing and tightening the rear lift bracket bolt to 24 nm (18 ft. Lbs.). Screw in and tighten the surge tank inlet fitting to 47 nm (35 ft. Lbs.) before installing the surge tank inlet hose into the fitting. Secure the fuel rail bracket retaining nut to the rear lift bracket with 4 nm (35 inch lbs.). The last installation steps involve connecting the air solenoid vacuum tube and fuel regulator vacuum tube and brake booster vacuum tube then adding the Throttle Body along with the fuel injector sight shield and air cleaner assembly while filling the cooling system.

Related Cadillac Seville Parts
 Cadillac Seville Radiator
 Cadillac Seville A/C Condenser Fan
 Cadillac Seville Coolant Reservoir Cap
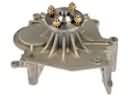 Cadillac Seville Cooling Fan Bracket
 Cadillac Seville Cooling Hose
 Cadillac Seville Fan Motor
 Cadillac Seville Fan Shroud
 Cadillac Seville Radiator Hose
 Cadillac Seville Radiator fan
 Cadillac Seville Thermostat Gasket
 Cadillac Seville Water Pump Gasket
 Cadillac Seville Water Pump Pulley