ChevyParts
My Garage
My Account
Cart
OEM 2001 Cadillac Seville CV Joint
CV Joint Axle- Select Vehicle by Model
- Select Vehicle by VIN
Select Vehicle by Model
orMake
Model
Year
Select Vehicle by VIN
For the most accurate results, select vehicle by your VIN (Vehicle Identification Number).
2 CV Joints found


2001 Cadillac Seville CV Joints, Front Part Number: 26075588
$269.62 MSRP: $609.63You Save: $340.01 (56%)Ships in 1-2 Business DaysProduct Specifications- Other Name: Joint Kit, Front Wheel Drive Axle; CV Joint; Inner CV Joint; Inner Joint; Inner Joint Assembly
- Position: Front
- Item Weight: 6.00 Pounds
- Item Dimensions: 7.5 x 7.2 x 6.5 inches
- Condition: New
- Fitment Type: Direct Replacement
- SKU: 26075588
- Warranty: This genuine part is guaranteed by GM's factory warranty.

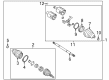
2001 Cadillac Seville CV Joints Part Number: 26075596
Product Specifications- Other Name: Joint Kit; CV Joint; Outer CV Joint; Outer Joint; Inner Joint Assembly; Outer Joint Assembly
- Condition: New
- SKU: 26075596
- Warranty: This genuine part is guaranteed by GM's factory warranty.
2001 Cadillac Seville CV Joint
With a comprehensive array of OEM 2001 Cadillac Seville CV Joint, from fuel pumps to door handles, our website is a one-stop-shop for your needs. All our genuine 2001 Cadillac Seville CV Joint are backed by the manufacturer's warranty and are offered at competitive prices in the market. Rest assured, you can shop with complete confidence.
2001 Cadillac Seville CV Joint Parts and Q&A
- Q: How to replace the inner CV Joint and seal on 2001 Cadillac Seville?A: Start the wheel drive shaft inner joint and seal replacement process with a hand grinder that cuts through the swage ring while protecting the tripot housing . Segment the large seal retaining clamp from the tripot joint using side cutters then discard it. To remove the seal from the halfshaft inboard region separate it from the trilobal bushing on the large diameter space then glide the seal along the bar shaft. To access the components inside the tripot joint spider and halfshaft bar requires removal of the housing. Extract the trilobal tripot bushing from the housing afterwards. Insert j 8059 (J 8059 Snap Ring Pliers) into the spacer ring to expand it before placing the tripot joint spider and spacer ring back onto the halfshaft bar. Use j 8059 j 8059 snap ring pliers to remove the retaining ring from the halfshaft bar groove while sliding off the tripot joint spider assembly alongside the halfshaft bar. Use cleaning solvent to clean all tripot balls along with needle rollers and housing until all contaminants and old grease disappear completely and allow parts to dry. A thorough examination of the halfshaft inboard seal together with the tripot joint spider assembly, housing, trilobal tripot bushing, and needle rollers should determine their presence of damage or wear. Put the new small seal clamp onto the small end of the joint seal before sliding both onto the halfshaft bar. The joint seal's small end needs to be inserted into the joint seal groove found on the halfshaft bar. Set the outboard section of the halfshaft assembly in j 41048 small swage tool before aligning the seal neck top with the indicator of the bottom die and placing the tool's upper half adjacent to the lower portion. Before bolt installation ensure the halfshaft inboard seal remains free of pinch points then begin bolt tightening by hand until proper friction fits are reached. Implement j 41048 (J 41048 Small Swage Tool) by engaging a vise. Place the inboard halfshaft end into the tool. Align the top seal neck with the lower die indicator. Place the tool's upper component over the lower section. Secure the halfshaft inboard seal, housing, and swage ring before torquing each j 41048 bolt at an 180-degree angle while altering bolt sequence until you reach bottom registration. Place the spacer ring on the halfshaft bar into the groove using tool j 8059. Place the tripot joint spider assembly on the halfshaft bar by sliding the counterbored face toward the bar's end so the assembly reaches maximum distance toward the spacer ring . The halfshaft bar retaining ring should go inside its groove with the trilobal tripot bushing fully touching the housing face. Squeeze half the grease from the service kit onto the halfshaft inboard seal before distributing the rest of the grease into the housing for repacking. First install the trilobal tripot bushing in the housing before placing the larger new seal retaining clamp on the halfshaft inboard seal. After that, slide the housing over the tripot joint spider assembly on the halfshaft bar. Insert the large diameter section of the halfshaft inboard seal through the trilobal tripot bushing exterior using the bigger retaining clamp installed first until the seal lip settles into its designated groove while verifying the seal maintains a proper form and size. Install the joint assembly into correct vehicle length then synchronize the halfshaft inboard seal , tri-pot housing , and large seal retaining clamp before latching the components. Use j 35910 (J 35910 Earred Clamp Tool) to crimp the large seal retaining clamp to 176 nm (130 ft. Lbs.) while using j 35910 with the breaker bar and torque wrench attached if needed.
Related 2001 Cadillac Seville Parts
 2001 Cadillac Seville Axle Shaft
 2001 Cadillac Seville CV Boot
 2001 Cadillac Seville Camshaft
 2001 Cadillac Seville Crankshaft
 2001 Cadillac Seville Crankshaft Seal
 2001 Cadillac Seville Crankshaft Thrust Washer Set
 2001 Cadillac Seville Drive Shaft
 2001 Cadillac Seville Head Gasket
 2001 Cadillac Seville Oil Filler Cap
 2001 Cadillac Seville Piston Ring
 2001 Cadillac Seville Timing Chain
 2001 Cadillac Seville Timing Cover Gasket