ChevyParts
My Garage
My Account
Cart
OEM 2002 Cadillac Seville CV Joint
CV Joint Axle- Select Vehicle by Model
- Select Vehicle by VIN
Select Vehicle by Model
orMake
Model
Year
Select Vehicle by VIN
For the most accurate results, select vehicle by your VIN (Vehicle Identification Number).
2 CV Joints found


2002 Cadillac Seville CV Joints, Front Part Number: 26075588
$269.62 MSRP: $609.63You Save: $340.01 (56%)Ships in 1-2 Business DaysProduct Specifications- Other Name: Joint Kit, Front Wheel Drive Axle; CV Joint; Inner CV Joint; Inner Joint; Inner Joint Assembly
- Position: Front
- Item Weight: 6.00 Pounds
- Item Dimensions: 7.5 x 7.2 x 6.5 inches
- Condition: New
- Fitment Type: Direct Replacement
- SKU: 26075588
- Warranty: This genuine part is guaranteed by GM's factory warranty.

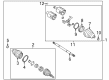
2002 Cadillac Seville CV Joints Part Number: 26075596
Product Specifications- Other Name: Joint Kit; CV Joint; Outer CV Joint; Outer Joint; Inner Joint Assembly; Outer Joint Assembly
- Condition: New
- SKU: 26075596
- Warranty: This genuine part is guaranteed by GM's factory warranty.
2002 Cadillac Seville CV Joint
With a comprehensive array of OEM 2002 Cadillac Seville CV Joint, from fuel pumps to door handles, our website is a one-stop-shop for your needs. All our genuine 2002 Cadillac Seville CV Joint are backed by the manufacturer's warranty and are offered at competitive prices in the market. Rest assured, you can shop with complete confidence.
2002 Cadillac Seville CV Joint Parts and Q&A
- Q: How to replace the outer CV Joint and seal on 2002 Cadillac Seville?A: Standards ensure that both large and small retaining clamps on the CV Joint can be cut using a side cutter before discarding them as waste. Begin by cutting away the small seal retaining clamp from the halfshaft bar with a side cutter and tossing it out. Pull the outboard seal off its attachment to the CV Joint outer race before sliding it away from the operating joint. Use snap ring pliers (J8059) to open the race retaining ring's ears by spreading them after cleaning grease from the CV Joint inner race. Then extract the CV Joint assembly from its bar. Tap the CV Joint cage with a brass drift and hammer to extract the first chrome alloy ball from the bar while performing this process six times until all balls are removed. Position the CV Joint cage in a right angle position relative to the CV Joint outer race centerline and place it so cage windows match the outer race's lands. The CV Joint cage assembly must be separated from the outer race before rotating the inner race 90 degrees toward the cage windows until successful extrusion through the cage window. A thorough cleaning process using cleaning solvent should remove all traces of old grease and contaminants from the inner and outer race assemblies as well as the CV Joint cage and balls before parts receive full drying. Lay the new swage ring onto the joint seal's small end before running it along the halfshaft bar. Slip the small seal end into its designated groove on the halfshaft bar. Place mount drive axle swage ring clamp (J41048) in a vise while positioning the outboard end of the halfshaft assembly into the tool. Swing the top seal neck on the bottom die into position and add the top half of the tool over the lower half. Affirm the seal has no pinched areas. Afterward add the hex bolts followed by hand tightening for smoothness before finishing. Position the swage ring and the seal together before using the ratchet wrench to orient each bolt of j41048 by 180 degrees while alternating between bolts until both sides are tightened to the bottom stage. Following grease application to inner and outer races ball grooves from the kit service you must hold the inner race at 90 degrees to the cage before inserting. First position the cage and inner race at 90-degrees relative to the outer race then insert them together. Follow these steps to place all six chrome balls: first insert the ball then rotate the cage to fit the opposing ball for each subsequent ball placement. To install the CV Joint insert grease into the joint and press it onto the halfshaft bar until the retaining ring properly fits into the groove. The outboard seal must have a flat surface without dimples or stretching; check then rectify any damage. Hand-shape the component when needed to equalize pressure and achieve proper dimensions. Put the outboard seal's big diameter through its large retaining clamp while the outer race remains stationary to let the lip rest within the groove. Drive the seal retaining clamp with j35910 tool and torque wrench along with a breaker bar until clamp reaches 176 nm (130 ft. Lbs.) torque level. During the inspection process verify the gap width of the clamp ear since it should not exceed 2.60mm (0.102 inch). Keep adjusting pressure until reaching correct dimension when the gap measurement surpasses 2.60 mm (0.102 inch).
Related 2002 Cadillac Seville Parts
 2002 Cadillac Seville Axle Shaft
 2002 Cadillac Seville CV Boot
 2002 Cadillac Seville Camshaft
 2002 Cadillac Seville Crankshaft
 2002 Cadillac Seville Crankshaft Seal
 2002 Cadillac Seville Crankshaft Thrust Washer Set
 2002 Cadillac Seville Drive Shaft
 2002 Cadillac Seville Head Gasket
 2002 Cadillac Seville Oil Filler Cap
 2002 Cadillac Seville Piston Ring
 2002 Cadillac Seville Timing Chain
 2002 Cadillac Seville Timing Cover Gasket