ChevyParts
My Garage
My Account
Cart
OEM 2002 Cadillac Eldorado CV Joint
CV Joint Axle- Select Vehicle by Model
- Select Vehicle by VIN
Select Vehicle by Model
orMake
Model
Year
Select Vehicle by VIN
For the most accurate results, select vehicle by your VIN (Vehicle Identification Number).
2 CV Joints found


2002 Cadillac Eldorado CV Joints, Front Part Number: 26075588
$269.62 MSRP: $609.63You Save: $340.01 (56%)Ships in 1-2 Business DaysProduct Specifications- Other Name: Joint Kit, Front Wheel Drive Axle; CV Joint; Inner CV Joint; Inner Joint; Inner Joint Assembly
- Position: Front
- Item Weight: 6.00 Pounds
- Item Dimensions: 7.5 x 7.2 x 6.5 inches
- Condition: New
- Fitment Type: Direct Replacement
- SKU: 26075588
- Warranty: This genuine part is guaranteed by GM's factory warranty.

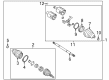
2002 Cadillac Eldorado CV Joints Part Number: 26075596
Product Specifications- Other Name: Joint Kit; CV Joint; Outer CV Joint; Outer Joint; Inner Joint Assembly; Outer Joint Assembly
- Condition: New
- SKU: 26075596
- Warranty: This genuine part is guaranteed by GM's factory warranty.
2002 Cadillac Eldorado CV Joint
With a comprehensive array of OEM 2002 Cadillac Eldorado CV Joint, from fuel pumps to door handles, our website is a one-stop-shop for your needs. All our genuine 2002 Cadillac Eldorado CV Joint are backed by the manufacturer's warranty and are offered at competitive prices in the market. Rest assured, you can shop with complete confidence.
2002 Cadillac Eldorado CV Joint Parts and Q&A
- Q: How to replace the inner CV Joint and seal on 2002 Cadillac Eldorado?A: Replacing the wheel drive shaft inner joint and seal requires these essential tools: snap ring pliers (J 8059) and drive axle seal clamp pliers (J 35910) and drive axle swage ring clamp (J 41048). You will need three specific tools for this job: snap ring pliers (J 8059), drive axle seal clamp pliers (J 35910), and drive axle swage ring clamp (J 41048). Start by checking for corrosion on the transmission sealing surface of the halfshaft before you clean it with 320 grit cloth if needed. A hand grinder will cut the swage ring without harming the tripot housing. Remove the large boot retaining clamp while disposing of it properly and avoid severing the wheel drive shaft's inboard seal. The inboard boot of the halfshaft requires removal from the trilobal bushing before sliding the boot away to extract the housing containing the spider and bar of the tripot joint. Clean the tripot balls and needle rollers and housing with cleaning solvent while you simultaneously discard the trilobal tripot bushing then remove all old grease and contaminants. Examine both halfshaft inboard boot and the tripot joint spider assembly and housing and needle rollers for possible wear and damage. During installation fit a fresh small boot clamp onto the joint boot before sliding both onto the halfshaft bar while maintaining the correct position within the boot groove. Mount the drive axle swage ring clamp (J 41048) into a vise to clamp the inboard end of the halfshaft assembly before aligning the boot neck using proper torque on the bolts. Secure each bolt of j 41048 with 180-degree rotations when aligning the inboard boot of the halfshaft and swage ring together with the halfshaft bar. Place the spacer ring on the halfshaft bar with snap ring pliers (J 8059) while facing the tripot joint spider assembly in the correct direction. Guide the tripot joint spider assembly onto the halfshaft bar before adding a retaining ring and grease to the halfshaft inboard boot and housing. The installation involves placing the trilobal tripot bushing in the housing before applying the larger boot retaining clamp onto the inboard halfshaft boot. Position the assembly. Shape the halfshaft inboard boot properly before setting the joint assembly into the correct vehicle measurement. The final step requires joint part alignment followed by large retaining clamp crimping onto the specified torque setting with drive axle seal clamp pliers (J 35910).
Related 2002 Cadillac Eldorado Parts
 2002 Cadillac Eldorado Automatic Transmission Filter
 2002 Cadillac Eldorado Automatic Transmission Shift Levers
 2002 Cadillac Eldorado Automatic Transmission Shifter
 2002 Cadillac Eldorado CV Boot
 2002 Cadillac Eldorado Flywheel
 2002 Cadillac Eldorado Transmission Assembly
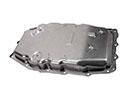 2002 Cadillac Eldorado Transmission Pan