ChevyParts
My Garage
My Account
Cart
OEM 2003 Cadillac CTS Crankshaft Position Sensor
Engine Crankshaft Position Sensor- Select Vehicle by Model
- Select Vehicle by VIN
Select Vehicle by Model
orMake
Model
Year
Select Vehicle by VIN
For the most accurate results, select vehicle by your VIN (Vehicle Identification Number).
1 Crankshaft Position Sensor found

2003 Cadillac CTS Crankshaft Position Sensor Part Number: 90494182
Product Specifications- Other Name: Sensor, Distributor (Also Knock Sensor); Engine Crankshaft Position Sensor; Crankshaft Sensor
- Replaces: 90540743
- Item Weight: 0.50 Pounds
- Item Dimensions: 10.6 x 9.3 x 1.3 inches
- Condition: New
- Fitment Type: Direct Replacement
- SKU: 90494182
- Warranty: This genuine part is guaranteed by GM's factory warranty.
2003 Cadillac CTS Crankshaft Position Sensor
With a comprehensive array of OEM 2003 Cadillac CTS Crankshaft Position Sensor, from fuel pumps to door handles, our website is a one-stop-shop for your needs. All our genuine 2003 Cadillac CTS Crankshaft Position Sensor are backed by the manufacturer's warranty and are offered at competitive prices in the market. Rest assured, you can shop with complete confidence.
2003 Cadillac CTS Crankshaft Position Sensor Parts Questions & Experts Answers
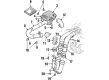
- Q: How to service and repair the Crankshaft Position Sensor on 2003 Cadillac CTS?A: To service and repair the Crankshaft Position Sensor, do the following: raise and support the vehicle first. And after removing the bolt supporting the crankshaft position (CKP), sensor on the engine block, then pull the ckp sensor and the o-ring seal. Lower down the vehicle, and remove the components according to the rpo code in order to reach the ckp sensor pigtail which may include the Wiper Motor module (LHD), the left air inlet grill panel (RHD), the front air inlet panel assembly bolts and the front air inlet panel assembly. Remove the wiring harness connector out of ckp sensor pigtail and remove pigtail from the retainer. Cut the tie strap connecting pigtail to the oil cooler pipes, - attach a scrap wire of approximately 91 cm (36 in.) to the ckp sensor pigtail for later use as a pull wire. Take the pigtail ckp sensor off and inspect the routing while pulling it down on the routing. Remove the sensor from the pull wire. For installation, tie the ckp sensor pigtail to the bottom of the pull wire and use it to guide to reformulate lead the pigtail in position. After detaching the pull wire from the sensor pigtail, link the ckp sensor pigtail to the retainer and the wiring harness connector. Raise and support the vehicle once more, clean the mating surfaces of ckp sensor and the engine block and install ckp sensor with new o-ring seal into the engine block. Fix the sensor with the bolt and tighten it up to 8 n.m (71 lb in). Check the harness for correct application and be sure that it does not touch the exhaust manifold and then drop the vehicle. Secure the ckp sensor pigtail to the oil cooler pipes with a tie strap and replace the components according to the rpo code - the Wiper Motor module if lhd, the front air inlet panel assembly, tighten the front air inlet panel assembly bolts at 6 n.m (53 lb. In.), and left air inlet grill panel if rhd.
Related 2003 Cadillac CTS Parts
 2003 Cadillac CTS Body Control Module
 2003 Cadillac CTS Camshaft Position Sensor
 2003 Cadillac CTS Ignition Coil
 2003 Cadillac CTS Mass Air Flow Sensor
 2003 Cadillac CTS Neutral Safety Switch
 2003 Cadillac CTS Oxygen Sensor
 2003 Cadillac CTS Coolant Temperature Sensor
 2003 Cadillac CTS Automatic Transmission Shift Position Sensor Switch
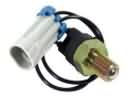 2003 Cadillac CTS Back Up Light Switch
 2003 Cadillac CTS Engine Control Module
 2003 Cadillac CTS Knock Sensor
 2003 Cadillac CTS Secondary Air Injection Check Valve