ChevyParts
My Garage
My Account
Cart
OEM 2004 Chevrolet Astro Weather Strip
Door Weatherstripping- Select Vehicle by Model
- Select Vehicle by VIN
Select Vehicle by Model
orMake
Model
Year
Select Vehicle by VIN
For the most accurate results, select vehicle by your VIN (Vehicle Identification Number).
13 Weather Strips found


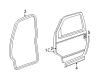
2004 Chevrolet Astro Door Weatherstrip, Front Part Number: 15161704
$61.98 MSRP: $92.25You Save: $30.27 (33%)Ships in 1-3 Business DaysProduct Specifications- Other Name: Weatherstrip Assembly-Front Side Door; Door Seal; Weatherstrip, Side Door Opening; Weatherstrip
- Position: Front
- Replaces: 15153988, 15734776, 15683709, 15757491, 15683632, 15683631, 15015746
- Item Weight: 3.10 Pounds
- Item Dimensions: 19.5 x 17.5 x 6.8 inches
- Condition: New
- Fitment Type: Direct Replacement
- Require Quantity: 2
- SKU: 15161704
- Warranty: This genuine part is guaranteed by GM's factory warranty.


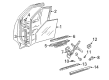
2004 Chevrolet Astro Belt Weatherstrip, Front Part Number: 15757529
$118.51 MSRP: $177.19You Save: $58.68 (34%)Product Specifications- Other Name: Weatherstrip Assembly-Front Side Door Window *Marked Print; Weatherstrip, Side Door Window Glass; Weatherstrip
- Position: Front
- Replaces: 15018966, 15725439
- Item Weight: 0.60 Pounds
- Item Dimensions: 35.0 x 2.8 x 1.0 inches
- Condition: New
- Fitment Type: Direct Replacement
- Require Quantity: 2
- SKU: 15757529
- Warranty: This genuine part is guaranteed by GM's factory warranty.


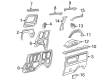
2004 Chevrolet Astro Weatherstrip Part Number: 15715694
Product Specifications- Other Name: Weatherstrip, Body Side Window; Weatherstrip, Side Door Window Glass
- Position: Front
- Replaces: 15532474
- Item Weight: 2.40 Pounds
- Item Dimensions: 54.8 x 16.6 x 0.9 inches
- Condition: New
- Fitment Type: Direct Replacement
- SKU: 15715694
- Warranty: This genuine part is guaranteed by GM's factory warranty.

 Product Specifications
- Other Name: Weatherstrip Assembly-Rear Door; Weatherstrip, Rear Door Opening
- Position: Rear Passenger Side
- Replaces: 15155606, 15998608
- Item Weight: 1.70 Pounds
- Item Dimensions: 14.7 x 13.9 x 6.9 inches
- Condition: New
- Fitment Type: Direct Replacement
- SKU: 15047000
- Warranty: This genuine part is guaranteed by GM's factory warranty.
- Product Specifications
- Other Name: Weatherstrip Assembly-Rear Door; Weatherstrip, Rear Door Opening
- Position: Rear Driver Side
- Replaces: 15155605, 15712013
- Item Weight: 1.30 Pounds
- Item Dimensions: 57.9 x 30.6 x 10.1 inches
- Condition: New
- Fitment Type: Direct Replacement
- SKU: 15046999
- Warranty: This genuine part is guaranteed by GM's factory warranty.
 Product Specifications
- Other Name: Weatherstrip Assembly-Rear Door; Weatherstrip, Rear Door Opening
- Position: Rear Passenger Side
- Replaces: 15155608, 15705320
- Item Weight: 2.00 Pounds
- Item Dimensions: 61.2 x 33.0 x 1.2 inches
- Condition: New
- Fitment Type: Direct Replacement
- SKU: 15766706
- Warranty: This genuine part is guaranteed by GM's factory warranty.
 Product Specifications
- Other Name: Weatherstrip Assembly-Rear Door; Weatherstrip, Rear Door Opening
- Position: Rear Driver Side
- Replaces: 15155607
- Item Weight: 1.60 Pounds
- Item Dimensions: 12.1 x 11.8 x 4.0 inches
- Condition: New
- Fitment Type: Direct Replacement
- SKU: 15766705
- Warranty: This genuine part is guaranteed by GM's factory warranty.

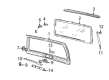
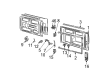
2004 Chevrolet Astro Weatherstrip, Rear Part Number: 15751726
Product Specifications- Other Name: Weatherstrip, Rear Compartment Lid Or Tailgate; Weatherstrip, End Gate Top And Bottom
- Position: Rear
- Replaces: 15155604, 15996652
- Item Weight: 2.00 Pounds
- Item Dimensions: 81.9 x 7.0 x 24.5 inches
- Condition: New
- Fitment Type: Direct Replacement
- SKU: 15751726
- Warranty: This genuine part is guaranteed by GM's factory warranty.

2004 Chevrolet Astro Weatherstrip Part Number: 15101551
Product Specifications- Other Name: Weatherstrip, Door Weatherstrip; Door Seal; Weatherstrip, Side Door Opening
- Position: Rear
- Replaces: 15734777, 15089422, 15153987
- Item Weight: 3.80 Pounds
- Item Dimensions: 17.9 x 17.4 x 3.1 inches
- Condition: New
- Fitment Type: Direct Replacement
- SKU: 15101551
- Warranty: This genuine part is guaranteed by GM's factory warranty.

2004 Chevrolet Astro Channel Part Number: 15006881
Product Specifications- Other Name: Run, Side Door Window Sash; Window Channel; Weatherstrip; Door Seal; Weatherstrip, Side Door Window Glass
- Position: Front
- Replaces: 15717457, 15717458
- Item Weight: 2.90 Pounds
- Item Dimensions: 5.9 x 19.0 x 17.8 inches
- Condition: New
- Fitment Type: Direct Replacement
- SKU: 15006881
- Warranty: This genuine part is guaranteed by GM's factory warranty.

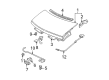
2004 Chevrolet Astro Rear Seal Part Number: 15714411
Product Specifications- Other Name: Seal, Hood Panel
- Position: Rear
- Item Weight: 1.20 Pounds
- Item Dimensions: 10.1 x 9.4 x 4.3 inches
- Condition: New
- Fitment Type: Direct Replacement
- SKU: 15714411
- Warranty: This genuine part is guaranteed by GM's factory warranty.
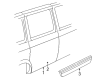
 Product Specifications
- Other Name: Seal, Body Side Window; Weatherstrip; Sealing Strip, Side Door Window Glass
- Position: Passenger Side
- Item Weight: 0.60 Pounds
- Item Dimensions: 30.2 x 3.6 x 1.1 inches
- Condition: New
- Fitment Type: Direct Replacement
- SKU: 15650744
- Warranty: This genuine part is guaranteed by GM's factory warranty.
- Product Specifications
- Other Name: Seal, Body Side Window; Weatherstrip; Sealing Strip, Side Door Window Glass
- Position: Driver Side
- Item Weight: 0.60 Pounds
- Item Dimensions: 36.0 x 3.7 x 0.8 inches
- Condition: New
- Fitment Type: Direct Replacement
- SKU: 15650743
- Warranty: This genuine part is guaranteed by GM's factory warranty.
2004 Chevrolet Astro Weather Strip
With a comprehensive array of OEM 2004 Chevrolet Astro Weather Strip, from fuel pumps to door handles, our website is a one-stop-shop for your needs. All our genuine 2004 Chevrolet Astro Weather Strip are backed by the manufacturer's warranty and are offered at competitive prices in the market. Rest assured, you can shop with complete confidence.
2004 Chevrolet Astro Weather Strip Parts and Q&A
- Q: How to replace the Front Side Door Upper Auxiliary Weather Strip on 2004 Chevrolet Astro?A: The process to replace Front Side Door Upper Auxiliary Sealing Strip involves first pulling the molding off its molding flange before the removal of the molding itself. Place the molding on the flange so that you start from the pre-shaped corners while moving towards the straight sections.
Related 2004 Chevrolet Astro Parts
 2004 Chevrolet Astro Door Latch Assembly
 2004 Chevrolet Astro Door Lock
 2004 Chevrolet Astro Door Striker
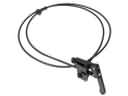 2004 Chevrolet Astro Hood Cable
 2004 Chevrolet Astro Lift Support
 2004 Chevrolet Astro Tailgate Latch
 2004 Chevrolet Astro Tailgate Lift Support
 2004 Chevrolet Astro Tailgate Lock
 2004 Chevrolet Astro Trunk Latch
 2004 Chevrolet Astro Trunk Lock Cylinder
 2004 Chevrolet Astro Window Channel
 2004 Chevrolet Astro Window Motor