ChevyParts
My Garage
My Account
Cart
OEM 2006 Cadillac STS Evaporator
A/C Evaporator Core- Select Vehicle by Model
- Select Vehicle by VIN
Select Vehicle by Model
orMake
Model
Year
Select Vehicle by VIN
For the most accurate results, select vehicle by your VIN (Vehicle Identification Number).
1 Evaporator found

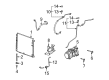
2006 Cadillac STS Evaporator Core Part Number: 89022546
$123.80 MSRP: $232.48You Save: $108.68 (47%)Ships in 1-2 Business DaysProduct Specifications- Other Name: Evaporator Kit, Air Conditioner Evaporator; A/C Evaporator Core Repair Kit; A/C Evaporator Core; A/C Evaporator; Evaporator; Evaporator Kit, A/C Evaporator
- Item Weight: 5.50 Pounds
- Item Dimensions: 16.5 x 13.8 x 12.6 inches
- Condition: New
- Fitment Type: Direct Replacement
- SKU: 89022546
- Warranty: This genuine part is guaranteed by GM's factory warranty.
2006 Cadillac STS Evaporator
With a comprehensive array of OEM 2006 Cadillac STS Evaporator, from fuel pumps to door handles, our website is a one-stop-shop for your needs. All our genuine 2006 Cadillac STS Evaporator are backed by the manufacturer's warranty and are offered at competitive prices in the market. Rest assured, you can shop with complete confidence.
2006 Cadillac STS Evaporator Parts and Q&A
- Q: How to replace the evaporator core on 2006 Cadillac STS?A: You should start the Evaporator core replacement by removing the hvac module assembly followed by discarding insulation from the thermal expansion valve (TXV). Start the process by removing first the hvac line clamp screw and then the clamp itself before disassembling both txv to Evaporator bolts and finally the txv line bracket. Wipe out the txv from the Evaporator core while disposing all o-rings. Remove the electrical connectors of the thermistor from both the hvac module retainer and the lh and auxiliary temperature actuators before placing the harnesses back in their original position. The front duct can be freed from the hvac module through retainer release and by unscrewing the case to separate it until the Evaporator core is extracted. Before moving on to installation steps start by adding refrigerant oil before installing both new Evaporator core seals and the core unit but do not push the unit into the hvac module since this may harm the thermistor. The installation requires linking both hvac module case sections by aligning temperature and mode doors with their respective slots before securing them with screws that should tighten to 1 n.m (8 lb in). Reposition the wire harness and then attach the lower left (LH) and auxiliary temperature actuator electrical connectors before connecting the thermistor electrical connector. The service technician should install new o-rings on the Evaporator core and txv lines before connecting the a/c system lines to the txv. Secure the txv onto the Evaporator core by carefully inserting it and install the txv line bracket then tighten the Evaporator bolts to 3.5 n.m (31 lb in). To finalize these steps the hvac line clamp gets installed with its screw tightened to 1 n.m (8 lb in), after which all insulation should be reinstalled covering lines and txv before the hvac module installation.
Related 2006 Cadillac STS Parts
 2006 Cadillac STS Cabin Air Filter
 2006 Cadillac STS A/C Accumulator
 2006 Cadillac STS A/C Compressor
 2006 Cadillac STS A/C Compressor Cut-Out Switches
 2006 Cadillac STS A/C Expansion Valve
 2006 Cadillac STS A/C Hose
 2006 Cadillac STS A/C Orifice Tube
 2006 Cadillac STS A/C System Valve Core
 2006 Cadillac STS Bed Mounting Hardware
 2006 Cadillac STS Blend Door Actuator
 2006 Cadillac STS HVAC Pressure Switch
 2006 Cadillac STS Heater Core