ChevyParts
My Garage
My Account
Cart
OEM 2010 Chevrolet Colorado Emblem
Badge- Select Vehicle by Model
- Select Vehicle by VIN
Select Vehicle by Model
orMake
Model
Year
Select Vehicle by VIN
For the most accurate results, select vehicle by your VIN (Vehicle Identification Number).
4 Emblems found

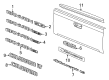
2010 Chevrolet Colorado Emblem Part Number: 84689784
$11.42 MSRP: $17.00You Save: $5.58 (33%)Ships in 1-3 Business DaysProduct Specifications- Other Name: Emblem, Front Side Door; Decal; Nameplate; Emblem, Cab, Load Carrier, Rear End, Door, Quarter Panel, Fender, Rocker Panel, Side Step.
- Replaces: 15223483, 15223484
- Condition: New
- Fitment Type: Direct Replacement
- SKU: 84689784
- Warranty: This genuine part is guaranteed by GM's factory warranty.

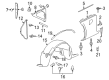
2010 Chevrolet Colorado Nameplate, Rear Part Number: 15805322
$103.76 MSRP: $154.43You Save: $50.67 (33%)Ships in 1-3 Business DaysProduct Specifications- Other Name: Emblem, End Gate And Rear Door Decoration; Plate, End Gate And Rear Door Decoration
- Position: Rear
- Item Weight: 0.40 Pounds
- Item Dimensions: 19.8 x 1.9 x 0.4 inches
- Condition: New
- Fitment Type: Direct Replacement
- SKU: 15805322
- Warranty: This genuine part is guaranteed by GM's factory warranty.

2010 Chevrolet Colorado Nameplate, Rear Part Number: 15869661
$90.14 MSRP: $134.16You Save: $44.02 (33%)Ships in 1-3 Business DaysProduct Specifications- Other Name: Emblem, End Gate And Rear Door Decoration
- Position: Rear
- Item Weight: 0.40 Pounds
- Item Dimensions: 2.2 x 18.9 x 0.3 inches
- Condition: New
- Fitment Type: Direct Replacement
- SKU: 15869661
- Warranty: This genuine part is guaranteed by GM's factory warranty.


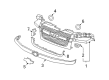
2010 Chevrolet Colorado Emblem, Front Part Number: 10357171
$117.32 MSRP: $175.40You Save: $58.08 (34%)Product Specifications- Other Name: Emblem, Radiator Grille And Front End Ornamentation; Emblem, Front Bumper
- Position: Front
- Replaces: 15199885
- Item Weight: 1.30 Pounds
- Item Dimensions: 8.9 x 3.6 x 3.5 inches
- Condition: New
- Fitment Type: Direct Replacement
- SKU: 10357171
- Warranty: This genuine part is guaranteed by GM's factory warranty.
2010 Chevrolet Colorado Emblem
With a comprehensive array of OEM 2010 Chevrolet Colorado Emblem, from fuel pumps to door handles, our website is a one-stop-shop for your needs. All our genuine 2010 Chevrolet Colorado Emblem are backed by the manufacturer's warranty and are offered at competitive prices in the market. Rest assured, you can shop with complete confidence.
2010 Chevrolet Colorado Emblem Parts and Q&A
- Q: How to replace the Pickup Box Side Emblem and Side Rear Nameplate on 2010 Chevrolet Colorado?A: Before working on the Colorado protect the Pickup Box Side Emblem and Side Rear Nameplate from damage by covering them with tape. Keep the J 25070 heat gun 6 inches away from the surface and apply it in circular motions to warm the decal for 30 seconds. Take a plastic mini tool to loosen the decal from the painted surface while heating it with a 3M(TM) Scotch Brite molding adhesive remover disk (3M(TM) P/N 07501) or equivalent. Clear the painted area with VMP naphtha followed by taking out the tail lamp. Whenever no decal location appears on the body, use strips to establish 207.1 mm (8.15 in) from the pickup box top edge to the top sticker area and 71.8 mm (2.83 in) from the sticker edge to the tail lamp opening. Set the J 25070 heat gun to 21°C (70°F) minimum and heat the door surface with care to avoid touching the decal backing. Press the decal sticker on the painted surface starting from its front end following backing removal. Press the decal against the panel and work your way down to secure proper attachment. Check that the decal has secured to the surface. Finish the process by taking off the tape from the decal area then putting back the tail lamp.
Related 2010 Chevrolet Colorado Parts
 2010 Chevrolet Colorado Window Motor
 2010 Chevrolet Colorado Center Console Base
 2010 Chevrolet Colorado Door Hinge
 2010 Chevrolet Colorado Door Latch Assembly
 2010 Chevrolet Colorado Door Lock
 2010 Chevrolet Colorado Door Moldings
 2010 Chevrolet Colorado Front Cross-Member
 2010 Chevrolet Colorado Hood Cable
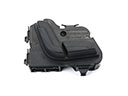 2010 Chevrolet Colorado Seat Switch
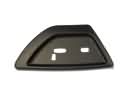 2010 Chevrolet Colorado Seat Switch Panel
 2010 Chevrolet Colorado Weather Strip
 2010 Chevrolet Colorado Window Channel