ChevyParts
My Garage
My Account
Cart
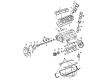
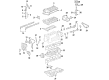
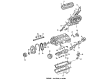
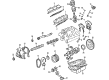
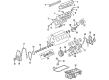
OEM Buick Cam Gear
Camshaft Gear- Select Vehicle by Model
- Select Vehicle by VIN
Select Vehicle by Model
orMake
Model
Year
Select Vehicle by VIN
For the most accurate results, select vehicle by your VIN (Vehicle Identification Number).
60 Cam Gears found


Buick Camshaft Gear Part Number: 340235
$58.88 MSRP: $92.23You Save: $33.35 (37%)Ships in 1-3 Business DaysProduct Specifications- Other Name: Sprocket, Camshaft; Variable Valve Timing Sprocket; Timing Gear; Cam Gear; Timing Gear Set; Sprocket, Engine Camshaft; Gear, Engine Camshaft


Buick Camshaft Gear Part Number: 24100362
$46.75 MSRP: $112.72You Save: $65.97 (59%)Product Specifications- Other Name: Sprocket, Camshaft; Variable Valve Timing Sprocket; Cam Gear; Sprocket; Sprocket, Engine Camshaft

Buick Camshaft Gear Part Number: 12552128
$111.44 MSRP: $223.75You Save: $112.31 (51%)Ships in 1-2 Business DaysProduct Specifications- Other Name: Sprocket, Engine Camshaft; Variable Valve Timing Sprocket; Timing Gear; Cam Gear; Timing Gear Set


Buick Camshaft Gear Part Number: 24505393
$51.87 MSRP: $81.23You Save: $29.36 (37%)Ships in 1-3 Business DaysProduct Specifications- Other Name: Sprocket, Engine Camshaft; Variable Valve Timing Sprocket; Cam Gear


Buick Camshaft Gear, Driver Side Part Number: 12597413
$84.46 MSRP: $132.30You Save: $47.84 (37%)Ships in 1-3 Business DaysProduct Specifications- Other Name: Sprocket, Camshaft; Variable Valve Timing Sprocket; Cam Gear; Intermediate Gear; Sprocket, Engine Camshaft
- Position: Driver Side


Buick Camshaft Gear Part Number: 24505306
$55.09 MSRP: $86.30You Save: $31.21 (37%)Ships in 1-3 Business DaysProduct Specifications- Other Name: Sprocket, Camshaft; Variable Valve Timing Sprocket; Timing Gear; Cam Gear; Timing Gear Set; Sprocket, Engine Camshaft

Buick Camshaft Gear, Passenger Side Part Number: 12597414
$84.46 MSRP: $132.30You Save: $47.84 (37%)Ships in 1-3 Business DaysProduct Specifications- Other Name: Sprocket, Camshaft; Variable Valve Timing Sprocket; Cam Gear; Intermediate Gear; Sprocket, Engine Camshaft
- Position: Passenger Side


Buick Camshaft Gear Part Number: 10166350
$29.75 MSRP: $56.86You Save: $27.11 (48%)Ships in 1-2 Business DaysProduct Specifications- Other Name: Sprocket, Engine Camshaft; Variable Valve Timing Sprocket; Timing Gear; Cam Gear; Timing Gear Set

Buick Actuator Part Number: 25203207
$132.31 MSRP: $227.24You Save: $94.93 (42%)Ships in 1-3 Business DaysProduct Specifications- Other Name: Actuator, Engine Camshaft
- Replaces: 12638661

Buick Camshaft Gear Part Number: 24506089
$44.91 MSRP: $70.35You Save: $25.44 (37%)Ships in 1-3 Business DaysProduct Specifications- Other Name: Sprocket, Engine Camshaft; Variable Valve Timing Sprocket; Timing Gear; Cam Gear; Timing Gear Set
Buick Actuator Part Number: 25203205
$132.61 MSRP: $227.75You Save: $95.14 (42%)Ships in 1-2 Business DaysProduct Specifications- Other Name: Actuator, Engine Camshaft
- Replaces: 12627114
Buick Actuator Part Number: 55512042
$61.99 MSRP: $97.10You Save: $35.11 (37%)Ships in 1-3 Business DaysProduct Specifications- Other Name: Sprocket Assembly-Camshaft Intake (W/ Camshaft Position A; Sprocket, Engine Camshaft
Buick Actuator Part Number: 55512041
$102.33 MSRP: $160.31You Save: $57.98 (37%)Ships in 1-3 Business DaysProduct Specifications- Other Name: Sprocket Assembly-Camshaft Exhaust (W/Camshaft Position AC; Sprocket, Engine Camshaft

Buick Actuator Part Number: 12684805
$120.56 MSRP: $205.24You Save: $84.68 (42%)Ships in 1-2 Business DaysProduct Specifications- Other Name: Actuator, Engine Camshaft
- Replaces: 12661007
Buick Actuator Part Number: 12698849
$60.39 MSRP: $94.60You Save: $34.21 (37%)Ships in 1-3 Business DaysProduct Specifications- Other Name: Actuator Assembly-Camshaft Position Intake; Actuator, Engine Camshaft
- Replaces: 12674561
Buick Actuator Part Number: 25203206
$132.61 MSRP: $227.75You Save: $95.14 (42%)Ships in 1-2 Business DaysProduct Specifications- Other Name: Actuator, Engine Camshaft
- Replaces: 12627115
Buick Actuator Part Number: 12674562
$58.95 MSRP: $101.24You Save: $42.29 (42%)Ships in 1-2 Business DaysProduct Specifications- Other Name: Actuator Assembly-Camshaft Position Exhaust; Actuator, Engine Camshaft
- Replaced by: 12698848
Buick Actuator Part Number: 55494199
$75.90 MSRP: $118.89You Save: $42.99 (37%)Product Specifications- Other Name: Sprocket Assembly-Camshaft (W/ Camshaft Position Actuator); Sprocket, Engine Camshaft


Buick Camshaft Gear Part Number: 12575882
Product Specifications- Other Name: Sprocket, Engine Camshaft; Variable Valve Timing Sprocket; Timing Gear; Cam Gear; Timing Gear Set
- Replaces: 12574990

Buick Actuator Assembly Part Number: 12580314
$143.94 MSRP: $226.48You Save: $82.54 (37%)Product Specifications- Other Name: Actuator, Engine Camshaft; Actuator
| Page 1 of 3 |Next >
1-20 of 60 Results
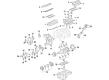
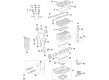
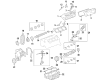
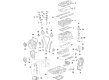
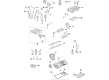
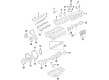
Buick Cam Gear
Choose OEM Cam Gear, you're making the optimal decision for superior quality and perfect performance. You can feel confident because each component goes through stringent quality checks. Every part is carefully built to comply with Buick's factory specifications. You'll enjoy a smooth, worry-free installation that fits just right. At ChevyPartsGiant.com, you'll find it easy to get top-quality OEM Buick Cam Gear. You can shop at highly competitive prices and protect your budget. All our genuine Buick parts include a dependable manufacturer's warranty. You'll also appreciate our straightforward return policy and swift delivery services for extra convenience.
Buick Cam Gear Parts and Q&A
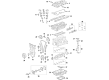
- Q: How to replace the primary cam gear and timing chain on Buick Enclave?A:To change the timing chain and sprockets, start by removing the engine front cover, then remove the spark plugs in order to facilitate the rotation of the Crankshaft. Then, remove the right bank secondary camshaft drive chain tensioner, secondary camshaft drive chain shoe, and secondary camshaft drive chain guide and then take out the right bank secondary camshaft drive chain. Follow to the removal of the Timing Chain Tensioner, in conjunction with the upper guide and the timing chain, the Crankshaft sprocket from the nose of the Crankshaft shall also be removed. For installation, ensure that the Crankshaft sprocket position has the timing mark visible and in line with the pin on Crankshaft, sliding it over until the sprocket contacts the step in the Crankshaft. Check the Crankshaft's position at stage one timing position with the timing mark in stage one timing mark on the oil pump cover using the en 46111. Mount the timing chain, then primary upper camshaft drive chain guide and finally installing the Timing Chain Tensioner. Next, install the right bank secondary camshaft drive chain, its guide, shoe, as well as the tensioner. Lastly, replace the spark plugs and the engine front cover.
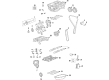
- Q: How to replace the primary cam gear and timing chain on Buick LaCrosse?A:It is important to remove the engine front cover when you want to replace the timing chain and sprockets. Next, pull out the right bank secondary camshaft drive chain tensioner, then the right bank secondary camshaft drive chain shoe, and finally, right bank secondary camshaft drive chain guide. And then, take the chains off from the right bank secondary camshaft drive and the Timing Chain Tensioner. Next, remove the timing chain upper guide and the timing chain. For installation, install the timing chain (120), primary upper camshaft drive chain guide (122) and Timing Chain Tensioner (123) respectively. Then install the right bank secondary camshaft drive chain (124), the right bank secondary camshaft drive chain guide (125), the right bank secondary camshaft drive chain shoe (126) and eventually the right bank secondary camshaft drive chain tensioner (127). Finish the process by replacing the engine front cover.


Related Buick Parts
 Buick Head Gasket
 Buick Oil Filter
 Buick Oil Pump
 Buick Balance Shaft Bearing Set
 Buick Crankshaft Pulley
 Buick Dipstick Tube
 Buick Motor And Transmission Mount
 Buick Oil Pan
 Buick Piston
 Buick Pushrod
 Buick Timing Chain Guide
 Buick Valve Cover Grommet