ChevyParts
My Garage
My Account
Cart
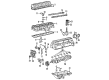
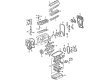
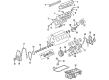
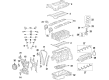
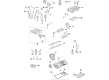
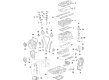
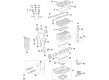
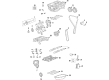
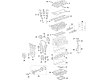
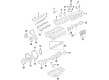
OEM Buick Camshaft
Cam- Select Vehicle by Model
- Select Vehicle by VIN
Select Vehicle by Model
orMake
Model
Year
Select Vehicle by VIN
For the most accurate results, select vehicle by your VIN (Vehicle Identification Number).
106 Camshafts found


Buick Intake Camshaft Part Number: 12586533
$163.78 MSRP: $271.05You Save: $107.27 (40%)Ships in 1-2 Business DaysProduct Specifications- Other Name: Camshaft, Engine; Camshaft

Buick Camshaft Part Number: 24574243
$212.51 MSRP: $510.42You Save: $297.91 (59%)Ships in 1-2 Business DaysProduct Specifications- Other Name: Camshaft, Engine


Buick Camshaft Part Number: 12666075
$87.96 MSRP: $137.78You Save: $49.82 (37%)Ships in 1-2 Business DaysProduct Specifications- Other Name: Camshaft Assembly-Intake; Camshaft, Engine

Buick Camshaft Part Number: 12569525
$93.79 MSRP: $124.20You Save: $30.41 (25%)Ships in 1-2 Business DaysProduct Specifications- Other Name: Camshaft, Engine
Buick Camshaft Part Number: 25198110
$217.11 MSRP: $341.61You Save: $124.50 (37%)Ships in 1-3 Business DaysProduct Specifications- Other Name: Camshaft, Engine
- Replaced by: 55565289


Buick Camshaft Part Number: 12632272
$80.37 MSRP: $125.85You Save: $45.48 (37%)Ships in 1-3 Business DaysProduct Specifications- Other Name: Camshaft, Engine
Buick Camshaft Part Number: 12688075
$82.08 MSRP: $128.55You Save: $46.47 (37%)Ships in 1-3 Business DaysProduct Specifications- Other Name: Camshaft Assembly-Intake; Camshaft, Engine
- Replaced by: 25206538
Buick Camshaft Part Number: 55513165
$376.00 MSRP: $591.49You Save: $215.49 (37%)Ships in 1-3 Business DaysProduct Specifications- Other Name: Camshaft, Engine


Buick Camshaft Part Number: 12677832
$70.88 MSRP: $111.05You Save: $40.17 (37%)Ships in 1-3 Business DaysProduct Specifications- Other Name: Camshaft, Engine
- Replaces: 12647871

Buick Intake Camshaft Part Number: 12626896
$192.61 MSRP: $303.05You Save: $110.44 (37%)Ships in 1-2 Business DaysProduct Specifications- Other Name: Camshaft Assembly-Intake; Camshaft; Camshaft, Engine
Buick Camshaft Part Number: 12666073
$66.76 MSRP: $104.55You Save: $37.79 (37%)Ships in 1-3 Business DaysProduct Specifications- Other Name: Camshaft Assembly-Intake; Camshaft, Engine
Buick Camshaft Part Number: 12688074
$90.15 MSRP: $141.18You Save: $51.03 (37%)Ships in 1-3 Business DaysProduct Specifications- Other Name: Camshaft, Engine
- Replaced by: 25206537
Buick Camshaft Part Number: 55508597
$79.78 MSRP: $124.94You Save: $45.16 (37%)Ships in 1-3 Business DaysProduct Specifications- Other Name: Camshaft, Engine
- Replaced by: 25205338

Buick Camshaft Part Number: 12675773
$64.37 MSRP: $155.19You Save: $90.82 (59%)Ships in 1-3 Business DaysProduct Specifications- Other Name: Camshaft Assembly-Intake; Camshaft, Engine
- Replaces: 12677323, 12672933, 12665277


Buick Camshaft Part Number: 12666072
$91.07 MSRP: $142.65You Save: $51.58 (37%)Ships in 1-3 Business DaysProduct Specifications- Other Name: Camshaft, Engine


Buick Camshaft Part Number: 12566671
$132.50 MSRP: $213.06You Save: $80.56 (38%)Ships in 1-2 Business DaysProduct Specifications- Other Name: Camshaft, Engine
Buick Camshaft Part Number: 12565170
$79.37 MSRP: $124.32You Save: $44.95 (37%)Ships in 1-3 Business DaysProduct Specifications- Other Name: Camshaft, Engine

Buick Camshaft Part Number: 24574242
Product Specifications- Other Name: Camshaft, Engine
Buick Camshaft Part Number: 24574240
Product Specifications- Other Name: Camshaft Assembly-Intake; Camshaft, Engine
Buick Camshaft Part Number: 55508596
$96.72 MSRP: $151.46You Save: $54.74 (37%)Product Specifications- Other Name: Camshaft Assembly-Intake; Camshaft, Engine
- Replaced by: 25205337
| Page 1 of 6 |Next >
1-20 of 106 Results
Buick Camshaft
Want to cut long-term maintenance and repair costs? Choose OEM Camshaft. Those parts deliver top durability you can trust. On our site, you'll find a huge catalog of genuine Buick parts. Prices are unbeatable, so you can keep more in your pocket. Every OEM Buick Camshaft includes a manufacturer's warranty. You can also get an easy return policy that keeps buying risk free. Fast delivery, get your car on the road quickly. It's simple to search, compare, and order. Stop guessing about quality or fit. Order today and save with parts that last.
Buick Camshaft Parts Questions & Experts Answers
- Q: How to replace the left side camshaft on Buick Enclave?A:The process starts with eliminating the Intake Manifold and next removing the left bank Camshaft cover before working on the left side Camshaft. Afterward you need to eliminate both the Camshaft sensors together with the Camshaft position actuator solenoid. Use the en 46111 and Crankshaft balancer to rotate the Crankshaft until the camshafts achieve neutral position with their flats parallel to the Camshaft cover rail. A open-end wrench must go on the Camshaft hex to stop its rotation while the Camshaft position actuator bolt can be loosened. The en-48313 requires unscrewing to fold its legs before you place it between Camshaft actuators with its bottom line resting against the Cylinder Head surface. Lengthen the en-48313 legs partially and slide one segment past the Timing Chain Guide while expanding it until the legs meet the chain without extra tension. Begin with hand-tightening the en-48313 before guiding the camshafts towards one another until the chain achieves required slack. Apply marks to the Camshaft position actuators along with the Timing Chain before you detach both components and the Camshaft position actuator bolt and camshafts. To assemble correctly position the Timing Chain and Camshaft position actuator alignment marks then install the camshafts onto the Cylinder Head followed by Camshaft actuator attachment. First install the bearing caps along with the camshafts and then eliminate the en-48313 by securing it with an open-end wrench to stop turns. First install the Camshaft position actuators while tightening them and proceed to install both the intake Camshaft position actuator solenoid before completing installation of the Camshaft sensors. The Crankshaft balancer needs installation before installing the Camshaft cover and Intake Manifold.
- Q: How to replace the camshaft on Buick Rainier?A:The first step for Camshaft replacement involves removing both the Camshaft cover as well as the intake and exhaust Camshaft sprocket bolts. You should use the Camshaft sprocket holding tool (J 44222) to attach it to the Cylinder Head before adjusting the horizontal bolts into the Camshaft sprockets which both maintain chain tension and prevent disturbances of Timing Chain components. Before removing the Camshaft bolts separate the sprockets with Timing Chain from the camshafts by using a rack to store the Camshaft caps for correct installation. Start by placing the Camshaft caps into storage and afterward detach the camshafts from the engine compartment. Engine oil must be applied to the Camshaft journal surface and its thrust area before positioning the camshafts into their original locations. Clean engine oil should also be used to coat the Camshaft lobes and journals. Use the Camshaft holding tool (J 44221) with its flats facing upwards at cylinder number 1 while the piston is at top dead center position. Use the original positions for the Camshaft caps because their direction and numerical sequence is clearly marked by pin stamping and torque the bolts to 12 nm (106 inch lbs.). First remove both Camshaft holding tools (J 44221 and J 44222). Then place the sprockets securely back onto the camshafts before removing the tools. Drive the intake Camshaft sprocket bolt to 20 nm torque and finish tightening it to an extra 100 degrees using the torque/angle meter (J 36660-A). Tighten the exhaust Camshaft actuator bolt to 25 nm initially before ending at 135 degrees with the torque/angle meter (J 36660-A). Use the torque/angle meter (J 36660-A) to perform two passes on the exhaust Camshaft actuator bolt where the first application provides 25 nm (18 ft. Lbs.) torque then the second maneuver adds 135 degrees rotation. Finally, install the Camshaft cover.
- Q: How to replace the left camshaft on Buick LaCrosse?A:The left Camshaft replacement requires uninstalling both Intake Manifold levels followed by removal of the left bank Camshaft cover together with sensors and position actuator solenoid. Obtain the Crankshaft rotation socket (EN46111) to rotate the Crankshaft until both camshafts achieve neutral (low tension) position while their flats remain parallel to the Camshaft cover rail. An open-end wrench positioned at the Camshaft hex will prevent Camshaft/engine rotation but leave the Camshaft position actuator bolt untouched until further steps are completed. The Timing Chain retention tool (EN46108) must be inserted fully into both Timing Chain segments for retention before tightnening its nuts. Mark the Timing Chain and its corresponding positions on the Camshaft position actuators for correct assembly before taking out the Camshaft position actuator bolt and camshafts. The installation process requires both components to align their designated reference marks before leaving the Camshaft position actuator bolt unwrapped. After mounting the camshafts onto their respective locations in the cylinder head you should install the Camshaft position actuators onto the camshafts and afterwards place the camshafts and Camshaft bearing caps. After removing en46108 install an open-end wrench at the Camshaft hex to stop its rotation before you install and tighten the Camshaft position actuators. Install the intake Camshaft position actuator solenoid with Camshaft sensors as well as the Crankshaft balancer and Camshaft cover and upper Intake Manifold and lower Intake Manifold.


Related Buick Parts
 Buick Oil Filter
 Buick Automatic Transmission Seal
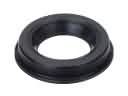 Buick Camshaft Seal
 Buick Crankshaft Gear
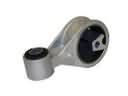 Buick Engine Torque Strut Mount
 Buick Exhaust Valve
 Buick Motor And Transmission Mount
 Buick Piston Ring
 Buick Pushrod
 Buick Rod Bearing
 Buick Timing Cover
 Buick Valve Cover Grommet