ChevyParts
My Garage
My Account
Cart
OEM Buick Century Control Arm Bushing
Suspension Arm Bushing- Select Vehicle by Model
- Select Vehicle by VIN
Select Vehicle by Model
orMake
Model
Year
Select Vehicle by VIN
For the most accurate results, select vehicle by your VIN (Vehicle Identification Number).
4 Control Arm Bushings found

Buick Century Lower Control Arm, Front Part Number: 14065721
$16.72 MSRP: $33.56You Save: $16.84 (51%)
Buick Century Lower Control Arm Bushing, Front Part Number: 10260991
$15.09 MSRP: $24.69You Save: $9.60 (39%)
Buick Century Lower Control Arm Bushing, Front Part Number: 10403698
$18.15 MSRP: $29.88You Save: $11.73 (40%)Ships in 1-2 Business Days
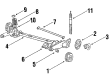
Buick Century Axle Bushing, Rear Part Number: 10097824
Buick Century Control Arm Bushing
Want to cut long-term maintenance and repair costs? Choose OEM Control Arm Bushing. Those parts deliver top durability you can trust. On our site, you'll find a huge catalog of genuine Buick Century parts. Prices are unbeatable, so you can keep more in your pocket. Every OEM Buick Century Control Arm Bushing includes a manufacturer's warranty. You can also get an easy return policy that keeps buying risk free. Fast delivery, get your car on the road quickly. It's simple to search, compare, and order. Stop guessing about quality or fit. Order today and save with parts that last.
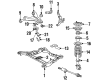
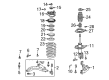
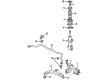
The Buick Century Control Arm Bushing is one of the parts of the suspension system; it is highly appreciated due to its durability and quality in various Buick Century models ranging from 1973 to 2005. This one is known as Control Arm Bushing and ensured the connection between the control arms and the frame of the car while it absorbs all the vibrations and reduce friction at the same time. The Buick Century Control Arm Bushing offers the control arms in the car free motion so as to respond to road conditions and the steering wheel inputs hence acting as an efficient shock absorber and improving safety. These bushings wear out or get damaged and they cause major troubles with suspension making the Buick Century less stable, and harder to handle. It also shows that Buick Century Control Arm Bushing is a universal product because it serves a number of variants of Buick Century and hence enables the drivers to have optimal yields. For instance, the Control Arm Bushing comes in different materials; rubber for standard use and you have the hard compound versions; polyurethane and synthetic elastomer that are tougher. Thus, the Buick Century Control Arm Bushing stands out in the global market for automotive parts, aiming at both the average car owner and a sports car or muscle car user. At the end, the durability and the efficiency of the Buick Century Control Arm Bushing would greatly contribute on the strength and stability of the suspension of the vehicle that gives comfort to the driver while driving safely.
Buick Century Control Arm Bushing Parts and Q&A
- Q: What tools are needed to replace the lower control arm bushings in the front on Buick Century?A:What is needed to replace the lower Control Arm bushings in the front are the following tool. Front drive axle boot retainer (J 16117 - A 36133), rear leaf spring mounting brace (J 21452), rear shock absorber-mounting stud, rear axle bearing (J 21516), rear axle rubber boot (A 36137), rear wheel stud 15-16x1 with a washer (J 14253), lateral link rod (J 22758-7), tire balancing block (GM 45466 - M), valve body drain plug (B-24-110), and front rod x-frame bearing (J 21474). In the beginning, take off the lower Control Arm and place it in a vice clutch. Make a mark on the lower Control Arm along the flat edge of the bushing flange. Apply high pressure lubricant (J 23444-A) on threads of puller bolt (J 21474-27). Assemble the bushing removal tools: puller bolt (J 21474-27), driven sprocket support bearing installer (J 34126), front knuckle support (J 35379), bushing installer (J 21474-2), and nut (J 21474-4), then tighten nut (J 21474-4) and disassemble the tools. For installation, it is advisable to have the lower Control Arm vertical bushing installed properly in order that the original vehicle ride and handling is maintained. Lining up the flat side of the bushing flange with the mark on the Control Arm should have the bushing 30 degree from the centerline, and it should also have the thin slot pointing outboard. Drive the bushing into the Control Arm, and apply high pressure lubricant (J 23444-A) into the threads of puller bolt (J 21474-27); assemble the installation tools. Puller bolt (J 21474-27), bushing installer (J 21474-13), bushing installer (J 21474-5) and nut (J 21474-4). Tighten nut (J 21474-4), dismantle the tools, and eventually, install the lower Control Arm.

Related Buick Century Parts
 Buick Century Control Arm
 Buick Century Ball Joint
 Buick Century Air Suspension Compressor
 Buick Century Coil Spring Insulator
 Buick Century Control Arm Bracket
 Buick Century Shock And Strut Mount
 Buick Century Steering Knuckle
 Buick Century Suspension Strut Rod
 Buick Century Sway Bar Bracket
 Buick Century Sway Bar Bushing
 Buick Century Sway Bar Kit
 Buick Century Trailing Arm Bushing