ChevyParts
My Garage
My Account
Cart
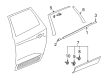
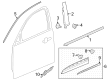
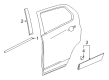
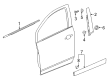
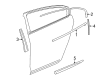
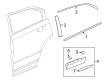
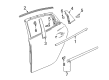
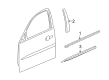
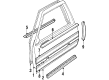
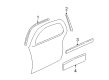
OEM Buick Door Moldings
- Select Vehicle by Model
- Select Vehicle by VIN
Select Vehicle by Model
orMake
Model
Year
Select Vehicle by VIN
For the most accurate results, select vehicle by your VIN (Vehicle Identification Number).
792 Door Moldings found


Buick Lower Molding, Outer Passenger Side Part Number: 20782950
$208.86 MSRP: $296.31You Save: $87.45 (30%)Ships in 1-3 Business DaysProduct Specifications- Other Name: Molding, Cab And Load Carrier Outer Side Decoration; Door Moldings
- Position: Outer Passenger Side
- Replaces: 25858310, 25922086

Buick Lower Molding, Front Driver Side Part Number: 84900498
$189.48 MSRP: $283.29You Save: $93.81 (34%)Ships in 1-3 Business DaysProduct Specifications- Other Name: Molding Kit, Front Side Door; Door Moldings
- Position: Front Driver Side
Buick Lower Molding, Front Passenger Side Part Number: 84900493
$178.40 MSRP: $266.72You Save: $88.32 (34%)Ships in 1-3 Business DaysProduct Specifications- Other Name: Molding Kit, Front Side Door; Door Moldings
- Position: Front Passenger Side

Buick Body Side Molding, Rear Passenger Side Part Number: 12374668
$178.12 MSRP: $266.30You Save: $88.18 (34%)Ships in 1-3 Business DaysProduct Specifications- Other Name: Molding Kit, Rear Side Door; Door Moldings
- Position: Rear Passenger Side
- Replaces: 12373392

Buick Belt Molding, Rear Driver Side Part Number: 23278142
$165.08 MSRP: $246.80You Save: $81.72 (34%)Ships in 1-3 Business DaysProduct Specifications- Other Name: Molding Assembly-Rear Side Door Window Belt Reveal; Molding, Rear Side Door Window Reveal
- Position: Rear Driver Side
Buick Lower Molding, Rear Driver Side Part Number: 23426202
$244.39 MSRP: $365.37You Save: $120.98 (34%)Ships in 1-3 Business DaysProduct Specifications- Other Name: Molding Assembly-Rear Side Door Lower *Service Primer; Door Moldings; Molding, Cab And Load Carrier Outer Side Decoration
- Position: Rear Lower Driver Side
- Replaces: 22985085

Buick Belt Molding, Front Passenger Side Part Number: 23278141
$165.08 MSRP: $246.80You Save: $81.72 (34%)Ships in 1-3 Business DaysProduct Specifications- Other Name: Molding, Front Door Window Reveal; Door Moldings
- Position: Front Passenger Side
Buick Lower Molding, Outer Driver Side Part Number: 20782951
$264.26 MSRP: $395.08You Save: $130.82 (34%)Ships in 1-3 Business DaysProduct Specifications- Other Name: Molding, Cab And Load Carrier Outer Side Decoration; Door Moldings
- Position: Outer Driver Side
- Replaces: 25922085, 25858311


Buick Body Side Molding Part Number: 88952080
$108.23 MSRP: $154.86You Save: $46.63 (31%)Ships in 1-2 Business DaysProduct Specifications- Other Name: Molding Kit, Rear Side Door Center; Door Moldings; Molding Kit, Rear Side Door
- Position: Rear Center
- Replaces: 12458838, 12532548

Buick Lower Molding, Front Driver Side Part Number: 84257189
$107.82 MSRP: $154.28You Save: $46.46 (31%)Ships in 1-3 Business DaysProduct Specifications- Other Name: Molding, Front Side Door; Door Moldings
- Position: Front Driver Side
- Replaces: 23196402

Buick Belt Molding, Rear Driver Side Part Number: 20912195
$197.89 MSRP: $295.86You Save: $97.97 (34%)Ships in 1-3 Business DaysProduct Specifications- Other Name: Molding Assembly-Rear Side Door Window Belt Reveal; Door Moldings; Weatherstrip; Belt Weatherstrip; Molding, Rear Side Door Window Reveal
- Position: Rear Driver Side
- Replaces: 20883706
Buick Belt Molding, Front Driver Side Part Number: 23278140
$165.08 MSRP: $246.80You Save: $81.72 (34%)Ships in 1-3 Business DaysProduct Specifications- Other Name: Molding, Front Door Window Reveal; Door Moldings
- Position: Front Driver Side

Buick Lower Molding, Black, Rear Driver Side Part Number: 84900481
$98.17 MSRP: $146.11You Save: $47.94 (33%)Ships in 1-3 Business DaysProduct Specifications- Other Name: Molding Assembly-Rear Side Door Lower *Bright Chromm; Door Moldings; Molding, Rear Side Door
- Position: Rear Lower Driver Side

Buick Reveal Molding, Rear Upper Passenger Side Part Number: 84244029
$62.42 MSRP: $92.90You Save: $30.48 (33%)Ships in 1-3 Business DaysProduct Specifications- Other Name: Molding Assembly-Rear Side Door Window Upper Reveal; Molding, Rear Side Door Window Reveal
- Position: Rear Upper Passenger Side

Buick Body Side Molding, Rear Passenger Side Part Number: 20902220
$90.06 MSRP: $134.04You Save: $43.98 (33%)Ships in 1-3 Business DaysProduct Specifications- Other Name: Molding, Rear Side Door; Door Moldings
- Position: Rear Passenger Side
- Replaces: 25792450
Buick Lower Molding, Black, Rear Passenger Side Part Number: 84900480
$98.17 MSRP: $146.11You Save: $47.94 (33%)Ships in 1-3 Business DaysProduct Specifications- Other Name: Molding Assembly-Rear Side Door Lower *Bright Chromm; Door Moldings; Molding, Rear Side Door
- Position: Rear Lower Passenger Side

Buick Belt Molding, Rear Passenger Side Part Number: 26215880
$88.36 MSRP: $131.51You Save: $43.15 (33%)Ships in 1-3 Business DaysProduct Specifications- Other Name: Molding Assembly-Rear Side Door Window Belt Reveal; Molding, Rear Side Door Window Reveal
- Position: Rear Passenger Side
- Replaces: 26688274, 26700305

Buick Body Side Molding, Front Center Driver Side Part Number: 19120824
$220.77 MSRP: $330.07You Save: $109.30 (34%)Product Specifications- Other Name: Molding Assembly, Front Side Door Center (Left-Hand); Door Moldings; Molding, Front Side Door
- Position: Front Center Driver Side
- Replaces: 19120041, 19121360

Buick Belt Molding, Front Passenger Side Part Number: 20550194
$116.85 MSRP: $174.70You Save: $57.85 (34%)Product Specifications- Other Name: Molding, Front Side Door Window Belt Reveal; Door Moldings; Molding, Front Door Window Reveal
- Position: Front Passenger Side

Buick Body Side Molding, Rear Passenger Side Part Number: 10265384
$11.97 MSRP: $17.82You Save: $5.85 (33%)Product Specifications- Other Name: Molding, Rear Side Door; Door Moldings
- Position: Rear Passenger Side
| Page 1 of 40 |Next >
1-20 of 792 Results
Buick Door Moldings
Want to cut long-term maintenance and repair costs? Choose OEM Door Moldings. Those parts deliver top durability you can trust. On our site, you'll find a huge catalog of genuine Buick parts. Prices are unbeatable, so you can keep more in your pocket. Every OEM Buick Door Moldings includes a manufacturer's warranty. You can also get an easy return policy that keeps buying risk free. Fast delivery, get your car on the road quickly. It's simple to search, compare, and order. Stop guessing about quality or fit. Order today and save with parts that last.
Buick Door Moldings Parts Questions & Experts Answers
- Q: How to replace the front window reveal door moldings on Buick Century?A:The replacement of front door window reveal molding begins by removing the outside door mirror with proper equipment. You should begin by unwinding the top window reveal molding then extract the front door reveal molding from its position properly using a small flat-bladed tool to disengage the retaining clips during removal. Inspection of plastic retainer clips should occur after reveal molding removal to determine if replacement is needed. Replace any damaged retainers. Place the upper reveal molding on the door beginning from the front end and press downward until the retaining plastic clips are completely seated. Install the outside mirror onto the door as the final step.
- Q: How to replace the front door moldings on Buick Regal?A:The first step for front door window reveal molding replacement begins with outside mirror removal from the door. The top window reveal molding needs gentle loosening and you can remove the door's front reveal molding with a flat-bladed tool and its retaining clips will pop loose. Check for damage on the plastic clip retainers before installing the reveal molding because any broken clips should get replaced. To attach the upper reveal molding to the door start by positioning it first and then press down beginning at the front end to ensure total plastic clip seating. Reattach the outside mirror on the door as the final step.
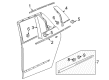
- Q: How to Properly Install Door Moldings on a Buick Rendezvous?A:The first step to replace rear door body side molding involves taking out all screws located at the rear edge. The upper molding edge requires heating using a heat gun (J 25070) with a 152 mm (6 in) distance maintained along a circular path for 30 seconds to reach 21-32°C (70-90°F). Use one plastic flat-blade tool to separate the upper molding edge before pulling it out and extracting the retainers to take the molding off the door. Drill a small hole into the center of the central retainer pin on the lower support retainer. Next, place a small screw into the hole and use pliers to remove the central retainer pin. Follow the same procedure for the rear support retainer. The rear door panel surface requires cleaning with either a 3M(TM) ScotchBrite molding adhesive remover disk (3M(TM) P/N 07501) or equivalent followed by Varnish Makers and Painters (VMP) naphtha until complete dryness is achieved. To install the lower support retainer position it with the notch facing down before using a small hammer to install its center pins. The same instructions apply to install the rear support retainer. Use the heat gun (J 25070) to warm the upper molding edge before installation. The lower flange should rest on the retainer support without coming into contact with adhesive backing. Push the molding retainer clips into the door panel holes. After removing protective tape from the molding, insert retainer clips until they are fully seated inside the panel holes. Complete the process by applying pressure to the molding's upper edge while installing screws to the rear side before torquing them to 6 N.m (53 lb in).


Related Buick Parts
 Buick Door Handle
 Buick Trunk Latch
 Buick Window Regulator
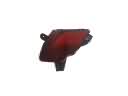 Buick Bumper Reflector
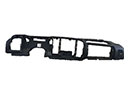 Buick Dash Panel Vent Portion Covers
 Buick Door Armrest
 Buick Door Latch Assembly
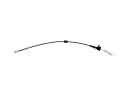 Buick Door Latch Cable
 Buick Door Striker
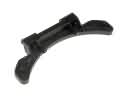 Buick Fuel Door Hinge
 Buick Windshield Wiper
 Buick Wiper Blade