ChevyParts
My Garage
My Account
Cart
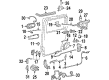
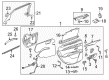
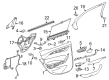
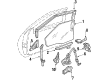
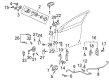
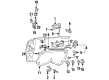
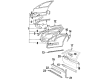
OEM Buick Door Latch Assembly
Door Latch- Select Vehicle by Model
- Select Vehicle by VIN
Select Vehicle by Model
orMake
Model
Year
Select Vehicle by VIN
For the most accurate results, select vehicle by your VIN (Vehicle Identification Number).
212 Door Latch Assemblys found


Buick Lock, Front Driver Side Part Number: 13579564
$132.94 MSRP: $195.26You Save: $62.32 (32%)Ships in 1-2 Business DaysProduct Specifications- Other Name: Latch Assembly-Front Side Door; Door Latch Assembly; Door Lock; Latch; Latch, Front Side Door
- Position: Front Driver Side


Buick Lock Actuator, Rear Driver Side Part Number: 22820696
$175.40 MSRP: $257.62You Save: $82.22 (32%)Ships in 1-2 Business DaysProduct Specifications- Other Name: Latch Assembly-Rear Side Door; Door Lock Actuator Motor; Door Latch Assembly; Door Lock; Lock; Latch; Latch, Door Lock
- Position: Rear Driver Side
- Replaces: 20839790, 25973135, 20940244


Buick Lock Actuator, Rear Driver Side Part Number: 13579545
$123.10 MSRP: $179.22You Save: $56.12 (32%)Ships in 1-2 Business DaysProduct Specifications- Other Name: Latch, Rear Side Door; Door Lock Actuator Motor; Door Latch Assembly; Door Lock Actuator; Door Lock; Latch
- Position: Rear Driver Side


Buick Lock Actuator, Front Driver Side Part Number: 13579522
$133.83 MSRP: $194.84You Save: $61.01 (32%)Ships in 1-2 Business DaysProduct Specifications- Other Name: Lock, Front Side Door; Door Lock Actuator Motor; Door Latch Assembly; Door Lock Actuator; Door Lock; Lock Assembly; Lock; Latch; Latch, Front Side Door
- Position: Front Driver Side
- Replaces: 13503801, 13503819, 13577983


Buick Lock Assembly, Front Driver Side Part Number: 16603891
$195.69 MSRP: $409.08You Save: $213.39 (53%)Ships in 1-2 Business DaysProduct Specifications- Other Name: Lock, Front Side Door; Door Lock; Lock
- Position: Front Driver Side

Buick Lock Actuator, Front Passenger Side Part Number: 13533591
$117.71 MSRP: $198.76You Save: $81.05 (41%)Ships in 1-3 Business DaysProduct Specifications- Other Name: Latch Assembly-Front Side Door; Door Lock Actuator Motor; Door Latch Assembly; Door Lock Actuator; Door Lock; Lock; Latch, Front Side Door
- Position: Front Passenger Side
- Replaced by: 13546503

Buick Lock Actuator, Front Passenger Side Part Number: 13546503
$117.71 MSRP: $198.76You Save: $81.05 (41%)Ships in 1-2 Business DaysProduct Specifications- Other Name: Latch Assembly-Front Side Door; Lock Assembly; Lock; Latch; Latch, Front Side Door; Latch, Door Lock
- Position: Front Passenger Side
- Replaces: 13546500, 13598360, 13507153, 13597545, 13533614, 13533690, 13597797, 13592282, 13528349, 13528253, 13533591

Buick Lock Actuator, Front Driver Side Part Number: 20790493
$149.69 MSRP: $223.79You Save: $74.10 (34%)Ships in 1-2 Business DaysProduct Specifications- Other Name: Lock, Front Side Door; Door Lock Actuator Motor; Door Lock Actuator; Door Lock; Lock
- Position: Front Driver Side
- Replaces: 25876431, 25866031

Buick Lock, Rear Part Number: 25876459
$125.16 MSRP: $187.12You Save: $61.96 (34%)Ships in 1-2 Business DaysProduct Specifications- Other Name: Lock, Rear Side Door; Door Latch Assembly; Door Lock
- Position: Rear
- Replaces: 15891973, 25841487

Buick Lock Actuator, Rear Passenger Side Part Number: 25948725
$172.26 MSRP: $257.53You Save: $85.27 (34%)Ships in 1-2 Business DaysProduct Specifications- Other Name: Lock, Rear Side Door; Door Lock Actuator Motor; Door Latch Assembly; Door Lock; Lock Assembly; Lock; Lock, Door Lock
- Position: Rear Passenger Side
- Replaces: 15110510, 15079229

Buick Lock, Rear Driver Side Part Number: 10347138
$159.42 MSRP: $238.35You Save: $78.93 (34%)Ships in 1-2 Business DaysProduct Specifications- Other Name: Lock Assembly-Rear Side Door Rear; Door Latch Assembly; Door Lock; Latch; Lock, Rear Side Door; Lock, Door Lock
- Position: Rear Driver Side
- Replaces: 10321722

Buick Lock Actuator, Rear Passenger Side Part Number: 13546554
$117.71 MSRP: $172.88You Save: $55.17 (32%)Ships in 1-2 Business DaysProduct Specifications- Other Name: Latch Assembly-Rear Side Door; Latch Assembly; Lock; Latch; Latch, Rear Side Door; Latch, Door Lock
- Position: Rear Passenger Side
- Replaces: 13546552, 13507136, 13533610, 13533667, 13533636, 13598385, 13507139, 13528250, 13528356

Buick Lock Actuator, Rear Passenger Side Part Number: 13528274
$114.45 MSRP: $168.10You Save: $53.65 (32%)Ships in 1-2 Business DaysProduct Specifications- Other Name: Latch Assembly-Rear Side Door; Door Lock Actuator Motor; Door Latch Assembly; Door Lock; Latch Assembly; Lock Assembly; Lock; Latch
- Position: Rear Passenger Side
- Replaced by: 13546591

Buick Lock, Front Passenger Side Part Number: 16608222
Product Specifications- Other Name: Lock, Front Side Door; Door Lock
- Position: Front Passenger Side

Buick Lock Assembly, Front Passenger Side Part Number: 16637878
Product Specifications- Other Name: Lock, Front Side Door; Door Lock; Lock
- Position: Front Passenger Side
Buick Lock Assembly, Front Passenger Side Part Number: 16637880
Product Specifications- Other Name: Lock, Front Side Door; Door Lock; Lock
- Position: Front Passenger Side

Buick Lock Assembly, Front Driver Side Part Number: 16637797
Product Specifications- Other Name: Lock Assembly-Front Side Door; Door Latch Assembly; Door Lock; Lock; Lock, Front Side Door
- Position: Front Driver Side
- Replaces: 16634799

Buick Lock Assembly, Front Passenger Side Part Number: 16629392
Product Specifications- Other Name: Lock, Front Side Door; Door Lock; Lock
- Position: Front Passenger Side

Buick Lock Assembly, Front Driver Side Part Number: 16634795
Product Specifications- Other Name: Lock Assembly-Front Side Door; Door Latch Assembly; Door Lock; Lock; Lock, Front Side Door
- Position: Front Driver Side
Buick Lock Assembly, Front Driver Side Part Number: 16629393
Product Specifications- Other Name: Lock, Front Side Door; Door Lock; Lock
- Position: Front Driver Side
| Page 1 of 11 |Next >
1-20 of 212 Results
Buick Door Latch Assembly Parts Questions & Experts Answers
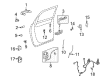
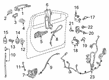
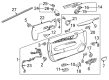
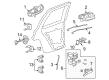
- Q: How to replace the rear Door Latch Assembly on Buick LaCrosse?A: The process to change the rear Door Lock starts with the removal of rear door trim panel and rear door water deflector. Notice that outside handle lock rods on the outside handles need adjustment before operation by eliminating all free play between handles and locks. Open the outside handle rod to the lock clip before releasing the rod from the Door Lock. Extract the lock and cable/rod from the door after taking out screws (1, 3, 2) which keep the lock attached to the door by working through the access hole in the door inner panel. Use the provided tab on the electrical connector todetach it from the lock system then extract the Door Lock assembly together with its cable. Installation requires you to connect the Door Lock with cable to the lock and to reconnect the electrical connector through tab pushing then insert the lock and cable/rod through the door panel access hole inside the door. First secure the Door Lock with screws (1, 3, 2) starting with the top screw followed by the bottom screw and ending with the middle screw when securing. Tighten all screws to 10 n.m (89 lb in). Seam the outside handle rod through the clip while pulling the clip sides together. Check the door function before implementing the rear door water deflector and rear door trim panel reinstall.
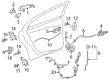
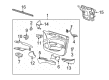
- Q: How to replace the rear Door Latch Assembly on Buick LeSabre?A: The process to replace the rear door latch starts with door trim panel removal plus door module and water deflector then proceeds to the inside Door Handle removal. Separate the outside Door Handle rod from the door latch by opening the clip on the door latch before uninstalling the door latch fasteners and accompanying inside Door Handle latch and lock rods. First disconnect all electric wiring from the door latch and then remove the handle together with the lock rods. As part of the installation process you must connect the inside Door Handle along with the lock rods to the door latch before adding electrical connectors then setting the door latch in place while tightening each fastener to 10 n.m (89 lb in). To attach the outside Door Handle latch rod with the door latch simply feed the rod through the wing of the Door Latch Assembly then close the clip. The door handles should be checked for proper operation before the installation of door trim components and water deflector. The final steps are to install the water deflector along with the door module then the door trim panel.
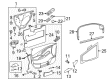
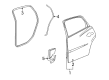
- Q: How to replace the front Door Latch Assembly on Buick Rainier?A: The process to replace the front door latch begins with complete closure of the window. Take off both the panel from the door trim and the rear part of the water deflector. Remove the lock rod retaining clip from the outside Door Handle then take out the lock rod from the handle. First disconnect the lock cylinder rod from its cylinder when equipped while you remove the inside Door Handle. Start by removing three latch retaining screws from the door and then position the latch to break electrical connections when needed before eliminating it from the door. Record the exact arrangement of the inside and outside handle lock rods before removing them from the latch and then the actuator. During installation the user should attach the actuator to the latch and install the outside and inside handle lock rods at the previously marked locations. Reinstall the latch inside the door and connect electrical connectors when required by using the three screws tightened at 10 n.m (22 lb in). The procedure ends with reattaching the inside Door Handle followed by cylinder lock rod connection to the cylinder and the installation of the lock rod at the outside Door Handle and final securing with the rod retaining clip. Place the water deflector along with the door trim panel in its original position next.


Related Buick Parts
 Buick Emblem
 Buick Door Handle
 Buick Window Motor
 Buick Body Mount Hole Plug
 Buick Bumper Reflector
 Buick Door Armrest
 Buick Door Lock Actuator
 Buick Door Seal
 Buick Tailgate Latch
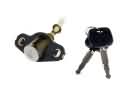 Buick Trunk Lock Cylinder
 Buick Weather Strip
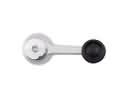 Buick Window Crank Handles