Make sure this part fits

GM 15110507
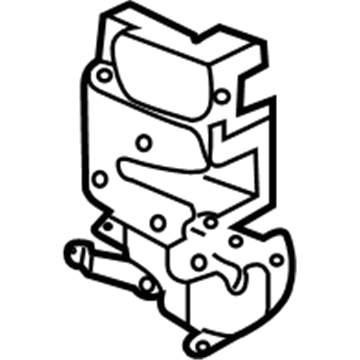
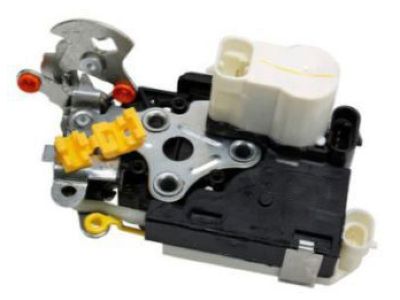
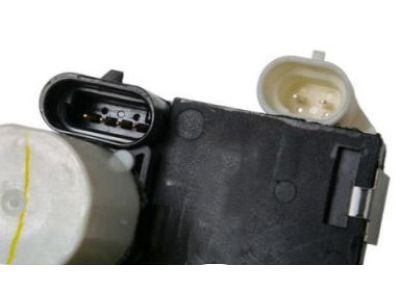
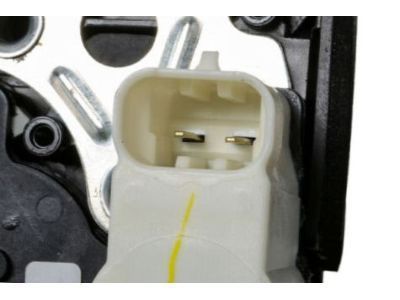
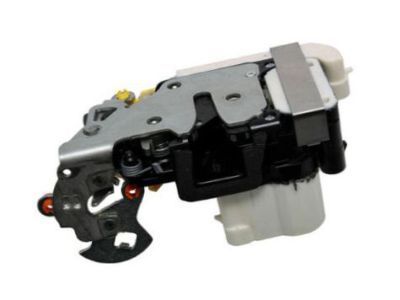
Lock Actuator, Front Driver Side

2002-2009 GM

Customer Questions & Expert Answers (20)
GM 15110507 Lock Actuator, Front Driver Side
  • Part Description
    Lock, Front Side Door; Door Lock Actuator Motor; Door Lock Actuator; Door Lock
  • Position
    Front Driver Side
  • Replaces
    15079224, 15076330
  • Manufacturer
    General Motors
Make sure this part fits
$203.63 MSRP: $296.46
You Save: $92.83 (32%)
Ships in 1-3 Business Days
1
ADD TO CART
  • Related Parts
  • Product Specifications
  • Vehicle Fitment
  • Customer Questions & Expert Answers
  • Product Specifications

    BrandGenuine GM
    Manufacturer Part Number15110507
    Part DescriptionLock, Front Side Door; Door Lock Actuator Motor; Door Lock Actuator; Door Lock
    Other NamesLock; Lock, Door Lock
    Item Dimensions8.1 x 5.4 x 5.3 inches
    Item Weight1.30 Pounds
    PositionFront Driver Side
    ConditionNew
    Fitment TypeDirect Replacement
    Replaces15079224, 15076330
    ManufacturerGeneral Motors
    SKU15110507
    WarrantyThis genuine GM part is guaranteed by GM's factory warranty.
    Shipping & ReturnShipping Policy Return Policy
    Warning: California's Proposition 65
  • Vehicle Fitment

    Year Make Model Trim Engine
    2004-2007 Buick RainierCXL, CXL Plus6 Cyl 4.2 L GAS, 8 Cyl 5.3 L GAS
    2002-2009 Chevrolet TrailblazerBase, LS, LT, LTZ, North Face, SS6 Cyl 4.2 L GAS, 8 Cyl 5.3 L GAS, 8 Cyl 6.0 L GAS
    2002-2006 Chevrolet Trailblazer EXTLS, LT, North Face6 Cyl 4.2 L GAS, 8 Cyl 5.3 L GAS
    2002-2009 GMC EnvoyDenali, SLE, SLT6 Cyl 4.2 L GAS, 8 Cyl 5.3 L GAS
    2002-2006 GMC Envoy XLDenali, SLE, SLT6 Cyl 4.2 L GAS, 8 Cyl 5.3 L GAS
    2004-2005 GMC Envoy XUVSLE, SLT6 Cyl 4.2 L GAS, 8 Cyl 5.3 L GAS
    2002-2004 Oldsmobile BravadaBase6 Cyl 4.2 L GAS
  • Customer Questions & Expert Answers

    Q:
    Is this 15110507 designed for my car? Posted by ChevyPartsGiant Specialist
    A:
    Please Select Your Vehicle model to see if part number 15110507 is suitable before ordering.
    Posted by ChevyPartsGiant Specialist
    Q:
    How to replace the front Door Latch Assembly on Buick Rainier? Posted by Customer
    A:
    The process to replace the front door latch begins with complete closure of the window. Take off both the panel from the door trim and the rear part of the water deflector. Remove the lock rod retaining clip from the outside Door Handle then take out the lock rod from the handle. First disconnect the lock cylinder rod from its cylinder when equipped while you remove the inside Door Handle. Start by removing three latch retaining screws from the door and then position the latch to break electrical connections when needed before eliminating it from the door. Record the exact arrangement of the inside and outside handle lock rods before removing them from the latch and then the actuator. During installation the user should attach the actuator to the latch and install the outside and inside handle lock rods at the previously marked locations. Reinstall the latch inside the door and connect electrical connectors when required by using the three screws tightened at 10 n.m (22 lb in). The procedure ends with reattaching the inside Door Handle followed by cylinder lock rod connection to the cylinder and the installation of the lock rod at the outside Door Handle and final securing with the rod retaining clip. Place the water deflector along with the door trim panel in its original position next.
    Posted by ChevyPartsGiant Specialist
    Q:
    How to replace the front door lock actuator on Buick Rainier? Posted by Customer
    A:
    Replacing the front Door Lock Actuator begins with trimming the door panel while you also remove the deflector and latch assembly. The two screws holding the actuator in place must be removed from the lock. Perform a smooth lift and rotation of the actuator which will detach the rubber Bumper from the latch before removing the actuator from its position. Start by placing the rubber Bumper on the latch and rotate the actuator toward the latch to complete the Bumper engagement. Fitting the first tooth of both gears precisely determines the success of the actuator-latch assembly. Strap the actuator to the latch before fastening it with the 2 screws while following the service precautions for fastener notice. Secure the screws to 0.75 n.m (6 lb in). The last step involves installing the lock panel together with the door deflector and the door trim.
    Posted by ChevyPartsGiant Specialist
    Q:
    How to replace the front side Door Latch Assembly on GMC Envoy? Posted by Customer
    A:
    The first step to replace the front side door latch requires complete closure of the window. Start by removing both parts of the water deflector as well as the door trim. To start the replacement you should detach the outside Door Handle lock rod retaining clip then take out the lock rod. You should first detach the lock cylinder rod from its cylinder when equipped before taking out the inside Door Handle. You should remove the three screws that secure the latch to the door before positioning the latch to undo electrical connectors if required. After detachment from the door you can proceed with the latch removal. Take note of inside and outside handle lock rod positions before removing them from the latch then detach the actuator from the latch assembly. Install the actuator to the latch before reinstalling both inside and outside handle lock rods using the initial installation procedure. Connect the electrical connectors through the positioning of the latch, after that install it onto the door while securing it with three screws torqued to 10 nm (89 lb in). Install the inside Door Handle followed by connecting the lock cylinder rod when present and installing the lock rod to the outside Door Handle and attaching the lock rod retaining clip. The last step includes reinstallation of the door trim panel with the water deflector.
    Posted by ChevyPartsGiant Specialist
    Q:
    How to replace the front Door Latch Assembly on GMC Envoy? Posted by Customer
    A:
    The first step to replace the front door latch requires users to fully shut the window. Take out the door trim panel alongside the rear half of the water deflector. The lock rod retaining clip should be detached from the outside Door Handle and the handle must receive the lock rod for removal. First disconnect the cylinder rod when available and afterward separate the inner Door Handle from its mountings. Before detaching the latch from the door remove the three screws which keep it in place then adjust its position for easy electrical connector disconnection. Record where the inside and outside handle lock rods sit before removing them from the latch and its following actuator. First attach the actuator to the latch after which mount the noted positions of both inside and outside lock rods. Install the latch by connecting its electrical connectors if required before reinserting it in the door. Use 3 screws to attach the latch before tightening them to 10 n.m (22 lb in). To finish the installation you must reinstall the inside Door Handle while joining the lock cylinder rod to the cylinder when present and installing the lock rod onto the outside Door Handle by using the lock rod retaining clip. You should replace the water deflector then the door trim panel.
    Posted by ChevyPartsGiant Specialist
    Q:
    How to replace the front Door Latch Assembly on Chevrolet Trailblazer? Posted by Customer
    A:
    Start replacing the front door latch by completely closing the window. The first step requires you to take out the door trim panel together with the rear section from the water deflector. The external Door Handle requires the lock rod retaining clip removal before removing the lock rod from the handle. The inside Door Handle requires removal if lock cylinder rod is present since you must first detach its rod from the cylinder. The door latch requires three screws removal before disconnecting electrical connectors so you can move the latch out of the door opening. First note the starting position of inside and outside handle lock rods then disconnect and remove both rods from the latch followed by the actuator. The installation process starts by attaching the actuator to the latch followed by reinstallation of the inside and outside handle lock rods according to previous procedure steps. Safely position the latch for connection of electrical connectors before placing it into the door slot. Tighten the three screws which secure the latch up to 10 n.m (22 lb in) force. The installation process involves putting back the inside Door Handle followed by connecting the lock cylinder rod to the cylinder (when possible) then placing the lock rod onto the outside Door Handle while anchoring it with the lock rod retaining clip. You need to put back the door trim panel along with the water deflector at the end.
    Posted by ChevyPartsGiant Specialist
    Q:
    How do you secure the latch after installation for the 2007 Buick Rainier? Posted by Customer
    A:
    Install the 3 screws (Part Number: 123456) and tighten them to 10 N.m (89 lb in).
    Posted by ChevyPartsGiant Specialist
    See expert answers on similar Door Latch Assembly
    Q:
    What is the next step after removing the screws for the 2007 Buick Rainier? Posted by Customer
    A:
    Simultaneously lift and rotate the actuator to disengage the rubber bumper from the latch, then remove the actuator from the latch.
    Posted by ChevyPartsGiant Specialist
    See expert answers on similar Door Lock Actuator
    Q:
    What should be done after removing the fasteners for the 2007 Buick Rainier? Posted by Customer
    A:
    Disconnect the electrical connectors from the latch and take the latch out of the door.
    Posted by ChevyPartsGiant Specialist
    See expert answers on similar Door Latch Assembly
    Q:
    What should be removed after the door trim panel for the 2009 Chevrolet Trailblazer? Posted by Customer
    A:
    Next, take out the water deflector.
    Posted by ChevyPartsGiant Specialist
    See expert answers on similar Door Lock Actuator
    Q:
    What is the first step to replace the rear door latch for the 2005 Chevrolet Trailblazer? Posted by Customer
    A:
    Close the window completely.
    Posted by ChevyPartsGiant Specialist
    See expert answers on similar Door Latch Assembly
    Q:
    What should be done before removing the latch itself for the 2002 Chevrolet Trailblazer? Posted by Customer
    A:
    Disconnect the electrical connectors from the latch.
    Posted by ChevyPartsGiant Specialist
    See expert answers on similar Door Latch Assembly
    Q:
    What is the next step after removing the screws for the 2002 Chevrolet Trailblazer? Posted by Customer
    A:
    Carefully lift and rotate the actuator to disengage the rubber bumper from the latch, then remove the actuator from the latch.
    Posted by ChevyPartsGiant Specialist
    See expert answers on similar Door Lock Actuator
    Q:
    What is the final step after securing the actuator for the 2005 Chevrolet Trailblazer? Posted by Customer
    A:
    Reinstall the lock to the door, followed by the water deflector and finally the door trim panel.
    Posted by ChevyPartsGiant Specialist
    See expert answers on similar Door Lock Actuator
    Q:
    How should the latch be positioned during installation for the 2009 Chevrolet Trailblazer? Posted by Customer
    A:
    Position the latch back onto the door.
    Posted by ChevyPartsGiant Specialist
    See expert answers on similar Door Latch Assembly
    Q:
    What should be done after aligning the actuator for the 2008 GMC Envoy? Posted by Customer
    A:
    Install the actuator to the top of the latch and secure it with the 2 screws, tightening them to 0.75 N.m (6 lb in).
    Posted by ChevyPartsGiant Specialist
    See expert answers on similar Door Lock Actuator
    Q:
    What should be connected to the latch during installation for the 2003 GMC Envoy? Posted by Customer
    A:
    Connect the electrical connectors to the latch.
    Posted by ChevyPartsGiant Specialist
    See expert answers on similar Door Latch Assembly
    Q:
    What is the first step in the installation process for the 2003 GMC Envoy? Posted by Customer
    A:
    Attach the rubber bumper to the latch.
    Posted by ChevyPartsGiant Specialist
    See expert answers on similar Door Lock Actuator
    Q:
    How do you detach the actuator from the lock for the 2007 GMC Envoy? Posted by Customer
    A:
    Take out the 2 screws that secure the actuator to the lock.
    Posted by ChevyPartsGiant Specialist
    See expert answers on similar Door Lock Actuator
    Q:
    How do you fully engage the rubber bumper for the 2009 GMC Envoy? Posted by Customer
    A:
    Rotate the actuator toward the latch to fully engage the rubber bumper.
    Posted by ChevyPartsGiant Specialist
    See expert answers on similar Door Lock Actuator
    If you have any questions about this product, please don't hesitate to ask us. We will be happy to help you!

OEM GM 15110507, Excellent Performance and Perfect Fitment

To ensure reliability, purchase GM part # 15110507 Lock Actuator, Front Driver Side. It is sometimes referred to as GM Door Lock, GM Door Lock Actuator, GM Door Latch Assembly. Choosing OEM parts is the optimal decision for guaranteeing superior quality and perfect performance. These components undergo stringent quality checks and are carefully constructed to comply with GM's factory specifications, ensuring a smooth installation process.

ChevyPartsGiant.com is a leading supplier of genuine GM parts such as GM 15110507 Lock Actuator, Front Driver Side. Our website boasts an extensive inventory of OEM GM parts, available at highly competitive prices in the market. Should you require any new genuine GM parts, rest assured we will deliver them swiftly and efficiently to your doorstep. Furthermore, all our parts come with the assurance of a manufacturer's warranty. For detailed Chevy parts information, click here.
Choose ChevyPartsGiant for discounted prices, exceptional service and fast delivery