ChevyParts
My Garage
My Account
Cart
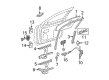
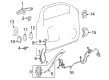
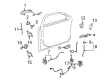
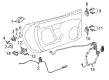
OEM Chevrolet Door Latch Assembly
Door Latch- Select Vehicle by Model
- Select Vehicle by VIN
Select Vehicle by Model
orMake
Model
Year
Select Vehicle by VIN
For the most accurate results, select vehicle by your VIN (Vehicle Identification Number).
582 Door Latch Assemblys found


Chevrolet Lock Assembly, Rear Driver Side Part Number: 20790501
$174.52 MSRP: $256.32You Save: $81.80 (32%)Ships in 1-2 Business DaysProduct Specifications- Other Name: Lock, Rear Side Door; Door Lock; Lock
- Position: Rear Driver Side
- Replaces: 15884445, 25876457


Chevrolet Lock, Front Driver Side Part Number: 20846340
$117.72 MSRP: $169.90You Save: $52.18 (31%)Product Specifications- Other Name: Lock, Front Side Door; Door Latch Assembly; Door Lock; Latch
- Position: Front Driver Side
- Replaces: 25810510, 25898352


Chevrolet Lock Actuator, Front Driver Side Part Number: 20790497
$116.30 MSRP: $167.85You Save: $51.55 (31%)Ships in 1-2 Business DaysProduct Specifications- Other Name: Lock, Front Side Door; Door Lock Actuator Motor; Door Lock Actuator; Door Lock; Lock Assembly
- Position: Front Driver Side
- Replaces: 15884449, 25876435


Chevrolet Lock Actuator, Rear Passenger Side Part Number: 25876390
$161.56 MSRP: $237.28You Save: $75.72 (32%)Ships in 1-2 Business DaysProduct Specifications- Other Name: Latch Assembly-Rear Side Door; Door Lock Actuator Motor; Door Lock; Lock Assembly; Latch, Door Lock
- Position: Rear Passenger Side
- Replaces: 25873487, 20783858, 25945737


Chevrolet Lock, Front Driver Side Part Number: 10395381
$163.31 MSRP: $244.17You Save: $80.86 (34%)Ships in 1-3 Business DaysProduct Specifications- Other Name: Lock, Front Side Door; Door Lock; Lock, Door Lock
- Position: Front Driver Side


Chevrolet Lock Actuator, Rear Passenger Side Part Number: 25876398
$161.56 MSRP: $237.28You Save: $75.72 (32%)Ships in 1-3 Business DaysProduct Specifications- Other Name: Latch Assembly, Rear Side Door; Door Lock Actuator Motor; Door Lock; Lock Assembly; Latch, Door Lock
- Position: Rear Passenger Side
- Replaces: 20783866, 25945745


Chevrolet Lock Assembly, Rear Passenger Side Part Number: 20790500
$176.38 MSRP: $256.78You Save: $80.40 (32%)Ships in 1-2 Business DaysProduct Specifications- Other Name: Lock, Rear Side Door; Door Lock; Lock
- Position: Rear Passenger Side
- Replaces: 25876456, 15884444

Chevrolet Lock Assembly, Front Driver Side Part Number: 20790496
$162.06 MSRP: $238.01You Save: $75.95 (32%)Ships in 1-2 Business DaysProduct Specifications- Other Name: Lock, Front Side Door; Door Lock
- Position: Front Driver Side
- Replaces: 15884448, 25876434


Chevrolet Lock Actuator, Front Driver Side Part Number: 15918137
$116.17 MSRP: $170.62You Save: $54.45 (32%)Ships in 1-2 Business DaysProduct Specifications- Other Name: Lock, Front Side Door; Door Lock Actuator Motor; Door Lock Actuator; Door Lock; Lock; Lock, Door Lock
- Position: Front Driver Side
- Replaces: 10395383, 15129744


Chevrolet Lock Actuator, Green Line, Front Driver Side Part Number: 22865521
$160.76 MSRP: $234.05You Save: $73.29 (32%)Ships in 1-2 Business DaysProduct Specifications- Other Name: Lock, Front Side Door; Door Lock Actuator Motor; Door Latch Assembly; Door Lock Actuator; Door Lock; Lock; Latch
- Position: Front Driver Side
- Replaces: 20772312, 20922229, 25876452, 22785608, 25829641, 22742874, 25964535

Chevrolet Latch, Brownstone, Front Passenger Side Part Number: 22898882
$126.02 MSRP: $188.40You Save: $62.38 (34%)Ships in 1-3 Business DaysProduct Specifications- Other Name: Latch, Front Side Door; Door Latch Assembly
- Position: Front Passenger Side

Chevrolet Latch Assembly, Rear Part Number: 86782301
$201.95 MSRP: $301.86You Save: $99.91 (34%)Ships in 1-3 Business DaysProduct Specifications- Other Name: Latch, Rear Compartment Lid Or Tail Gate Latch; Lock; Latch, Rear Hatch Window
- Position: Rear
- Replaces: 85558619, 84987998, 85125191
Chevrolet Latch, Front Passenger Side Part Number: 23422431
$134.50 MSRP: $201.09You Save: $66.59 (34%)Ships in 1-3 Business DaysProduct Specifications- Other Name: Latch Assembly-Front Side Door (Right-Hand); Door Latch Assembly; Latch, Front Side Door
- Position: Front Passenger Side
Chevrolet Latch, Black, Front Driver Side Part Number: 22826660
$134.86 MSRP: $199.84You Save: $64.98 (33%)Ships in 1-2 Business DaysProduct Specifications- Other Name: Latch, Front Side Door; Door Latch Assembly
- Position: Front Driver Side
Chevrolet Lock Actuator, Front Passenger Side Part Number: 20790495
$144.01 MSRP: $207.84You Save: $63.83 (31%)Ships in 1-2 Business DaysProduct Specifications- Other Name: Lock, Front Side Door; Door Lock Actuator Motor; Door Lock Actuator; Door Lock; Lock Assembly
- Position: Front Passenger Side
- Replaces: 25876433, 15884447

Chevrolet Lock, Driver Side Part Number: 13540955
$112.29 MSRP: $167.88You Save: $55.59 (34%)Ships in 1-3 Business DaysProduct Specifications- Other Name: Latch Assembly-Front Side Door *Less Finish; Door Latch Assembly; Door Lock; Latch; Latch, Front Side Door
- Position: Driver Side
- Replaces: 13539376
Chevrolet Latch, Front Passenger Side Part Number: 84451454
$125.69 MSRP: $187.92You Save: $62.23 (34%)Product Specifications- Other Name: Latch Assembly-Front Side Door; Door Latch Assembly; Latch, Front Side Door
- Position: Front Passenger Side
- Replaces: 23422433
Chevrolet Lock, Passenger Side Part Number: 13540956
$112.29 MSRP: $167.88You Save: $55.59 (34%)Ships in 1-3 Business DaysProduct Specifications- Other Name: Latch Assembly-Front Side Door *Less Finish; Door Latch Assembly; Door Lock; Latch; Latch, Front Side Door
- Position: Passenger Side
- Replaces: 13539377
Chevrolet Lock, Black, Front Driver Side Part Number: 13540957
$119.14 MSRP: $178.12You Save: $58.98 (34%)Ships in 1-3 Business DaysProduct Specifications- Other Name: Latch Assembly-Front Side Door; Door Latch Assembly; Door Lock; Latch; Latch, Front Side Door
- Position: Front Driver Side

Chevrolet Lock Actuator, Rear Passenger Side Part Number: 13546574
$135.10 MSRP: $201.99You Save: $66.89 (34%)Ships in 1-3 Business DaysProduct Specifications- Other Name: Latch Assembly-Rear Side Door; Latch; Latch, Rear Side Door
- Position: Rear Passenger Side
- Replaces: 13533629, 13533604, 13510962, 13528321, 13508295, 13510506
| Page 1 of 30 |Next >
1-20 of 582 Results
Chevrolet Door Latch Assembly
Want to cut long-term maintenance and repair costs? Choose OEM Door Latch Assembly. Those parts deliver top durability you can trust. On our site, you'll find a huge catalog of genuine Chevrolet parts. Prices are unbeatable, so you can keep more in your pocket. Every OEM Chevrolet Door Latch Assembly includes a manufacturer's warranty. You can also get an easy return policy that keeps buying risk free. Fast delivery, get your car on the road quickly. It's simple to search, compare, and order. Stop guessing about quality or fit. Order today and save with parts that last.
Chevrolet Door Latch Assembly Parts Questions & Experts Answers
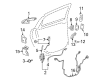
- Q: How to replace the front Door Latch Assembly on Chevrolet Impala?A:The process to replace a front Door Lock in an impala requires initial removal of front door trim panel along with the water deflector. You must detach interior handle rods from inside handle before you remove the clip which holds those rods onto the door. Separate the outside handle rod-to-lock clip from the lock before unscrewing the lock with screws from the door. Start by pulling out the lock from its position while maintaining the connection of inside handle rods followed by disconnecting electrical connectors. Start by placing the inside handle rods onto the lock before aligning the lock through the opening of the inner bar then restore electrical linkage points. Use the following correct fastener tightening order for lock screws when installing: start with top then bottom and middle followed by tightening the screws to 10 n.m (89 lb in). The installation requires a new outside handle rod-to-lock clip that should be mounted onto the lock lever followed by positioning the outside Door Handle rod into the clip to remove any play before installing the clip cover over the threaded rod. After reinserting the inside handle rods into the handle you should attach the water deflector and trim panel and secure the clip back onto the inside handle rods. Conduct a final examination of the Door Lock system for adequate functioning.
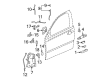
- Q: How to replace the upper rear side access door latch assembly on Chevrolet Colorado?A:The first step for replacing the upper rear side access door latch involves opening the rear side access door while removing the rear side access door trim panel. Remove the upper latch rod retaining clip to disconnect it from the latch after which you can take out the bolts (1, 2) and remove the upper latch from the rear side access door. Install the upper latch on the rear side access door first then put only a loose grip on lower bolts for initial attachment. Secure the lower bolts until the latch bracket attaches to the door panel before attaching the upper latch rod with its respective retaining clips. aginiola close the rear side access door to achieve upper latch self-alignment before fully tightening the lower bolts to 9 N.m (80 lb in). View the rear side access door a second time to set and firmly tighten the upper latch bolt to 9 N.m (80 lb in). As a conclusion reinstall the rear side access door trim panel before closing the door.
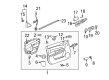
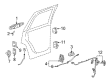
- Q: How to replace the rear side Door Latch Assembly on Chevrolet Malibu?A:The first step for changing the rear side door latch requires you to close your window completely. First uninstall the door trim panel along with the water deflector. Lock rods inside the door handle should be separated from the latch mechanism while disconnecting the outside handle lock rod from the outside handle. Secure the door replacement process by removing 3 fasteners designated as part number 123456 which hold the latch to the door and by disconnecting electrical connectors attached to the latch before extracting the latch from the door. After taking the actuator out you should proceed to take it off the latch. To install the actuator users should first place the latch into the door before attaching the actuator to the latch. Connect the electrical connectors to the latch while following the Fastener Notice before tightening the three fasteners (part number: 123456) to 10 N.m (89 lb in). The installation process begins by putting the outside handle lock rod to its place on the outside handle followed by the inside door handle lock rod going to the latch. The last step includes putting back the door trim panel together with the water deflector.


Related Chevrolet Parts
 Chevrolet Door Handle
 Chevrolet Window Regulator
 Chevrolet Hood Latch
 Chevrolet Window Motor
 Chevrolet Wiper Arm
 Chevrolet Door Armrest
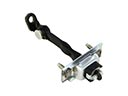 Chevrolet Door Check
 Chevrolet Door Moldings
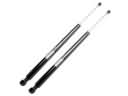 Chevrolet Tailgate Lift Support
 Chevrolet Window Channel
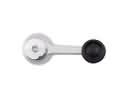 Chevrolet Window Crank Handles
 Chevrolet Windshield Wiper
Browse Chevrolet Door Latch Assembly by Models
Nova S10 Colorado C10 Tahoe Cruze Malibu Camaro Equinox Impala SS SSR Avalanche Silverado 1500 Silverado 2500 HD Caprice Classic Cobalt Suburban Traverse Blazer HHR Sonic Tracker Volt El Camino K10 Spark Trax Trailblazer Astro Cavalier Corvette C20 Aveo Beretta Bolt EUV Bolt EV C1500 C2500 C30 C3500 Celebrity Chevette City Express Corsica Express 1500 Express 2500 Express 3500 G10 G20 G30 K1500 K20 K2500 K30 K3500 K5 Blazer Lumina Metro Monte Carlo P30 Prizm S10 Blazer Silverado 2500 Sprint Uplander Venture Lumina APV Silverado 3500 Suburban 1500 Trailblazer EXT Avalanche 1500 Avalanche 2500 Aveo5 C10 Suburban C1500 Suburban C20 Suburban C2500 Suburban Captiva Sport Citation II Cruze Limited Impala Limited K10 Suburban K1500 Suburban K20 Suburban K2500 Suburban Malibu Limited P20 R10 R10 Suburban R1500 Suburban R20 R20 Suburban R2500 R2500 Suburban R30 R3500 Silverado 1500 Classic Silverado 1500 HD Silverado 1500 HD Classic Silverado 1500 LD Silverado 1500 LTD Silverado 2500 HD Classic Silverado 3500 Classic Silverado 3500 HD Spark EV Spectrum Suburban 2500 Suburban 3500 HD V10 V10 Suburban V1500 Suburban V20 V20 Suburban V2500 Suburban V30 V3500