ChevyParts
My Garage
My Account
Cart
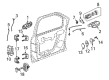
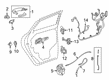
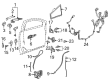
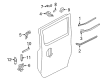
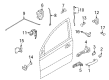
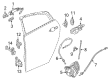
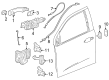
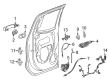
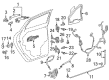
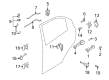
OEM Chevrolet Door Check
Front Door Check Strap- Select Vehicle by Model
- Select Vehicle by VIN
Select Vehicle by Model
orMake
Model
Year
Select Vehicle by VIN
For the most accurate results, select vehicle by your VIN (Vehicle Identification Number).
86 Door Checks found


Chevrolet Door Check, Front Driver Side Part Number: 15196109
$88.64 MSRP: $131.93You Save: $43.29 (33%)Ships in 1-3 Business DaysProduct Specifications- Other Name: Check, Front Door Hinge; Check, Door Check
- Position: Front Driver Side
- Replaces: 15155077


Chevrolet Door Check, Front Part Number: 84469267
$30.76 MSRP: $45.78You Save: $15.02 (33%)Ships in 1-3 Business DaysProduct Specifications- Other Name: Link Assembly-Front Side Door Check
- Position: Front
- Replaced by: 42846249

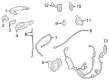
Chevrolet Door Check, Rear Lower Part Number: 84382024
$29.88 MSRP: $44.48You Save: $14.60 (33%)Ships in 1-2 Business DaysProduct Specifications- Other Name: Link, Rear Side Door Lower Hinge
- Position: Rear Lower
- Replaced by: 86511005

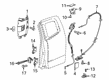
Chevrolet Door Check, Front Part Number: 23166545
$35.19 MSRP: $52.38You Save: $17.19 (33%)Ships in 1-3 Business DaysProduct Specifications- Other Name: Link Assembly-Front Side Door Check
- Position: Front
- Replaced by: 86573952

Chevrolet Door Check, Passenger Side Part Number: 19316900
$20.00 MSRP: $29.77You Save: $9.77 (33%)Ships in 1-3 Business DaysProduct Specifications- Other Name: Check, Door Check; Check, Rear Side Door Lower Hinge
- Position: Passenger Side

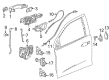
Chevrolet Door Check, Front Driver Side Part Number: 42623097
$40.84 MSRP: $60.78You Save: $19.94 (33%)Ships in 1-3 Business DaysProduct Specifications- Other Name: Link Assembly-Front Side Door Check; Check, Front Door Hinge
- Position: Front Driver Side
- Replaces: 96649046

Chevrolet Door Check, Rear Lower Part Number: 42597096
$30.34 MSRP: $45.16You Save: $14.82 (33%)Ships in 1-3 Business DaysProduct Specifications- Other Name: Link, Rear Side Door Lower Hinge
- Position: Rear Lower
- Replaced by: 42846247

Chevrolet Door Check, Front Part Number: 85626168
$19.64 MSRP: $29.24You Save: $9.60 (33%)Ships in 1-2 Business DaysProduct Specifications- Other Name: Link Assembly-Front Side Door Check; Link, Front Door Hinge
- Position: Front
- Replaces: 84734782

Chevrolet Door Check, Rear Lower Part Number: 85626942
$30.34 MSRP: $45.16You Save: $14.82 (33%)Ships in 1-2 Business DaysProduct Specifications- Other Name: Link, Rear Side Door Lower Hinge; Link, Door Check
- Position: Rear Lower
- Replaces: 84530755


Chevrolet Door Check, Rear Lower Part Number: 84286486
$30.34 MSRP: $45.16You Save: $14.82 (33%)Ships in 1-3 Business DaysProduct Specifications- Other Name: Link, Rear Side Door Lower Hinge
- Position: Rear Lower
- Replaced by: 85626940
Chevrolet Door Check, Front Passenger Side Part Number: 42623098
$36.61 MSRP: $54.49You Save: $17.88 (33%)Ships in 1-3 Business DaysProduct Specifications- Other Name: Link Assembly-Front Side Door Check; Check, Front Door Hinge
- Position: Front Passenger Side
- Replaces: 96649047
Chevrolet Door Check, Driver Side Part Number: 19316901
$20.19 MSRP: $30.06You Save: $9.87 (33%)Ships in 1-3 Business DaysProduct Specifications- Other Name: Check, Door Check; Check, Rear Side Door Lower Hinge
- Position: Driver Side

Chevrolet Door Check, Rear Lower Part Number: 23166568
$30.34 MSRP: $45.16You Save: $14.82 (33%)Ships in 1-3 Business DaysProduct Specifications- Other Name: Link, Rear Side Door Lower Hinge
- Position: Rear Lower
- Replaced by: 85642649

Chevrolet Door Check, Front Part Number: 23360941
$36.61 MSRP: $54.49You Save: $17.88 (33%)Ships in 1-3 Business DaysProduct Specifications- Other Name: Link Assembly-Front Side Door Check
- Position: Front
- Replaced by: 85631336

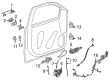
Chevrolet Door Check, Front Part Number: 84487916
$36.61 MSRP: $54.49You Save: $17.88 (33%)Ships in 1-3 Business DaysProduct Specifications- Other Name: Link Assembly-Front Side Door Check
- Position: Front
- Replaced by: 85626941

Chevrolet Door Check, Front Part Number: 84181191
$34.73 MSRP: $51.69You Save: $16.96 (33%)Ships in 1-3 Business DaysProduct Specifications- Other Name: Link Assembly-Front Side Door Check
- Position: Front
- Replaced by: 42871449

Chevrolet Door Check, Passenger Side Part Number: 42623100
$34.16 MSRP: $50.84You Save: $16.68 (33%)Ships in 1-3 Business DaysProduct Specifications- Other Name: Check, Door Check; Check, Rear Side Door Lower Hinge
- Position: Passenger Side
- Replaces: 96649097

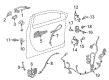
Chevrolet Door Check, Rear Lower Part Number: 42825116
$11.23 MSRP: $16.72You Save: $5.49 (33%)Ships in 1-2 Business DaysProduct Specifications- Other Name: Link, Rear Side Door Lower Hinge
- Position: Rear Lower

Chevrolet Door Check, Rear Lower Part Number: 23360939
$30.34 MSRP: $45.16You Save: $14.82 (33%)Ships in 1-3 Business DaysProduct Specifications- Other Name: Link, Rear Side Door Lower Hinge
- Position: Rear Lower
- Replaced by: 85631334

Chevrolet Door Check, Front Part Number: 15929399
$70.66 MSRP: $105.17You Save: $34.51 (33%)Product Specifications- Other Name: Check Assembly-Front Side Door; Check, Door Check
- Position: Front
- Replaces: 10389544, 15880945, 15293237
| Page 1 of 5 |Next >
1-20 of 86 Results
Chevrolet Door Check
Want to cut long-term maintenance and repair costs? Choose OEM Door Check. Those parts deliver top durability you can trust. On our site, you'll find a huge catalog of genuine Chevrolet parts. Prices are unbeatable, so you can keep more in your pocket. Every OEM Chevrolet Door Check includes a manufacturer's warranty. You can also get an easy return policy that keeps buying risk free. Fast delivery, get your car on the road quickly. It's simple to search, compare, and order. Stop guessing about quality or fit. Order today and save with parts that last.
Chevrolet Door Check Parts Questions & Experts Answers
- Q: How to replace the door check link on the front door on Chevrolet Equinox?A:The replacement process for the front Door Check should start with turning off the ignition key and removing it from the vehicle to avoid potential deployment of sir system and harm to people. Take out both the front door trim panel and front door lower speaker before starting replacement. Begin by removing bolts securing the hinge pillar check and the nuts fastening the check to the door frame until you can draw out the check from the speaker opening. You should mount the check onto the door frame after following instructions on the fastener notice. Follow the check installation by securing the nuts with a 10 n.m torque then proceeding to tighten the check bolts to the same torque. Completion of the replacement requires you to install the front door lower speaker followed by installation of the front door trim panel.
- Q: How to replace the rear side access door check link on Chevrolet Colorado?A:The first procedure for replacing a rear side access door check includes removing its associated trim panel from the door. Start by disconnecting the bolt which keeps the rear side access door check proper to the body framework and then perform the same action with the check portal nuts that attach it to the door. Proceed to take out the rear side access door check from the door after these tasks. Before the installation of the new rear side door check, the fitment must begin with the door positioning where the alignment mark faces upward. Tighten the check nuts to 9 Nm (80 lb in) after installing them to the door. The bolt needs installation to fasten the rear side access check to the body while torqueing it up to 25 Nm (18.4 lb ft). Reinstall the rear side access door trim panel as the last step.
- Q: How to replace the rear door check link on Chevrolet Malibu?A:The first step to replace the rear door check starts by removing the door inner trim panel and rear door water deflector. The first step involves removing the check bolt coupled with nuts before you separate the check from the rear door. Install the new check while maintaining proper orientation of its R and L markings which should have R facing upward for right-hand installation and L facing upward for left-hand installation. Secure the check in the rear door before installing its nuts where torque should reach 10 N.m (89 lb in). Next install the front door check bolt so that it achieves a torque strength of 9 N.m which equates to 80 lb in. Put back the rear door water deflector followed by installation of the door inner trim panel.


Related Chevrolet Parts
 Chevrolet Emblem
 Chevrolet Bumper
 Chevrolet Tailgate Latch
 Chevrolet Cup Holder
 Chevrolet Hood Latch
 Chevrolet Tailgate Lock
 Chevrolet Window Motor
 Chevrolet Center Console Base
 Chevrolet Door Armrest
 Chevrolet Lift Support
 Chevrolet Mirror Cover
 Chevrolet Trunk Latch
Browse Chevrolet Door Check by Models
Colorado Tahoe Cruze Malibu Camaro Equinox Impala SS SSR Silverado 1500 Silverado 2500 HD Caprice Classic Cobalt Suburban Traverse Blazer Sonic Tracker Trax Trailblazer Aveo Beretta Bolt EUV Bolt EV C1500 City Express Corsica Express 1500 Express 2500 Express 3500 G10 G20 G30 K1500 Lumina Metro P30 Prizm Silverado 2500 Silverado 3500 Suburban 1500 Trailblazer EXT Avalanche 1500 Avalanche 2500 Aveo5 Cruze Limited P20 Silverado 1500 Classic Silverado 1500 HD Silverado 1500 HD Classic Silverado 1500 LD Silverado 1500 LTD Silverado 2500 HD Classic Silverado 3500 Classic Silverado 3500 HD Spectrum Suburban 2500