ChevyParts
My Garage
My Account
Cart
OEM Chevrolet Door Moldings
- Select Vehicle by Model
- Select Vehicle by VIN
Select Vehicle by Model
orMake
Model
Year
Select Vehicle by VIN
For the most accurate results, select vehicle by your VIN (Vehicle Identification Number).
1564 Door Moldings found


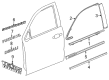
Chevrolet Lower Molding, Front Driver Side Part Number: 25824824
$182.08 MSRP: $272.22You Save: $90.14 (34%)Ships in 1-3 Business DaysProduct Specifications- Other Name: Molding, Front Side Door; Door Moldings
- Position: Front Driver Side


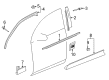
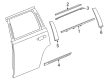
Chevrolet Belt Molding, Front Driver Side Part Number: 84291967
$124.02 MSRP: $185.42You Save: $61.40 (34%)Product Specifications- Other Name: Molding, Front Door Window Reveal; Door Moldings; Molding, Front Door Window(Inner/Outer)
- Position: Front Driver Side
- Replaces: 20963509, 23227746, 23445730


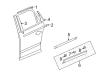
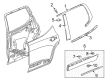
Chevrolet Side Molding, Rear Center Driver Side Part Number: 22763943
$176.30 MSRP: $263.59You Save: $87.29 (34%)Ships in 1-3 Business DaysProduct Specifications- Other Name: Molding Assembly-Rear Side Door Center *Service Primer; Door Moldings; Molding, Cab And Load Carrier Outer Side Decoration
- Position: Rear Center Driver Side
- Replaces: 20978019, 25922683


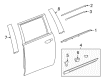
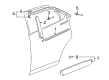
Chevrolet Belt Weatherstrip, Rear Driver Side Part Number: 23227742
$134.01 MSRP: $200.36You Save: $66.35 (34%)Ships in 1-3 Business DaysProduct Specifications- Other Name: Molding Assembly-Rear Side Door Window Belt Reveal *Exterior Bright; Door Moldings; Weatherstrip; Molding, Back/Rear Window Glass Reveal
- Position: Rear Driver Side
- Replaces: 23445726, 20963511

Chevrolet Lower Molding, Front Passenger Side Part Number: 25824825
$187.00 MSRP: $279.57You Save: $92.57 (34%)Ships in 1-2 Business DaysProduct Specifications- Other Name: Molding, Front Side Door; Door Moldings
- Position: Front Passenger Side


Chevrolet Belt Weatherstrip, Rear Passenger Side Part Number: 23227745
$134.01 MSRP: $200.36You Save: $66.35 (34%)Ships in 1-2 Business DaysProduct Specifications- Other Name: Molding Assembly-Rear Side Door Window Belt Reveal *Exterior Bright; Door Moldings; Weatherstrip; Molding, Back/Rear Window Glass Reveal
- Position: Rear Passenger Side
- Replaces: 23445729, 20963514


Chevrolet Reveal Molding, Black, Front Driver Side Part Number: 25975013
$200.22 MSRP: $299.34You Save: $99.12 (34%)Ships in 1-3 Business DaysProduct Specifications- Other Name: Molding, Front Door Window Reveal; Door Moldings; Molding, Front Door Window(Inner/Outer)
- Position: Front Driver Side
- Replaces: 25811107, 25939894


Chevrolet Lower Molding, Dark Smoke Gray, Rear Driver Side Part Number: 25824826
$187.00 MSRP: $279.57You Save: $92.57 (34%)Ships in 1-2 Business DaysProduct Specifications- Other Name: Molding Assembly-Rear Side Door Lower *Dark Smoke Gry; Door Moldings; Molding, Rear Side Door
- Position: Rear Lower Driver Side

Chevrolet Belt Weatherstrip, Rear Driver Side Part Number: 23227744
$134.01 MSRP: $200.36You Save: $66.35 (34%)Ships in 1-3 Business DaysProduct Specifications- Other Name: Molding Assembly-Rear Side Door Window Belt Reveal *Exterior Bright; Door Moldings; Weatherstrip; Molding, Back/Rear Window Glass Reveal
- Position: Rear Driver Side
- Replaces: 23445728, 20963513

Chevrolet Lower Molding, Dark Smoke Gray, Rear Passenger Side Part Number: 25824827
$187.00 MSRP: $279.57You Save: $92.57 (34%)Ships in 1-3 Business DaysProduct Specifications- Other Name: Molding Assembly-Rear Side Door Lower *Dark Smoke Gry; Door Moldings; Molding, Rear Side Door
- Position: Rear Lower Passenger Side

Chevrolet Belt Molding, Front Driver Side Part Number: 20940630
$137.47 MSRP: $205.52You Save: $68.05 (34%)Ships in 1-3 Business DaysProduct Specifications- Other Name: Molding, Front Door Window Reveal; Door Moldings; Belt Weatherstrip; Molding, Front Door Window(Inner/Outer)
- Position: Front Driver Side
- Replaces: 25804009, 25920494, 20851365, 25886690, 25939936, 25891386

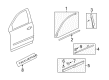
Chevrolet Side Molding, Outer Passenger Side Part Number: 23104174
$135.73 MSRP: $202.92You Save: $67.19 (34%)Ships in 1-3 Business DaysProduct Specifications- Other Name: Molding, Cab And Load Carrier Outer Side Decoration; Door Moldings
- Position: Outer Passenger Side

Chevrolet Lower Molding, Black Chrome, Rear Passenger Side Part Number: 84849556
$175.38 MSRP: $262.20You Save: $86.82 (34%)Ships in 1-3 Business DaysProduct Specifications- Other Name: Molding Assembly-Rear Side Door Lower *Service Primer; Door Moldings; Molding, Rear Side Door
- Position: Rear Lower Passenger Side
- Replaces: 84371086
Chevrolet Side Molding, Rear Center Passenger Side Part Number: 22763942
$198.05 MSRP: $296.09You Save: $98.04 (34%)Ships in 1-3 Business DaysProduct Specifications- Other Name: Molding Assembly-Rear Side Door Center *Service Primer; Door Moldings; Molding, Cab And Load Carrier Outer Side Decoration
- Position: Rear Center Passenger Side
- Replaces: 20978018, 25922684

Chevrolet Lower Molding, Black, Rear Passenger Side Part Number: 84514843
$158.26 MSRP: $236.61You Save: $78.35 (34%)Ships in 1-3 Business DaysProduct Specifications- Other Name: Molding Assembly-Rear Side Door Lower *Black; Door Moldings; Molding, Rear Side Door
- Position: Rear Lower Passenger Side
Chevrolet Reveal Molding, Black, Front Passenger Side Part Number: 25975014
$156.90 MSRP: $224.51You Save: $67.61 (31%)Ships in 1-3 Business DaysProduct Specifications- Other Name: Molding, Front Door Window Reveal; Door Moldings; Molding, Front Door Window(Inner/Outer)
- Position: Front Passenger Side
- Replaces: 25811108

Chevrolet Belt Molding, Rear Driver Side Part Number: 84205385
$145.33 MSRP: $217.28You Save: $71.95 (34%)Ships in 1-2 Business DaysProduct Specifications- Other Name: Molding Assembly-Rear Side Door Window Belt Reveal; Molding, Rear Side Door Window Reveal
- Position: Rear Driver Side
- Replaced by: 42903903
- Replaces: 22987623, 84004640

Chevrolet Lower Molding, Black, Rear Driver Side Part Number: 42810506
$161.23 MSRP: $241.05You Save: $79.82 (34%)Ships in 1-3 Business DaysProduct Specifications- Other Name: Molding Assembly-Rear Side Door Lower *Black; Molding, Rear Side Door
- Position: Rear Lower Driver Side
- Replaces: 42759823, 42786622
Chevrolet Lower Molding, Black, Rear Driver Side Part Number: 42810510
$161.23 MSRP: $241.05You Save: $79.82 (34%)Ships in 1-3 Business DaysProduct Specifications- Other Name: Molding Assembly-Rear Side Door Lower *Black; Molding, Rear Side Door
- Position: Rear Lower Driver Side
- Replaces: 42786626, 42759819, 42737889

Chevrolet Lower Molding, Black, Front Driver Side Part Number: 84514878
$157.54 MSRP: $235.53You Save: $77.99 (34%)Ships in 1-3 Business DaysProduct Specifications- Other Name: Molding Assembly-Front Side Door Lower *Black; Door Moldings; Molding, Front Side Door
- Position: Front Lower Driver Side
| Page 1 of 79 |Next >
1-20 of 1564 Results
Chevrolet Door Moldings
Choose OEM Door Moldings, you're making the optimal decision for superior quality and perfect performance. You can feel confident because each component goes through stringent quality checks. Every part is carefully built to comply with Chevrolet's factory specifications. You'll enjoy a smooth, worry-free installation that fits just right. At ChevyPartsGiant.com, you'll find it easy to get top-quality OEM Chevrolet Door Moldings. You can shop at highly competitive prices and protect your budget. All our genuine Chevrolet parts include a dependable manufacturer's warranty. You'll also appreciate our straightforward return policy and swift delivery services for extra convenience.
Chevrolet Door Moldings Parts and Q&A
- Q: How to replace the door moldings on the side door lock pillar on Chevrolet S10?A:Replacing the side door lock pillar garnish molding requires front rear door sill trim plate removal along with upper and lower front seat belt anchor bolts. The procedure begins with removing the front side door lock pillar garnish molding from the vehicle after threadng the seat belt through it. Reinstall the front side door lock pillar garnish molding while keeping the seat belt leading through it. Service Precautions Fastener Notice requires strict compliance. Reinstall the upper and lower front seat belt anchor bolts at 70 N.m (52 lb ft) torque and secure the front and rear door sill trim plates.
- Q: How to replace the rear upper door moldings on Chevrolet Tahoe?A:To replace rear door upper garnish molding, remove the plastic expanding fasteners at the window latch closeout first. Use the Door Trim Pad Clip Remover (J 38778) to remove the retainers from the retainer seats and remove the trim panel from the liftgate. For installation, align the retainers with the liftgate hole, apply pressure on the seat retainers, finally install the expanding plastic retainers onto the window latch close out.


Related Chevrolet Parts
 Chevrolet Door Handle
 Chevrolet Door Lock Cylinder
 Chevrolet Tailgate Lock
 Chevrolet Body Mount Hole Plug
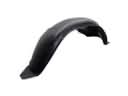 Chevrolet Fender Splash Shield
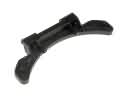 Chevrolet Fuel Door Hinge
 Chevrolet Instrument Panel Light Bulb
 Chevrolet Liftgate Hinge
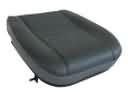 Chevrolet Seat Cushion Pad
 Chevrolet Window Channel
 Chevrolet Windshield Wiper
 Chevrolet Wiper Blade
Browse Chevrolet Door Moldings by Models
Nova S10 Colorado C10 Tahoe Cruze Malibu Camaro Equinox Impala SS Avalanche Silverado 1500 Silverado 2500 HD Caprice Classic Cobalt Suburban Traverse Blazer HHR Tracker Volt El Camino K10 Spark Trax Trailblazer Astro Cavalier Corvette C20 Aveo Beretta Bolt EUV Bolt EV C1500 C2500 C30 C3500 Celebrity Chevette City Express Corsica Express 1500 Express 2500 Express 3500 G10 G20 G30 K1500 K20 K2500 K30 K3500 K5 Blazer Lumina Metro Monte Carlo P30 Prizm S10 Blazer Silverado 2500 Sprint Uplander Venture Lumina APV Silverado 3500 Suburban 1500 Trailblazer EXT Avalanche 1500 Avalanche 2500 Aveo5 C10 Suburban C1500 Suburban C20 Suburban C2500 Suburban Captiva Sport Citation II Cruze Limited Impala Limited K10 Suburban K1500 Suburban K20 Suburban K2500 Suburban Malibu Limited P20 R10 R10 Suburban R1500 Suburban R20 R20 Suburban R2500 R2500 Suburban R30 R3500 Silverado 1500 Classic Silverado 1500 HD Silverado 1500 HD Classic Silverado 1500 LD Silverado 1500 LTD Silverado 2500 HD Classic Silverado 3500 Classic Silverado 3500 HD Spectrum Suburban 2500 V10 V10 Suburban V1500 Suburban V20 V20 Suburban V2500 Suburban V30 V3500