ChevyParts
My Garage
My Account
Cart
OEM Chevrolet Seat Cushion Pad
Seat Pad Cushion- Select Vehicle by Model
- Select Vehicle by VIN
Select Vehicle by Model
orMake
Model
Year
Select Vehicle by VIN
For the most accurate results, select vehicle by your VIN (Vehicle Identification Number).
1055 Seat Cushion Pads found

Chevrolet Seat Cushion, Beige Part Number: 96891958
$664.05 MSRP: $997.06You Save: $333.01 (34%)Ships in 1-3 Business DaysProduct Specifications- Other Name: Cushion Assembly, Passenger Seat *Beige; Cushion, Front/Rear
- Position: Passenger Side

Chevrolet Cushion Assembly, Black, Passenger Side Part Number: 22970730
$118.25 MSRP: $176.75You Save: $58.50 (34%)Ships in 1-3 Business DaysProduct Specifications- Other Name: Cushion, Front/Rear; Seat Cushion
- Position: Passenger Side
- Replaces: 22807414
Chevrolet Cushion Assembly, Beige, Driver Side Part Number: 22834736
$163.44 MSRP: $244.30You Save: $80.86 (34%)Ships in 1-3 Business DaysProduct Specifications- Other Name: Cushion, Front/Rear; Seat Cushion
- Position: Driver Side
Chevrolet Seat Cushion, Beige Part Number: 96891955
$326.96 MSRP: $1124.87You Save: $797.91 (71%)Ships in 1-2 Business DaysProduct Specifications- Other Name: Cushion Assembly, Passenger Seat *Beige; Cushion, Front/Rear
- Position: Passenger Side
- Replaces: 96669759

Chevrolet Seat Cushion Pad, Passenger Side Part Number: 22972734
$139.74 MSRP: $208.88You Save: $69.14 (34%)Ships in 1-3 Business DaysProduct Specifications- Other Name: Pad Assembly-Passenger Seat Cushion; Pad, Front Seat Cushion; Seat Cushion
- Position: Passenger Side


Chevrolet Seat Cushion Pad Part Number: 84427083
$163.49 MSRP: $244.39You Save: $80.90 (34%)Ships in 1-3 Business DaysProduct Specifications- Other Name: Pad, Seat Cushion; Pad, Front Seat Cushion; Seat Cushion

Chevrolet Seat Cushion Pad, Rear Part Number: 87820735
$208.20 MSRP: $311.21You Save: $103.01 (34%)Ships in 1-2 Business DaysProduct Specifications- Other Name: Pad, Rear Seat Cushion
- Position: Rear
- Replaces: 23492058, 84211035, 84018632

Chevrolet Seat Back Pad, Front Part Number: 22774673
$23.19 MSRP: $183.22You Save: $160.03 (88%)Ships in 1-2 Business DaysProduct Specifications- Other Name: Pad, Front Seat Back
- Position: Front
- Replaces: 22774671

Chevrolet Seat Back Pad, Front Part Number: 22774672
$122.57 MSRP: $183.22You Save: $60.65 (34%)Ships in 1-3 Business DaysProduct Specifications- Other Name: Pad, Front Seat Back
- Position: Front
- Replaces: 22774670

Chevrolet Seat Back Pad, Front Part Number: 22855721
$125.94 MSRP: $188.25You Save: $62.31 (34%)Ships in 1-3 Business DaysProduct Specifications- Other Name: Pad, Front Seat Back
- Position: Front

Chevrolet Seat Cushion, Black Part Number: 96989624
$52.79 MSRP: $286.91You Save: $234.12 (82%)Ships in 1-2 Business DaysProduct Specifications- Other Name: Cushion Assembly, Passenger Seat; Cushion, Front/Rear
- Position: Passenger Side
- Replaces: 96669776

Chevrolet Seat Cushion Pad, Driver Side Part Number: 22914420
$170.99 MSRP: $255.58You Save: $84.59 (34%)Ships in 1-3 Business DaysProduct Specifications- Other Name: Pad, Seat Cushion; Seat Cushion
- Position: Driver Side

Chevrolet Seat Back Pad, Front Part Number: 84064387
$99.89 MSRP: $148.65You Save: $48.76 (33%)Ships in 1-3 Business DaysProduct Specifications- Other Name: Pad, Front Seat Back
- Position: Front
- Replaces: 23379747

Chevrolet Seat Back Pad, Front Part Number: 84064385
$103.21 MSRP: $153.57You Save: $50.36 (33%)Ships in 1-3 Business DaysProduct Specifications- Other Name: Pad, Front Seat Back
- Position: Front
- Replaces: 23379745

Chevrolet Seat Back Pad, Rear Part Number: 84933119
$28.19 MSRP: $41.95You Save: $13.76 (33%)Ships in 1-3 Business DaysProduct Specifications- Other Name: Pad, Rear Seat Back; Pad, Seat Back Cushion
- Position: Rear
- Replaces: 84856960

Chevrolet Seat Cushion Pad Part Number: 84010077
$39.29 MSRP: $58.46You Save: $19.17 (33%)Ships in 1-3 Business DaysProduct Specifications- Other Name: Pad, Seat Cushion; Pad, Front Seat Cushion
- Position: Front
- Replaces: 23380021, 23266121, 22892418

Chevrolet Seat Cushion Pad Part Number: 89026510
$45.52 MSRP: $67.74You Save: $22.22 (33%)Ships in 1-3 Business DaysProduct Specifications- Other Name: Pad, Seat Cushion; Seat Cushion
- Position: Rear Driver Side

Chevrolet Seat Cushion Pad, Rear Part Number: 84566975
$102.14 MSRP: $151.99You Save: $49.85 (33%)Ships in 1-3 Business DaysProduct Specifications- Other Name: Pad, Rear Seat Cushion; Seat Cushion
- Position: Rear
- Replaces: 84247282

Chevrolet Seat Back Pad, Front Passenger Side Part Number: 22972733
$194.55 MSRP: $290.81You Save: $96.26 (34%)Product Specifications- Other Name: Pad, Front Seat Back
- Position: Front Passenger Side
Chevrolet Cushion Assembly, Black, Driver Side Part Number: 22970729
$118.25 MSRP: $176.75You Save: $58.50 (34%)Ships in 1-3 Business DaysProduct Specifications- Other Name: Cushion, Front/Rear; Seat Cushion
- Position: Driver Side
- Replaces: 22807412
| Page 1 of 53 |Next >
1-20 of 1055 Results
Chevrolet Seat Cushion Pad
Want to cut long-term maintenance and repair costs? Choose OEM Seat Cushion Pad. Those parts deliver top durability you can trust. On our site, you'll find a huge catalog of genuine Chevrolet parts. Prices are unbeatable, so you can keep more in your pocket. Every OEM Chevrolet Seat Cushion Pad includes a manufacturer's warranty. You can also get an easy return policy that keeps buying risk free. Fast delivery, get your car on the road quickly. It's simple to search, compare, and order. Stop guessing about quality or fit. Order today and save with parts that last.
Chevrolet Seat Cushion Pad Parts Questions & Experts Answers
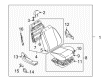
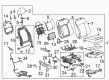
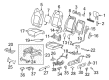
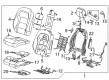
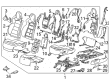
- Q: How to replace the front seat cushion pad and cover on Chevrolet Colorado?A:The first task to replace front seat cushion covers and pads starts with extracting the seat from inside the vehicle. The next step involves pulling out the cup holder bracket to detach its front seat cushion outer trim panel. The seat frame should be loosened by removing the 3 bolts on its cup holder bracket to proceed with the unclipping of front, rear and side J-strips (1, 2) located underneath the seat. The seat switch bezel can be removed when the lumbar knob pulls straight off the seat. First remove the recliner handle and proceed to take out the two bolts which hold the seat recliner in place with the seat adjuster before fully separating the seat back assembly from the seat cushion assembly. Begin by disconnecting the seat belt buckle electrical connector from its base and remove all clips or straps which bind the electrical harness to the bottom of the seat cushion frame. Start by removing the bolt which fastens the seat belt buckle assembly to the seat adjuster then detach the seat cushion cover together with foam before removing the hog rings that fix the cover to the pad. Cutting the broken pad requires removal of the heating element from the pad surface. Then apply the sticky heating element to the pad if you replace the pad during installation. Place the cover on the pad through the use of hog rings , then connect the seat cushion foam pad along with its cover to the frame. The seat belt buckle assembly should be inserted into the seat cushion pad before attaching it to the seat adjuster through the bolt which needs tightening to 55 N.m (41 lb ft). Secure the electrical harness at the bottom of the seat cushion frame while connecting the seat belt buckle electrical connector. Fit the seat back assembly onto the seat cushion assembly before locking in the seat recliner to the seat adjuster through 2 bolts that need a tightness of 24 N.m (18 lb ft). The seat switch bezel installation should be followed by pushing the lumbar knob directly onto its shaft. You should install the recliner handle before you attach the J-strips on the underside of the seat (1, 2) to the front and rear and side positions. Use the 3 bolts to fasten the cup holder bracket onto the seat frame before tightening them to 9.1 N.m (80 lb in). Afterward, set the front seat cushion outer trim panel along with inserting the cup holder directly onto the bracket. Install the seat as a final step.
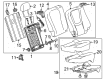
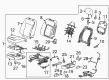
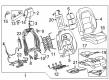
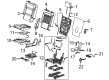
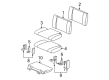
- Q: How to replace the Seat Cushion Pad and trim cover for a bench seat on Chevrolet S10?A:The first step for bench seat seat cushion trim cover and pad replacement includes removing the seat from the vehicle together with any seat back release lever installation on the vehicle. Detach the seat back before breaking free the J-strips from the seat bottom frame. To initiate the installation remove the manual lumbar knob lever and after that remove the seat bottom cover and pad. The procedure begins by attaching the seat bottom pad straight to the seat bottom surface before putting on the seat bottom cover. You can install the J-strips onto the seat bottom frame before reattaching the seat back and the seat back release lever if it has that feature. Reinstall the manual lumbar knob lever only when equipped before the seat back can be placed inside the vehicle.
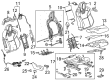
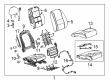
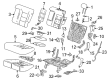
- Q: How to replace the rear seat back Seat Cushion Pad and cover on Chevrolet Tahoe?A:Besides the belt latch plates one needs a drift punch or equivalent tool to press the belt buckle release hole while pulling the safety belt. Press the seat handle near the back then push the seat forward before lifting it out from the rails mounted on the floor. To install the seat you should place it into your vehicle so the attaching points fit correctly into floor rail slots. The front portion of seat risers needs to enter the floor rail pins while pushing the seat to lock its position. After securing the front part the seat should be rolled backward until it reaches its proper position. The installation of the lap/shoulder belt quick release latch plate requires inserting it into the Seat Belt buckle then pushing the latch plate until it locks within the buckle.


Related Chevrolet Parts
 Chevrolet Emblem
 Chevrolet Center Console
 Chevrolet Door Striker
 Chevrolet Automatic Transmission Shift Indicator
 Chevrolet Center Console Base
 Chevrolet Door Armrest
 Chevrolet Door Seal
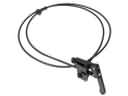 Chevrolet Hood Cable
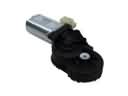 Chevrolet Seat Motor
 Chevrolet Seat Switch Panel
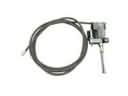 Chevrolet Sunroof Cable
 Chevrolet Weather Strip
Browse Chevrolet Seat Cushion Pad by Models
S10 Colorado Tahoe Cruze Malibu Camaro Equinox Impala SS SSR Avalanche Silverado 1500 Silverado 2500 HD Caprice Classic Cobalt Suburban Traverse Blazer HHR Sonic Tracker Volt Spark Trax Trailblazer Corvette Aveo Bolt EUV Bolt EV C1500 C2500 C3500 City Express Express 1500 Express 2500 Express 3500 K1500 K2500 K3500 Lumina Metro Monte Carlo P30 Prizm Silverado 2500 Uplander Venture Silverado 3500 Suburban 1500 Trailblazer EXT Avalanche 1500 Avalanche 2500 Aveo5 Captiva Sport Cruze Limited Impala Limited Malibu Limited Silverado 1500 Classic Silverado 1500 HD Silverado 1500 HD Classic Silverado 1500 LD Silverado 1500 LTD Silverado 2500 HD Classic Silverado 3500 Classic Silverado 3500 HD Spark EV Suburban 2500