ChevyParts
My Garage
My Account
Cart
OEM Chevrolet Hood Cable
Hood Release Cable- Select Vehicle by Model
- Select Vehicle by VIN
Select Vehicle by Model
orMake
Model
Year
Select Vehicle by VIN
For the most accurate results, select vehicle by your VIN (Vehicle Identification Number).
125 Hood Cables found


Chevrolet Release Cable Part Number: 20840749
$46.50 MSRP: $69.21You Save: $22.71 (33%)Ships in 1-3 Business DaysProduct Specifications- Other Name: Cable, Hood Latch; Hood Release Cable
- Replaces: 20756258


Chevrolet Release Cable Part Number: 23434316
$44.77 MSRP: $66.63You Save: $21.86 (33%)Ships in 1-3 Business DaysProduct Specifications- Other Name: Cable, Hood Latch; Hood Release Cable
- Replaces: 23439956, 22770129, 13312787, 20944973


Chevrolet Release Handle, Black Part Number: 96476604
$15.89 MSRP: $23.65You Save: $7.76 (33%)Ships in 1-3 Business DaysProduct Specifications- Other Name: Handle, Hood Latch
- Replaces: 96449523


Chevrolet Release Cable Part Number: 15769412
$88.70 MSRP: $132.03You Save: $43.33 (33%)Ships in 1-3 Business DaysProduct Specifications- Other Name: Cable, Hood Latch; Hood Release Cable
- Replaces: 15728525, 15016468


Chevrolet Release Cable Part Number: 21997874
$39.85 MSRP: $62.38You Save: $22.53 (37%)Ships in 1-3 Business DaysProduct Specifications- Other Name: Cable, Hood Latch; Hood Release Cable
- Replaces: 15160712


Chevrolet Release Cable Part Number: 15242999
$50.25 MSRP: $74.80You Save: $24.55 (33%)Ships in 1-3 Business DaysProduct Specifications- Other Name: Cable, Hood Latch; Hood Release Cable; Gutter
- Replaces: 25677972


Chevrolet Release Cable Part Number: 15751510
$52.32 MSRP: $77.87You Save: $25.55 (33%)Ships in 1-3 Business DaysProduct Specifications- Other Name: Cable, Hood Latch; Hood Release Cable

Chevrolet Release Cable Part Number: 84755336
$30.28 MSRP: $45.08You Save: $14.80 (33%)Ships in 1-2 Business DaysProduct Specifications- Other Name: Cable, Hood Latch
- Replaced by: 85602059

Chevrolet Release Cable Part Number: 20959350
$31.01 MSRP: $46.16You Save: $15.15 (33%)Ships in 1-3 Business DaysProduct Specifications- Other Name: Cable Package, Hood Latch; Hood Release Cable
- Replaces: 92233983, 92232162, 92243196

Chevrolet Release Cable Part Number: 84279473
$44.77 MSRP: $66.63You Save: $21.86 (33%)Ships in 1-3 Business DaysProduct Specifications- Other Name: Cable, Hood Latch; Hood Release Cable
- Replaces: 23486864

Chevrolet Release Cable, Gray Part Number: 42711125
$29.40 MSRP: $43.76You Save: $14.36 (33%)Ships in 1-3 Business DaysProduct Specifications- Other Name: Handle Assembly-Hood Primary Latch Release Cable *Dark Ash Gre; Hood Release Cable; Handle, Hood Latch

Chevrolet Release Handle, Black Part Number: 23286357
$5.61 MSRP: $8.35You Save: $2.74 (33%)Ships in 1-3 Business DaysProduct Specifications- Other Name: Handle, Hood Latch
- Replaces: 23213717

Chevrolet Release Cable Part Number: 23285643
$7.66 MSRP: $11.40You Save: $3.74 (33%)Ships in 1-3 Business DaysProduct Specifications- Other Name: Cable, Hood Latch; Hood Release Cable

Chevrolet Release Cable Part Number: 92229980
$34.79 MSRP: $51.78You Save: $16.99 (33%)Ships in 1-3 Business DaysProduct Specifications- Other Name: Cable, Hood Latch; Hood Release Cable

Chevrolet Release Cable, Gray Part Number: 84026393
$6.69 MSRP: $9.95You Save: $3.26 (33%)Ships in 1-3 Business DaysProduct Specifications- Other Name: Cable Assembly-Hood Primary & Secondary Latch Release *Atmosphere R; Hood Release Cable; Cable, Hood Latch
- Replaces: 23332136
Chevrolet Release Handle, Gray Part Number: 23332138
$6.03 MSRP: $8.97You Save: $2.94 (33%)Ships in 1-3 Business DaysProduct Specifications- Other Name: Handle Assembly-Hood Primary & Secondary Latch Release *Dark Atmospherr; Handle, Hood Latch

Chevrolet Release Lever Part Number: 87844557
$31.67 MSRP: $47.14You Save: $15.47 (33%)Ships in 1-2 Business DaysProduct Specifications- Other Name: Cable Assembly-Hood Secondary Latch Release; Release Cable
- Replaced by: 87850146

Chevrolet Release Cable Part Number: 42357514
$11.51 MSRP: $17.14You Save: $5.63 (33%)Ships in 1-3 Business DaysProduct Specifications- Other Name: Cable, Hood Latch; Hood Release Cable


Chevrolet Release Cable Part Number: 84100312
$44.77 MSRP: $66.63You Save: $21.86 (33%)Ships in 1-3 Business DaysProduct Specifications- Other Name: Cable, Hood Latch; Hood Release Cable
- Replaces: 23356304
Chevrolet Release Cable Part Number: 22759325
$50.47 MSRP: $75.12You Save: $24.65 (33%)Ships in 1-3 Business DaysProduct Specifications- Other Name: Cable, Hood Latch; Hood Release Cable
- Replaces: 25980928
| Page 1 of 7 |Next >
1-20 of 125 Results
Chevrolet Hood Cable
Want to cut long-term maintenance and repair costs? Choose OEM Hood Cable. Those parts deliver top durability you can trust. On our site, you'll find a huge catalog of genuine Chevrolet parts. Prices are unbeatable, so you can keep more in your pocket. Every OEM Chevrolet Hood Cable includes a manufacturer's warranty. You can also get an easy return policy that keeps buying risk free. Fast delivery, get your car on the road quickly. It's simple to search, compare, and order. Stop guessing about quality or fit. Order today and save with parts that last.
Chevrolet Hood Cable Parts Questions & Experts Answers
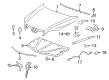
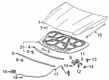
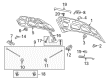
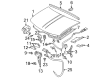
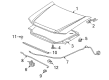
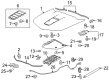
- Q: How to replace the Hood Cable for the Primary Latch Release on Chevrolet Colorado?A:Begin by removing the grille before starting the hood primary latch cable replacement. Before beginning start by removing the Hood Latch and detach the Hood Cable from its housing. Secure the mechanic's wire to terminate at the outer end of the cable with careful note of its upcoming installation path. After removing restraints from the inner fender and radiator support use a gentle push to feed the grommet through the cowl panel into vehicle interior space. Detach the hood release handle from its knee bolster mounting bolts then remove its cable from the release handle. Once the cowl panel cable exit is reached after sound insulation removal the mechanic's wire must be separated from the cable which will remain in its position for guide installation. The cable should be extracted from the vehicle's interior space. The mechanic's wire enables effective cable installation at this point by connecting to the new cable's exterior end before guiding it beneath the sound insulation toward the cowl panel for exterior cable passage. Use the cable to reach the release handle before placing the cable grommet into position at the cowl panel. Screw the release handle back into the knee bolster while applying 1 n.m (9 lb in) torque to the bolts. Follow the cable guidance while you attach the inner fender retainers then mount the Hood Latch assembly. The Hood Latch and the grille should be installed after completing the process.
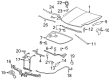
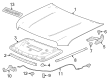
- Q: How to replace the Hood Cable for the Primary Latch Release on Chevrolet Equinox?A:First, open the hood and pull out the Hood Latch to change the Hood Cable. Then, remove the Hood Cable from the structure, mark its routing in the engine compartment for reinstallation. Inside the vehicle remove the left front carpet retainer & reposition carpet to expose the release handle. Pull the release handle up, pry back the front hood handle slip to unlock it from the hinge pillar and pull out the Hood Cable grommet from the front of the dash, as well as the cable from the core support. For installation, insert the Hood Cable and grommet through the front of the dash, insert the hood release handle to the hinge pillar and set it in, replace the carpet and install the front carpet retainer. Route the Hood Cable through the body structure and install the Hood Latch. Lastly, check the proper operation of the Hood Cable and close the hood.
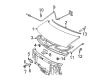
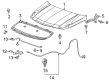
- Q: How to replace the Hood Cable on Chevrolet Malibu?A:The procedure to replace Hood Cable begins with opening the hood while removing the upper fascia support. First mark the latch position to the body frame and then disconnect the hood release cable from the hood latch by squeezing the hood release cable retainer. Finally detach the hood latch bolts. The next step involves removing the side trim panel retainers followed by the hush panel from the instrument panel and finally the knee bolster of the instrument panel. Safeguard the string termination point inside the passenger section before you uninstall the bolts which secure the hood cable handle. The wire or string should be attached to the end of the hood release cable to help during its installation. Leveled down a small flat-bladed tool to extract the grommet from engine to passenger sector after you detach the hood release cable through the instrument panel while removing string or cord from this area. Use the small flat-bladed tool to pass both the wire or string and new hood cable through the instrument panel hole resulting in full grommet insertion. Take the wire or string out followed by attaching the hood cable ball to the existing latch and securing the fasteners to 10 N.m (89 lb in). To conclude the fix install the upper fascia support along with the knee bolster and hood cable handle as well as side trim panel and hush panel.


Related Chevrolet Parts
 Chevrolet Emblem
 Chevrolet Center Console
 Chevrolet Tailgate Latch
 Chevrolet Center Console Latch
 Chevrolet Cup Holder
 Chevrolet Door Latch Assembly
 Chevrolet Center Console Base
 Chevrolet Dash Panel Vent Portion Covers
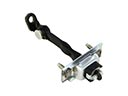 Chevrolet Door Check
 Chevrolet Liftgate Hinge
 Chevrolet Seat Cushion Pad
 Chevrolet Weather Strip
Browse Chevrolet Hood Cable by Models
Nova S10 Colorado C10 Tahoe Cruze Malibu Camaro Equinox Impala SS SSR Avalanche Silverado 1500 Silverado 2500 HD Caprice Classic Cobalt Suburban Traverse Blazer HHR Sonic Tracker Volt K10 Spark Trax Trailblazer Astro Cavalier Corvette C20 Aveo Beretta Bolt EUV Bolt EV C1500 C2500 C30 C3500 Celebrity Chevette City Express Corsica Express 1500 Express 2500 Express 3500 G10 G20 G30 K1500 K20 K2500 K30 K3500 K5 Blazer Lumina Metro Monte Carlo P30 Prizm S10 Blazer Silverado 2500 Sprint Uplander Venture Lumina APV Silverado 3500 Suburban 1500 Trailblazer EXT Avalanche 1500 Avalanche 2500 Aveo5 C10 Suburban C1500 Suburban C20 Suburban C2500 Suburban Captiva Sport Citation II Cruze Limited Impala Limited K10 Suburban K1500 Suburban K20 Suburban K2500 Suburban Malibu Limited P20 R10 R10 Suburban R1500 Suburban R20 R20 Suburban R2500 R2500 Suburban R30 R3500 Silverado 1500 Classic Silverado 1500 HD Silverado 1500 HD Classic Silverado 1500 LD Silverado 1500 LTD Silverado 2500 HD Classic Silverado 3500 Classic Silverado 3500 HD Spark EV Spectrum Suburban 2500 Suburban 3500 HD V10 V10 Suburban V1500 Suburban V20 V20 Suburban V2500 Suburban V30 V3500