ChevyParts
My Garage
My Account
Cart
OEM Chevrolet Trailblazer Hood Cable
Hood Release Cable- Select Vehicle by Model
- Select Vehicle by VIN
Select Vehicle by Model
orMake
Model
Year
Select Vehicle by VIN
For the most accurate results, select vehicle by your VIN (Vehicle Identification Number).
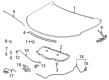
2 Hood Cables found


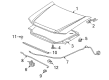
Chevrolet Trailblazer Release Cable Part Number: 21997874
$39.85 MSRP: $62.38You Save: $22.53 (37%)Ships in 1-3 Business Days
Chevrolet Trailblazer Release Lever Part Number: 42730771
$35.34 MSRP: $55.31You Save: $19.97 (37%)Ships in 1-3 Business Days
Chevrolet Trailblazer Hood Cable
Want to cut long-term maintenance and repair costs? Choose OEM Hood Cable. Those parts deliver top durability you can trust. On our site, you'll find a huge catalog of genuine Chevrolet Trailblazer parts. Prices are unbeatable, so you can keep more in your pocket. Every OEM Chevrolet Trailblazer Hood Cable includes a manufacturer's warranty. You can also get an easy return policy that keeps buying risk free. Fast delivery, get your car on the road quickly. It's simple to search, compare, and order. Stop guessing about quality or fit. Order today and save with parts that last.
Chevrolet Trailblazer Hood Cable Parts and Q&A
- Q: How to replace the Hood Cable for the Primary Latch Release on Chevrolet Trailblazer?A:Start the hood primary latch cable replacement by removing the left front door sill plate and then the left closeout/insulator panel before moving on to the grille. Separate the Hood Latch and detach the Hood Cable from the Hood Latch assembly. Mark down the cable route while affixing mechanic's wire to the outer conclusion of the cable. Lift the inner fender retainers which hold the cable next to the headlamp housing panel and Radiator before pulling out the cable between them. Push the grommet casing through the bulkhead before removing the hood release handle attachment nut from its position on the left cowl trim panel to detach the cable from the release handle. Pull the cable through the cowl panel opening behind the sound insulation while detaching the mechanic's wire for easy installation guidance. The cable needs extraction from the automobile. Use the mechanic's wire to lead the new cable underneath sound insulation before passing through the cowl panel from its exterior side. Connect the cable to the handle but install the grommet onto the panel before attaching it to the cowl. Secure the release handle in its left side kick panel installation by using the nut which needs to be tightened at 7 nm (62 lb in). Follow the established cable path to the inner fender retainers where you should attach the cable before installing it to the Hood Latch assembly. Finish the installation by reattaching the Hood Latch followed by the grille and then the left closeout/insulator panel and left front door sill plate.

Related Chevrolet Trailblazer Parts
 Chevrolet Trailblazer Emblem
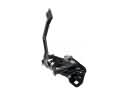 Chevrolet Trailblazer Hood Latch
 Chevrolet Trailblazer Window Regulator
 Chevrolet Trailblazer Brake Fluid Level Sensor
 Chevrolet Trailblazer Door Hinge
 Chevrolet Trailblazer Door Striker
 Chevrolet Trailblazer Front Cross-Member
 Chevrolet Trailblazer Lift Support
 Chevrolet Trailblazer Mirror Cover
 Chevrolet Trailblazer Weather Strip
 Chevrolet Trailblazer Window Channel
 Chevrolet Trailblazer Windshield Wiper