ChevyParts
My Garage
My Account
Cart
OEM Chevrolet Tracker Hood Cable
Hood Release Cable- Select Vehicle by Model
- Select Vehicle by VIN
Select Vehicle by Model
orMake
Model
Year
Select Vehicle by VIN
For the most accurate results, select vehicle by your VIN (Vehicle Identification Number).
3 Hood Cables found

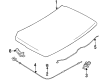
Chevrolet Tracker Release Cable Part Number: 96066241

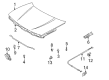
Chevrolet Tracker Release Cable Part Number: 91175217

Chevrolet Tracker Release Lever Part Number: 30021391
Chevrolet Tracker Hood Cable
Want to cut long-term maintenance and repair costs? Choose OEM Hood Cable. Those parts deliver top durability you can trust. On our site, you'll find a huge catalog of genuine Chevrolet Tracker parts. Prices are unbeatable, so you can keep more in your pocket. Every OEM Chevrolet Tracker Hood Cable includes a manufacturer's warranty. You can also get an easy return policy that keeps buying risk free. Fast delivery, get your car on the road quickly. It's simple to search, compare, and order. Stop guessing about quality or fit. Order today and save with parts that last.
A Chevrolet Tracker Hood Cable stands as an essential part which demonstrates superior reliability together with performance capabilities in Chevrolet Tracker vehicles. The hood release lever uses this critical cable to link with the hood latch mechanism so that drivers can easily access the engine compartment. The Chevrolet Tracker Hood Cable withstands regular use until it shows signs of damage through cracking because of deteriorating materials. Maintaining the hood cable regularly becomes essential because it enables both effective hood operation and safe use on the road. The Chevrolet Tracker Hood Cable functions efficiently in a wide range of Tracker vehicle models starting from multiple generations through today. Through each production phase since its 1988 launch the Chevrolet Tracker series has progressed in performance quality while gaining better off-roading capabilities. The hood cable excels in the automotive market through its reliable design alongside strength that enables users to handle demanding situations when driving Chevrolet car vehicles. The the automaker model Hood Cable enables smooth hood operation thus enabling essential maintenance tasks and inspections which collectively extend the life of the vehicle. The car Hood Cable stands as an essential component for the car because of its proven reliability which aligns with the production brand mission to prioritize quality and performance experience.
Chevrolet Tracker Hood Cable Parts and Q&A
- Q: How to replace the Hood Cable for the Primary Latch Release on Chevrolet Tracker?A:To replace the Hood Cable, raise and support the hood first. Remove the 2 bolts and the Hood Latch from the front upper panel and then remove the Hood Cable from the Hood Latch. Use a mechanic's wire to attach to the Hood Cable to make it easy for removal and installation. Pull the Hood Cable from the hold down clips and take the hood release handle off. Pull the Hood Cable through the body and take it out of the car by pulling the mechanic's wire from inside the vehicle of the passenger compartment; keeping the mechanic wire hanging through the body makes reinstalling it easier. Now, following the removal of the mechanic's wire from the cable, connect the mechanic's wire to the new Hood Cable and feed the same through the body. Cutting the mechanic's wire once the cable is in place, put the hood release handle. Secure the Hood Cable to the hood hold down clips, then connect them up on the Hood Latch. Mount the Hood Latch to the front upper panel and screw it in with the 2 retaining bolts but do not tighten. Adjust the Hood Latch so that the striker shaft will fall into the center groove of the Hood Latch and also ensure that the hood is flush with the front fenders. Finally, tighten the Hood Latch retaining bolts to a maximum of 10 n.m (89 lb in) before putting the hood down.

Related Chevrolet Tracker Parts
 Chevrolet Tracker Center Console
 Chevrolet Tracker Control Arm Bracket
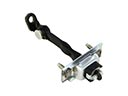 Chevrolet Tracker Door Check
 Chevrolet Tracker Door Hinge
 Chevrolet Tracker Door Lock
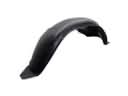 Chevrolet Tracker Fender Splash Shield
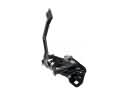 Chevrolet Tracker Hood Latch
 Chevrolet Tracker Instrument Panel Light Bulb
 Chevrolet Tracker Lift Support
 Chevrolet Tracker Shift Linkage Boot
 Chevrolet Tracker Side View Mirrors
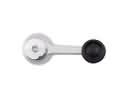 Chevrolet Tracker Window Crank Handles