ChevyParts
My Garage
My Account
Cart
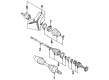
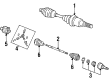
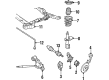
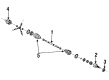
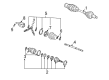
OEM Buick Drive Shaft
Axle Shaft- Select Vehicle by Model
- Select Vehicle by VIN
Select Vehicle by Model
orMake
Model
Year
Select Vehicle by VIN
For the most accurate results, select vehicle by your VIN (Vehicle Identification Number).
54 Drive Shafts found


Buick Axle Shaft, Passenger Side Part Number: 7846164
$50.66 MSRP: $90.46You Save: $39.80 (44%)Ships in 1-3 Business DaysProduct Specifications- Other Name: Shaft - Axle; Shaft
- Position: Passenger Side
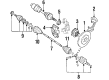
Buick Axle Shaft, Driver Side Part Number: 7846165
$38.32 MSRP: $68.42You Save: $30.10 (44%)Ships in 1-3 Business DaysProduct Specifications- Other Name: Shaft, Axle; Shaft
- Position: Driver Side


Buick Axle Assembly, Front Driver Side Part Number: 84750308
$291.37 MSRP: $500.39You Save: $209.02 (42%)Ships in 1-2 Business DaysProduct Specifications- Other Name: Shaft Assembly-Front Wheel Drive Half; Axle Shaft
- Position: Front Driver Side
- Replaced by: 85660319

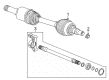
Buick Axle Assembly, Front Driver Side Part Number: 84527909
$411.01 MSRP: $705.87You Save: $294.86 (42%)Ships in 1-2 Business DaysProduct Specifications- Other Name: Shaft Assembly-Front Wheel Drive Half; Axle Shaft
- Position: Front Driver Side
- Replaced by: 84675882

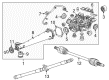
Buick Axle Shafts, Rear Driver Side Part Number: 84853352
$138.66 MSRP: $218.17You Save: $79.51 (37%)Ships in 1-3 Business DaysProduct Specifications- Other Name: Shaft Assembly-Rear Wheel Drive; Axle Shaft; Axle Assembly
- Position: Rear Driver Side
- Replaced by: 86508787

Buick Axle Assembly, Front Part Number: 84410439
$200.04 MSRP: $317.60You Save: $117.56 (38%)Ships in 1-2 Business DaysProduct Specifications- Other Name: Shaft Assembly-Front Wheel Drive Half; Axle Shaft
- Position: Front
- Replaced by: 85558611


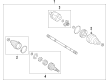
Buick Axle Assembly, Front Part Number: 60002820
$110.60 MSRP: $173.24You Save: $62.64 (37%)Ships in 1-3 Business DaysProduct Specifications- Other Name: Shaft Assembly-Front Wheel Drive Half; Axle Shaft
- Position: Front
- Replaced by: 60008700

Buick Axle Assembly, Front Part Number: 60003682
$128.99 MSRP: $202.97You Save: $73.98 (37%)Ships in 1-3 Business DaysProduct Specifications- Other Name: Shaft Assembly-Front Wheel Drive Half; Axle Shaft
- Position: Front
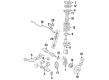
Buick Axle Assembly, Front Driver Side Part Number: 84675884
$181.48 MSRP: $285.55You Save: $104.07 (37%)Ships in 1-3 Business DaysProduct Specifications- Other Name: Shaft Assembly-Front Wheel Drive Half; Axle Shaft
- Position: Front Driver Side
- Replaces: 84754487, 84138316


Buick Drive Shaft Part Number: 12562646
Product Specifications- Other Name: Shaft Assembly-Propeller; Driveshaft; Shaft, Propeller


Buick Drive Shaft Part Number: 15036982
Product Specifications- Other Name: Shaft, Propeller; Driveshaft
- Replaces: 15152332, 15188012

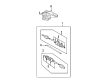
Buick Axle Assembly, Driver Side Part Number: 26014998
Product Specifications- Other Name: Shaft Kit; Axle Shaft
- Position: Driver Side
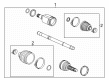
Buick Axle Shaft, Front Driver Side Part Number: 26002114
Product Specifications- Other Name: Shaft, Front Wheel Drive
- Position: Front Driver Side
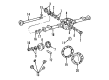
Buick Axle Assembly, Driver Side Part Number: 26000387
Product Specifications- Other Name: Axle Kit; Axle Shaft; Shaft
- Position: Driver Side

Buick Axle Shaft Assembly, Driver Side Part Number: 26009538
Product Specifications- Other Name: Halfshaft; Axle Shaft; Axle Assembly
- Position: Driver Side
Buick Axle Shaft Assembly, Driver Side Part Number: 26009539
Product Specifications- Other Name: Half Shift; Axle Shaft; Axle Assembly
- Position: Driver Side
Buick Axle Assembly, Passenger Side Part Number: 26015030
Product Specifications- Other Name: Shaft Kit; Axle Shaft
- Position: Passenger Side
Buick Axle Shaft Assembly, Passenger Side Part Number: 26015543
Product Specifications- Other Name: Shaft Assembly; Axle Shaft; Axle Assembly
- Position: Passenger Side
Buick Axle Shaft Assembly, Passenger Side Part Number: 26015544
Product Specifications- Other Name: Shaft Assembly; Axle Shaft; Axle Assembly
- Position: Passenger Side

Buick Axle Assembly, Driver Side Part Number: 26073387
Product Specifications- Other Name: Shaft Kit; CV Axle Assembly; Axle Shaft; CV Axle; Shaft
- Position: Driver Side
| Page 1 of 3 |Next >
1-20 of 54 Results
Buick Drive Shaft
Want to cut long-term maintenance and repair costs? Choose OEM Drive Shaft. Those parts deliver top durability you can trust. On our site, you'll find a huge catalog of genuine Buick parts. Prices are unbeatable, so you can keep more in your pocket. Every OEM Buick Drive Shaft includes a manufacturer's warranty. You can also get an easy return policy that keeps buying risk free. Fast delivery, get your car on the road quickly. It's simple to search, compare, and order. Stop guessing about quality or fit. Order today and save with parts that last.
Buick Drive Shaft Parts Questions & Experts Answers
- Q: How to Properly Service and Repair the Drive Shaft on Buick Rendezvous?A:A replacement process for the propeller shaft begins with vehicle lifting and support. Make reference marks on the propeller shaft at its transfer case flange before unbolt the propeller shaft-to-transfer case flange bolts. After properly marking the propeller shaft at its torque tube flange you can remove propeller shaft-to-torque tube flange bolts. Pull the propeller shaft toward the rear part of the vehicle before taking it out. Start propeller shaft installation by connecting it to the torque tube flange then align the reference marks found on both components. Before the assembly process users should clean the threaded sections and apply threadlocker GM P/N United States 12345493 P/N Canada 10953488 or equivalent to the threads. The bolt installation should be done by hand to maintain correct alignment of components where each pair of bolts features a crescent washer. Slightly push the propeller shaft until it reaches the rear of the vehicle and then position it to the transfer case flange with reference mark alignment. When installing bolts for the propeller shaft and transfer case assembly keep crescent washers on the pairs and tighten the bolts in a crossed sequence to 33 Nm (24 ft. lbs.). Afterward the propeller shaft requires cross sequential torquing to 33 Nm (24 ft. lbs.) on the torque tube bolts before lowering the vehicle.
- Q: How to Ensure Proper Alignment When Replacing the Drive Shaft on Buick Rainier?A:Begin by lifting the vehicle properly and then create precise markings for all driveline components that position them against the propeller shaft and axles and pinion and output shafts and flanges so the installation will maintain the initial components' relationship. When removing the bolts from the pinion yoke rear axle retainer avoid hammering the yoke's ears and refraining from using tools between universal joints for the sake of avoiding injection joint fractures. First disconnect the prop shaft from its position at the rear axle pinion yoke through a forward sliding motion before removing it from transmission or Transfer Case position by pulling it rearward thus completing the prop shaft removal process. The Slip Yoke splines need inspection for proper grease application before installation while lubrication should be provided if necessary. Position the propeller shaft into the transmission or Transfer Case according to reference marks removed previously before fitting it to the rear axle pinion yoke by using the same reference points. Drive the vehicle down then install the yoke retainers and bolts while tightening them to 20 nm (15 ft. Lbs.).


Related Buick Parts
 Buick Differential
 Buick CV Boot
 Buick Differential Bearing
 Buick Differential Seal
 Buick Driveshaft Yokes
 Buick Pinion Bearing
 Buick Pinion Washer
 Buick Slip Yoke
 Buick Universal Joint