ChevyParts
My Garage
My Account
Cart
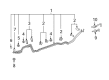
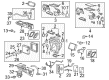
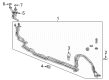
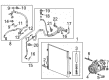
OEM Buick Enclave A/C Hose
Air Conditioning Hose- Select Vehicle by Model
- Select Vehicle by VIN
Select Vehicle by Model
orMake
Model
Year
Select Vehicle by VIN
For the most accurate results, select vehicle by your VIN (Vehicle Identification Number).
14 A/C Hoses found


Buick Enclave Rear A/C Tube Part Number: 23199274
$316.40 MSRP: $936.57You Save: $620.17 (67%)

Buick Enclave Compressor Hose Part Number: 20757021
$128.12 MSRP: $379.26You Save: $251.14 (67%)Ships in 1 Business Day


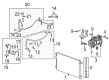
Buick Enclave Discharge Hose Part Number: 19356341
$66.90 MSRP: $137.48You Save: $70.58 (52%)Ships in 1-3 Business Days
Buick Enclave Suction Hose Part Number: 84819074
$116.96 MSRP: $209.80You Save: $92.84 (45%)Ships in 1-2 Business Days
Buick Enclave Tube Part Number: 25791601
$20.39 MSRP: $38.04You Save: $17.65 (47%)
Buick Enclave Rear Pipe Assembly Part Number: 84951613
$303.00 MSRP: $622.66You Save: $319.66 (52%)
Buick Enclave Pressure Hose Part Number: 84911259
$79.22 MSRP: $162.80You Save: $83.58 (52%)Ships in 1-2 Business DaysBuick Enclave Discharge Hose Part Number: 23491005
$130.26 MSRP: $235.74You Save: $105.48 (45%)
Buick Enclave Drain Hose Part Number: 23171645
$20.57 MSRP: $36.74You Save: $16.17 (45%)Ships in 1-3 Business Days
Buick Enclave A/C Tube Part Number: 22875372
$178.16 MSRP: $366.11You Save: $187.95 (52%)Ships in 1-2 Business Days
Buick Enclave Suction Hose Part Number: 20821216
$133.89 MSRP: $242.34You Save: $108.45 (45%)Ships in 1-2 Business Days
Buick Enclave Discharge Hose Part Number: 19433690
$126.36 MSRP: $259.66You Save: $133.30 (52%)Ships in 1-2 Business DaysBuick Enclave Compressor Hose Part Number: 19433113
$195.56 MSRP: $350.79You Save: $155.23 (45%)Ships in 1-3 Business Days
Buick Enclave Drain Hose Part Number: 25791603
Buick Enclave A/C Hose
Our website offers an extensive catalog of genuine Buick Enclave A/C Hose at unbeatable prices. Every OEM Buick Enclave A/C Hose comes with a manufacturer's warranty, an easy return policy, and rapid delivery service. Don't miss out on this great opportunity!
Buick Enclave A/C Hose Parts Questions & Experts Answers
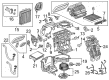
- Q: How to Replace the Auxiliary A/C Hose for Evaporator Tube on Buick Enclave?A: The first step to replace an auxiliary air conditioning evaporator tube requires refrigerant recovery through usage of the halogen leak detector (J 39400-A). The first step requires vehicle lift. The right rear inner wheelhouse liner must come out if necessary. Begin by detaching the auxiliary evaporator tube nut then using a downward force to free the auxiliary a/c evaporator tubes from the auxiliary hvac module. Detach the auxiliary evaporator tube clip nuts before freeing the tubes out of their respective clips. The procedure starts with txv tube and condenser tube removal while unfastening retaining nuts before heater/a/c tubes retaining nuts are taken off from their four frame-mounted studs and clips. You should take away both auxiliary a/c evaporator tubes from their clamps after extracting them from the vehicle. Insert the auxiliary a/c evaporator tubes into their vehicle positions and clamp them into place for installation. The driver should install the retaining nuts of the retaining studs and frames, then tighten them to 7 nm while connecting the auxiliary a/c evaporator tubes between the txv tube and condenser tube and definitely tighten the retaining nuts to 16 nm. The hvac module should receive the auxiliary a/c evaporator tubes before tightening all retaining nuts to 16 nm (12 lb ft). Secure the auxiliary evaporator tubes using nuts and tighten them to 4 nm (35 lb in) then reinstall the right rear inner wheelhouse liner when needed before lowering the vehicle and performing a leak test using the halogen leak detector (J 39400-A).

Related Buick Enclave Parts
 Buick Enclave Blend Door Actuator
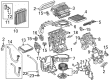
 Buick Enclave Evaporator
 Buick Enclave A/C Accumulator
 Buick Enclave A/C Compressor
 Buick Enclave A/C Compressor Cut-Out Switches
 Buick Enclave A/C Condenser
 Buick Enclave A/C Orifice Tube
 Buick Enclave A/C Service Cap
 Buick Enclave A/C Switch
 Buick Enclave A/C System Valve Core
 Buick Enclave Air Temperature Sensor
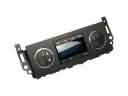 Buick Enclave HVAC Control Module