ChevyParts
My Garage
My Account
Cart
OEM Buick LeSabre A/C Condenser
Air Conditioning Condenser- Select Vehicle by Model
- Select Vehicle by VIN
Select Vehicle by Model
orMake
Model
Year
Select Vehicle by VIN
For the most accurate results, select vehicle by your VIN (Vehicle Identification Number).
8 A/C Condensers found

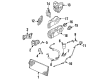
Buick LeSabre Condenser Part Number: 3095844
$140.98 MSRP: $263.06You Save: $122.08 (47%)

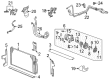
Buick LeSabre Condenser Part Number: 52485722


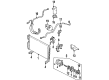
Buick LeSabre Condenser Part Number: 52482102


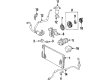
Buick LeSabre Condenser Part Number: 3094989

Buick LeSabre Condenser Part Number: 52482155

Buick LeSabre Condenser Part Number: 52462563
Buick LeSabre Condenser Part Number: 52456333

Buick LeSabre Condenser Part Number: 3094990
Buick LeSabre A/C Condenser
Want to cut long-term maintenance and repair costs? Choose OEM A/C Condenser. Those parts deliver top durability you can trust. On our site, you'll find a huge catalog of genuine Buick LeSabre parts. Prices are unbeatable, so you can keep more in your pocket. Every OEM Buick LeSabre A/C Condenser includes a manufacturer's warranty. You can also get an easy return policy that keeps buying risk free. Fast delivery, get your car on the road quickly. It's simple to search, compare, and order. Stop guessing about quality or fit. Order today and save with parts that last.
Buick LeSabre A/C Condenser is in fact one of the most important components that reflect the Buick's reliability and performance. Being one of the major components in the air conditioning system it performs the function of condensing gaseous refrigerant to liquid form on its way to the accumulator hence the efficiency of the vehicle's A/C System. The actual Antifreeze/Cooling system, Buick LeSabre A/C Condenser is located right in front of the radiator and is characterized by a strong network of tubes that contribute to the improvement of the automobile's efficiency and security. Specifically fitting the LeSabre range of models manufactured between the years 1959 and 2005, this A/C Condenser has historically been a pivotal piece for achieving and sustaining optimal in-car climates. To add to this assertion, the Buick LeSabre A/C Condenser is also long-lasting, in line with the car's general characteristics. Specifically, the A/C Condenser plays a role to the performance ability of a vehicle by providing an efficient system for the air conditioning mechanism to run. Buick LeSabre A/C Condenser has other simple features like a high level of cooling technology and compatibility with today's refrigerator. Buick prides itself on the quality of its automobile products, and the LeSabre A/C Condenser adds to this; it ensures that the LeSabre model delivers an extraordinary performance and accounts for the production line's standard and tradition, which is why any Buick LeSabre model needs the component.
Buick LeSabre A/C Condenser Parts and Q&A
- Q: How to properly service and replace the A/C Condenser in the HVAC system on Buick LeSabre?A:Begin condenser replacement by recovering refrigerant and conducting post-reinstallation tests with the halogen leak detector (J 39400-A). Begin by removing upper tie bar support brace bolts then move the support brace bolts at headlamp and bumper fascia mounting panel before relocating them away from the space. The process starts with removing the upper radiator seal and upper radiator mounting brackets while also disconnecting the compressor hose from evaporator hose from the condenser. Unfasten the left and right fasteners of the headlamp and bumper fascia mounting panel before lifting the panel forward to expose the condenser mounting bolts. To prevent damage to the radiator end tank during reinstallation only use the special length bolts for the two condenser to radiator mounting bolts. Lift the condenser to separate it from the radiator through its lower mounting tabs while disconnecting and removing the coolant sensor and extracting these two A/C Condenser seals. You must lift up the condenser then extract it from the vehicle. Installation requires the user to add proper oil to the new condenser followed by fitting it into the vehicle frame and connecting the low coolant sensor wiring harness. Place the condenser into its lower radiator mounting tabs and tighten bolts to 6 n.m (53 lb in). After installation of new A/C Condenser seals position the headlamp and bumper fascia mounting panel in place and tighten the fasteners to 9 n.m (7 lb ft). Connect the evaporator hose to the condenser followed by tightening the nut to 20 n.m (15 lb ft). Then connect the compressor hose while securing the nut to 20 n.m (15 lb ft). Mount the upper radiator brackets and bolt them into position with 9 n.m (7 lb ft) torque before sealing the radiator and attaching the front fascia to tie bar support with 9 n.m (7 lb ft). End the installation by putting front headlamps into place while performing a/c system recharging and leak detection with a halogen leak detector (J 39400-A).

Related Buick LeSabre Parts
 Buick LeSabre Blend Door Actuator
 Buick LeSabre Blower Motor
 Buick LeSabre Blower Motor Resistor
 Buick LeSabre Cabin Air Filter
 Buick LeSabre A/C Clutch
 Buick LeSabre A/C Compressor
 Buick LeSabre A/C Hose
 Buick LeSabre A/C Idler Pulley
 Buick LeSabre A/C Orifice Tube
 Buick LeSabre A/C Switch
 Buick LeSabre HVAC Control Module
 Buick LeSabre HVAC Pressure Switch