ChevyParts
My Garage
My Account
Cart
OEM Buick LeSabre Blend Door Actuator
Air Blend Door Actuator- Select Vehicle by Model
- Select Vehicle by VIN
Select Vehicle by Model
orMake
Model
Year
Select Vehicle by VIN
For the most accurate results, select vehicle by your VIN (Vehicle Identification Number).
10 Blend Door Actuators found


Buick LeSabre Actuator Part Number: 89018377
$41.76 MSRP: $123.64You Save: $81.88 (67%)Ships in 1-2 Business Days

Buick LeSabre Bracket Part Number: 89018376
$80.54 MSRP: $145.78You Save: $65.24 (45%)Ships in 1-2 Business Days


Buick LeSabre Temperature Door Actuator Part Number: 89018375
$124.63 MSRP: $256.14You Save: $131.51 (52%)Ships in 1-2 Business Days


Buick LeSabre Door Actuator Part Number: 89018365
$173.26 MSRP: $356.04You Save: $182.78 (52%)Ships in 1-2 Business Days


Buick LeSabre Actuator Part Number: 16124942
$107.54 MSRP: $201.97You Save: $94.43 (47%)Ships in 1-2 Business Days
Buick LeSabre Door Actuator Part Number: 89019070
$35.56 MSRP: $66.79You Save: $31.23 (47%)Ships in 1-3 Business DaysBuick LeSabre Bracket Part Number: 89018378
$150.17 MSRP: $282.00You Save: $131.83 (47%)Ships in 1-2 Business Days


Buick LeSabre Actuator Part Number: 1996773


Buick LeSabre Actuator Part Number: 16141822
$14.53 MSRP: $25.94You Save: $11.41 (44%)
Buick LeSabre Actuator Part Number: 1996823
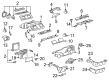
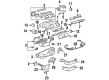
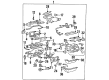
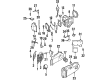
Buick LeSabre Blend Door Actuator
Want to cut long-term maintenance and repair costs? Choose OEM Blend Door Actuator. Those parts deliver top durability you can trust. On our site, you'll find a huge catalog of genuine Buick LeSabre parts. Prices are unbeatable, so you can keep more in your pocket. Every OEM Buick LeSabre Blend Door Actuator includes a manufacturer's warranty. You can also get an easy return policy that keeps buying risk free. Fast delivery, get your car on the road quickly. It's simple to search, compare, and order. Stop guessing about quality or fit. Order today and save with parts that last.
The Buick Lesabre Blend Door Actuator represents a vital component that controls the airflow within Buick Lesabre HVAC systems because of its high performance standards and dependability. Through its electrical mechanism this motor controls airflow across different vents so the cabin temperature stays within the set range through selective hot and cold air input. The Buick Lesabre Blend Door Actuator guides heated cabin air away from inappropriate entry which results in improved operational efficiency and better safety measures. The Buick Lesabre Blend Door Actuator covers all models of 1959 through 2005 production years because it maintains proper climate control when it functions correctly but an actuator failure causes uncomfortable weather conditions from improper thermal regulation and airflow misalignment. The long-lasting reputation of the Buick Lesabre continues to prevail due to its Blend Door Actuator which demonstrates exceptional durability. The car Blend Door Actuator possesses two notable features because it performs precise air distribution functions thereby enhancing driver comfort. Guiding the car Blend Door Actuator manufacturer stands as an industry forefront product demonstrating the brand's dedication to developing high-quality components which provide safe comfort for the automaker model vehicle operators.
Buick LeSabre Blend Door Actuator Parts and Q&A
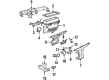
- Q: How to replace the driver side blend door actuator on Buick LeSabre?A:Begin driver air mix actuator replacement by removing the left side sound insulator and knee bolster together with the Instrument Panel Module (IPM). Improvise air mix actuator disconnection by removing its electrical connector followed by removing screws to extract the actuator. Position the driver air mix actuator first before fixing it with retaining screws which need to be tightened to 1.4 N.m (12 lb in). Reinstall the IPM and left side sound insulator while reattaching the driver air mix actuator electrical connector then installing the knee bolster.
- Q: How to replace the LH Blend Door Actuator on Buick LeSabre?A:It starts with removing the left side sound insulator and knee bolster and Instrument Panel Module (IPM). Remove the air temperature actuator after first disconnecting its electrical connector and unscrewing its retaining screws. The new air temperature actuator can be positioned with driver air mix retaining screws securely attaching it while applying 1.4 N.m (12 lb in). After reattaching the actuator electrical connector operate by reinstalling the IPM followed by the knee bolster then left side sound insulator. Finally, recalibrate the actuator.


Related Buick LeSabre Parts
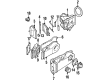
 Buick LeSabre Blower Motor Resistor
 Buick LeSabre A/C Accumulator
 Buick LeSabre A/C Clutch
 Buick LeSabre A/C Condenser
 Buick LeSabre A/C Hose
 Buick LeSabre A/C Idler Pulley
 Buick LeSabre A/C Orifice Tube
 Buick LeSabre A/C Switch
 Buick LeSabre A/C System Valve Core
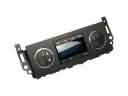 Buick LeSabre HVAC Control Module
 Buick LeSabre HVAC Pressure Switch
 Buick LeSabre Heater Core