ChevyParts
My Garage
My Account
Cart
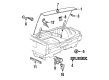
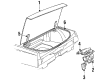
OEM Buick LeSabre Liftgate Hinge
Luggage Compartment Door Hinge- Select Vehicle by Model
- Select Vehicle by VIN
Select Vehicle by Model
orMake
Model
Year
Select Vehicle by VIN
For the most accurate results, select vehicle by your VIN (Vehicle Identification Number).
6 Liftgate Hinges found


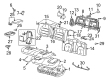
Buick LeSabre Lid Hinge, Rear Center Part Number: 12398110
$17.48 MSRP: $25.01You Save: $7.53 (31%)

Buick LeSabre Hinge, Passenger Side Part Number: 25541452
$49.27 MSRP: $70.50You Save: $21.23 (31%)
Buick LeSabre Hinge, Rear Driver Side Part Number: 25602097
Buick LeSabre Hinge, Rear Passenger Side Part Number: 25602096

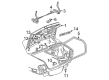
Buick LeSabre Hinge, Rear Passenger Side Part Number: 25697788

Buick LeSabre Hinge, Rear Driver Side Part Number: 20737517
Buick LeSabre Liftgate Hinge
Want to cut long-term maintenance and repair costs? Choose OEM Liftgate Hinge. Those parts deliver top durability you can trust. On our site, you'll find a huge catalog of genuine Buick LeSabre parts. Prices are unbeatable, so you can keep more in your pocket. Every OEM Buick LeSabre Liftgate Hinge includes a manufacturer's warranty. You can also get an easy return policy that keeps buying risk free. Fast delivery, get your car on the road quickly. It's simple to search, compare, and order. Stop guessing about quality or fit. Order today and save with parts that last.
Buick LeSabre Liftgate Hinge Parts and Q&A
- Q: How to Perform a Liftgate Hinge Replacement on a Buick LeSabre?A:Position the rear compartment lid at its full opening angle and support it before maintenance. Place an 8 mm x 130 mm bolt into every hinge slot to stop it from swinging open full range. Take off the rear compartment lid and rear shelf trim panel before folding the insulator away from the rear compartment hinge attachment hardware. Disassemble the hinge set by taking out the torque rod set along with the parts from the vehicle. Put the J 39384-10 Torsion Rod Adjustment Bar in place to let torque rods leave the rear compartment hinge. To assemble the torque rods you should use the Torsion Rod Adjustment Bar (J 39384-10) connection tool on the rear compartment hinges before installing the entire assembly back in the vehicle. Use bolts to fasten the hinges to the vehicle parts and tighten them until they reach 24 N.m or 18 lb ft torque value. Connect the hinge assembly components after taking out blocking bolts so the hinges can move all the way. Put on the rear compartment lid and make any needed adjustments. Secure the rear shelf trim part last.

Related Buick LeSabre Parts
 Buick LeSabre Trunk Latch
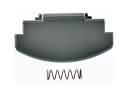 Buick LeSabre Center Console Latch
 Buick LeSabre Door Armrest
 Buick LeSabre Door Hinge
 Buick LeSabre Door Latch Assembly
 Buick LeSabre Door Lock
 Buick LeSabre Door Lock Actuator
 Buick LeSabre Door Lock Cylinder
 Buick LeSabre Door Seal
 Buick LeSabre Interior Light Bulb
 Buick LeSabre Lift Support
 Buick LeSabre Seat Motor